VirtualBox, Ubuntu and LAMP Stack

Came accross VirtualBox, a free & excellent virtual machine software. I decided to take it for a spin creating a Ubuntu virtual machine LAMP stack on it..

Here We Go

  1. Download and install VirtualBox
  2. Download latest Ubuntu iso installation file
  3. From VirtualBox create a new Virtual Machine. Select type: Linux and version: Ubuntu. On the next step you will be prompted with dvd drive containing the installaion disk, but instead just select the iso downloaded on step 2
  4. Go through the Ubuntu installation steps
  5. It’s also very helpful to install ssh server so you can ssh into your VM later on: sudo apt-get install openssh-server

Voila! You have ubuntu running on your Windows PC

Host and Guest

In virtualization realm, host indicates your physical PC (Windows 7 in my case), and guest is the virtual machine (Ubuntu). Most of virtual machine software documentation uses host and guest terminology heavily so make sure you’re familiar with it

Networking

This is where things get tricky. Virtual machine comes with virtual network adapters, and you have to do few configuration to setup connectivity between your virtual and physical adapters.

By default VirtualBox allows the guest machine to connect to the internet through NAT, so you can download data, browse internet etc. However if you want to run servers from the guest, it won’t be discoverable by the host or other PC in the host’s network immediately.

One approach to make them discoverable is by setting up port forwarding. You get here by going to networking section on the machine’s setting on Virtual Box

portforwarding

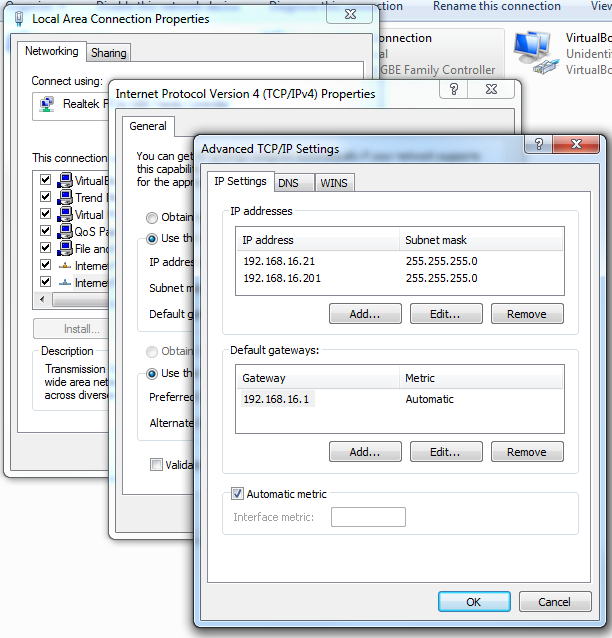
Note that setting port forwarding requires the port is actually free on your host machine. Hence I find it very useful to add an IP to your host’s network interface specifically for the VM so you don’t have port conflicts. In this example I added the IP on my interface:

addip

The “AMP”

So there’s the “L – Linux” done. Now for the Apache, Mysql and Php, it can simply be done by using Ubuntu’s apt-get package manager:

  1. Open a terminal / SSH session to your Ubuntu machine
  2. Elevate into root using sudo su root
  3. apt-get install apache2
  4. apt-get install php5
  5. apt-get install mysql-server mysql-client

Few helpful notes:

  • Default doc root is /var/www
  • To start / stop apache: sudo service apache2 stopsudo service apache2 start
  • To start / stop mysql: sudo service mysql stop / sudo service mysql start

Spring Basic Concept: Inversion of Control and Dependency Injection

If you’re a newbie just starting to learn Spring, or even if you’ve heard a lot about Spring but not sure what it was, Martin Fowler has an excellent article about this: Inversion of Control and Dependency Injection pattern.

It was a bit old (written in 2004) but every single conceptual discussion still applies today.

If any of the following keyword doesn’t make any sense to you, then I beg you spare 20 minutes of your time to read this excellent article:

  • Inversion of Control
  • Dependency Injection
  • Service Locator

Useful Apache Configuration

Redirecting HTTPS to HTTP (and vice versa)

RewriteEngine On
RewriteCond %{HTTPS} on
RewriteRule (.*) http://%{HTTP_HOST}%{REQUEST_URI}

http://stackoverflow.com/questions/8371/how-do-you-redirect-https-to-http

WordPress .htaccess Rewrite Rule

This .htaccess will rewrite any path not resolving to actual file or directory. It will add “/index.php” prefix into the URL. This is required for wordpress permalink

RewriteEngine On
RewriteBase /
RewriteCond %{REQUEST_FILENAME} !-f
RewriteCond %{REQUEST_FILENAME} !-d
RewriteRule . /index.php [L]

Redirecting mydomain.com to www.mydomain.com (or the opposite)

Your user often access your site using www prefix or without it, hence you setup both URL to resolve into your webhost in your DNS. However if you don’t redirect one into the other, search engine might think it’s a completely different site (hence website statistics etc will be wrong). One approach is to do external (301) redirect from one into the other.

RewriteCond %{HTTP_HOST} ^mydomain.com.au [NC]
RewriteRule (.*) http://www.mydomain.com.au/$1 [L,R=301]

Monitoring Apache

To enable apache monitoring, firstly make sure status module is enabled. Find following line on your httpd.conf

LoadModule status_module modules/mod_status.so

Then add following configuration section. The “Allow from” restriction will prevent arbitary IP to view this, so if your ISP provide you with static IP, put it here.


    SetHandler server-status
    Order deny,allow
    Deny from all
    Allow from 

You can monitor your apache server (see worker threads status etc) by going to http://mydomain.com/server-status


Stay Tuned!

More to come when I stumble accross them

See Also

Tomcat 7 JDBC Session Persistence

The default Tomcat session management strategy is in-memory session persisted into file when the server is shutdown gracefully. If the server dies in a cold fashion (eg: kill -9 or power outage), session data might be lost. One approach to mitigate this is to store session data into database using JDBC, aka JDBC Session Persistence.

JDBC Session Persistence can also aid load balancer failover scenario. I’d say this is an alternative to setting up (often cumbersome) TCP session replication. Note that if you have multiple cloud servers like Amazon EC2 it doesn’t come with TCP multicast feature — TCP session replication sounds like a nightmare to setup.

The Steps

  1. Ensure org.apache.catalina.session.StandardSession.ACTIVITY_CHECK or org.apache.catalina.STRICT_SERVLET_COMPLIANCE is set to true. Add line similar to following into your Tomcat’s startup.sh (if you’re on UNIX)
    export CATALINA_OPTS="-Dorg.apache.catalina.session.StandardSession.ACTIVITY_CHECK=true"

    Tomcat System Property Reference will explain what do each property means if you’re curious

  2. Create following SQL table (yes you need a database to store the session data)
    create table tomcat_sessions (
      session_id     varchar(100) not null primary key,
      valid_session  char(1) not null,
      max_inactive   int not null,
      last_access    bigint not null,
      app_name       varchar(255),
      session_data   mediumblob,
      KEY kapp_name(app_name)
    );
    
  3. Place a copy of mysql-connector-java.jar (or your DB’s JDBC driver) into $CATALINA_HOME/lib
  4. In your web app, add a META-INF/context.xml file. If you use standard maven layout you have to place it on src/main/webapp/META-INF/context.xml. You can copy the file from $CATALINA_HOME/conf/context.xml as a starting point. Then under element add following element


    Notice how the SQL column name corresponds to some of the settings above. In this configuration I used mysql database on localhost with database name “mytomcat” and username “root”. maxIdleBackup=”10″ specifies number of seconds before the in-memory session data is persisted into database.

    There are many other settings you can tweak, have a look at the Tomcat Manager Component Reference.

Fine Prints

This article is tested against Tomcat 7.0.39 but I guess it should also work with Tomcat 6. If you’ve jumped the ship from relational to MongoDB, . I haven’t got a chance to try it but it looks awesome.

Mitigating DoS Attack Using iptables

Continuing from my earlier post about iptables basics, the limit module of iptables can be used to mitigate DoS (Denial of Service) attack. Note that mitigating here means “reducing the damage”. The worst scenario is under a heavy DoS you can’t even SSH and run commands on your server. With iptables you can limit the frequency of packets — enabling you to SSH and take appropriate actions.

Following are the rules I currently use. This will only allow new incoming TCP connection on port 80 & 443 with specified frequency (see limit explanation below):

iptables -A INPUT -j ACCEPT -p tcp --dport 80 -m state --state NEW -m limit --limit 40/s --limit-burst 5 -m comment --comment 'Allow incoming HTTP'
iptables -A INPUT -j ACCEPT -p tcp --dport 443 -m state --state NEW -m limit --limit 40/s --limit-burst 5 -m comment --comment 'Allow incoming HTTPS'
  • -A INPUT: Append to the end of a chain called INPUT
  • -j ACCEPT: When rule match, accept the packet
  • -p tcp: Match only TCP protocol
  • –dport: Match given TCP port
  • -m state: Use the state module
  • –state NEW: Match only packets initiated from new connection. This rule will not match packets exchanged from an existing connections.
  • -m limit: Use the limit module
  • –limit 40/s: If more than 40 packet per second received, decrement one burst point. If no more burst point, reject the packet
  • –limit-burst 5: The initial number of burst point. A “burst” occur when the limit above is reached. On a period where limit is not reached, one burst point is regained, up to this maximum limit. If burst point is 0, subsequent burst will cause the current rule matching to fail — and iptables will try the next rules (if you setup iptables properly the packet should slip through to ‘reject all’ rule)

Add following rule to allow your program making connection to localhost (loopback interface)

iptables -A INPUT -i lo -j ACCEPT

I then append a rule to match packets exchanged from established / related connections. This is important so packet resulted from outbound connections are accepted:

iptables -A INPUT -j ACCEPT -m state --state RELATED,ESTABLISHED -m limit --limit 100/s --limit-burst 50

And finally, reject all packets not accepted by above rules. Be careful before you do this, make sure you’ve added rules to allow SSH (port 22) so you don’t lock yourself out.

iptables -A INPUT -j REJECT

Testing And Continual Adjustment

Finding the correct number for limit and burst could be hard, but what I find useful is to perform continuous monitoring and adjustment. Keep in mind your goal here is to ensure maximum capacity of the server is utilised while protecting it against DoS. One approach I like is to use the iptables LOG target. Assuming I add following rules:

iptables -A INPUT -j ACCEPT -p tcp --dport 80 -m state --state NEW -m limit --limit 40/s --limit-burst 5
iptables -A INPUT -j LOG -p tcp --dport 80 -m state --state NEW --log-prefix 'TCP 80 Burst Exhausted'

If the first rule did not match (eg: because of burst is exhausted), the LOG rule after it will match and print into your syslog (typically /var/log/messages) with prefix “TCP 80 Burst Exhausted”. LOG target will not accept / reject the packet — after logging, iptables will continue checking the subsequent ruless.

The neat thing here is you can grep ‘TCP 80 Burst Exhausted’ /var/log/messages to detect when was last time suspected DoS attack occured. If the suspected attack is determined to be false alarm, your limit and burse setting is too strict, and you should gradually increase it.

Saving and Restoring

Updating rules at specific order can be very tedious, you have to count the terminal screen lines, insert the new rule, delete the old one and so on. There’s one trick you can do, that is to leverage iptables-restore command. Everytime you save the rule using service iptables save /etc/sysconfig/iptables file is updated with your rule specification. You can update this file and restore it using iptables-restore. Beware! A syntax error will cause your rule to be skipped. It’s best to test your command first by adding it to the bottom, and use this method to re-order the rules.

AWS EC2: UNIX User Management and SSH with Password Authentication on Amazon Linux AMI

Once you’ve created your , you will get a private key (generated during the server setup process) and a default UNIX user called ec2-user. By default password authentication is disabled (because it’s plain text password transferred over the internet). You can login using a ssh client from your PC using this command:

ssh -i /path/to/mykeypair.pem 

If you’re on windows and you use Putty it might be slightly more tricky:

  1. First you need PuttyGen tool
  2. Once you’ve downloaded and installed it, open it and select File -> Load private key. Find your keypair file
  3. PuttyGen will display success message if your keypair is valid. Then select Save private key
  4. On your putty connection parameter, go to Connection -> SSH -> Auth and use the above saved file for Private key file for authentication

Generating Encrypted Password

Standard UNIX and commands can be used to manage users on Amazon Linux, however you first need to know how to generate encrypted password. Supposed I want to encrypt my password string “holasenior”, run following commands:

[]# python
Python 2.4.3 (#1, Jan  9 2013, 06:47:03)
[GCC 4.1.2 20080704 (Red Hat 4.1.2-54)] on linux2
Type "help", "copyright", "credits" or "license" for more information.
>>> import crypt; print

>>> crypt.crypt('holasenior','mysalt123')
'myOZ9FACMq7sA'
>>>

myOZ9FACMq7sA is your encrypted password. mysalt123 is an encryption salt to defent against dictionary attack.

Adding New User

To add new user “ironman” with password “holasenior” encrypted with salt “mysalt123″:

sudo useradd -p myOZ9FACMq7sA ironman

Changing Password of Existing User

To change password of existing user “ec2-user” to “holasenior” encrypted with salt “mysalt123″:

sudo usermod -p myOZ9FACMq7sA ec2-user

SSH with Password Authentication

WARNING: Using plain-text password authentication for SSH is dangerous, your password will be visible over the internet.

To enable password authentication, edit /etc/sshd_config file and find following line and change it to yes

PasswordAuthentication no

Posting JSON to Spring MVC Controller

Spring MVC can be setup to automatically bind incoming JSON string into a Java object. Firstly, ensure you have jackson-mapper-asl included on the classpath:


  org.codehaus.jackson
  jackson-mapper-asl
  1.9.13

Assuming the JSON string we want to bind represent a person object like this:

{
  name: "Gerry",
  age: 20,
  city: "Sydney"
}

Which will be bound into following Java class:

public class Person {
  private String name;
  private int age;
  private String city;
  // getters & setters ...
}

Declare the Spring MVC controller handler method like below. The handler method is mapped into path “addPerson” with method POST.

(value = "/addPerson", 
                method = RequestMethod.POST,
                headers = {"Content-type=application/json"})

public JsonResponse addPerson( Person person) {
  logger.debug(person.toString());
  return new JsonResponse("OK","");
}

Also pay attention to and the returned JsonResponse object. Here JsonResponse is a class to return the result of the addPerson operation.

public class JsonResponse {

  private String status = "";
  private String errorMessage = "";

  public JsonResponse(String status, String errorMessage) {
    this.status = status;
    this.errorMessage = errorMessage;
  }
}

When converted to JSON this will look like this:

{
  status : "OK",
  errorMessage : ""
}

Below is an example jQuery based javascript handler that posts into the above Spring MVC handler and observe the returned value:

$.ajax({
  type: "POST",
  url: "addPerson",
  data: JSON.stringify({ name: "Gerry", age: 20, city: "Sydney" }),
  contentType: 'application/json',
  success: function(data) {
    if(data.status == 'OK') alert('Person has been added');
    else alert('Failed adding person: ' + data.status + ', ' + data.errorMessage);
  }
});

Spring MVC Executor Service Anomaly Due to Holding HttpServletRequest for too Long

Encountered a strange problem with Spring MVC running on Tomcat 7 today. I had a with 1 max thread capacity on my application which wasn’t working as it supposed to. My Runnable task look something like this:

public class LongRunningTask implements Runnable {

  private HttpServletRequest request;
  
  public LongRunningTask(HttpServletRequest request) {
    this.request = request;
  }
  
  
  public void run() {
    // do something ..
  }

}

Notice I originally added a reference to HttpServletRequest with the intention of obtaining the remote host and address of the client. My controller class look something like this:


public class HomeController {

   private ThreadPoolTaskExecutor taskExecutor;

  (...)
  public String schedule(HttpServletRequest req, ...) {
    taskExecutor.submit(new LongRunningTask(req));
  }
}

With the hope that user’s get their response immediately while the actual work is still queued on the background.

Turns out this caused all sorts of strange behavior. Sometime the task will run, most of the time it will just sit in the queue forever / won’t even queue at all.

After further research and trial and error, I figured out this was because my runnable is holding a reference to HttpServletRequest. When I refactored the code the task executor work as per normal again.

I’ve came into a conclusion that holding to a HttpServletRequest object for longer than necessary is not a good practice.

Benchmarking Web Page Load Time Using Apache AB Tool

Any apache httpd installation comes with ab tool on the bin folder. This handy tool can be used to perform benchmark testing:

ab -n 10 -c 2 http://www.mycoolwebsite.com/
  • -n 10: Make a total of 10 request to http://www.mycoolwebsite.com/
  • -c 2: Allow maximum simultaneously 2 concurrent request (2 threads)

The output you get is quite self-describing:

This is ApacheBench, Version 2.3 
Copyright 1996 Adam Twiss, Zeus Technology Ltd, http://www.zeustech.net/
Licensed to The Apache Software Foundation, http://www.apache.org/

Benchmarking www.vantagefx.com (be patient).....done


Server Software:        Apache
Server Hostname:        www.mycoolwebsite.com
Server Port:            80

Document Path:          /
Document Length:        29320 bytes

Concurrency Level:      2
Time taken for tests:   4.524 seconds
Complete requests:      10
Failed requests:        0
Write errors:           0
Total transferred:      297360 bytes
HTML transferred:       293200 bytes
Requests per second:    2.21 [#/sec] (mean)
Time per request:       904.890 [ms] (mean)
Time per request:       452.445 [ms] (mean, across all concurrent requests)
Transfer rate:          64.18 [Kbytes/sec] received

Connection Times (ms)
              min  mean[+/-sd] median   max
Connect:        0    1   1.3      0       4
Processing:   806  887  90.4    852    1063
Waiting:      804  885  90.4    850    1061
Total:        806  887  91.3    852    1067

Percentage of the requests served within a certain time (ms)
  50%    852
  66%    888
  75%    918
  80%   1027
  90%   1067
  95%   1067
  98%   1067
  99%   1067
 100%   1067 (longest request)

Note that however I believe this tool will only request specified html page, not external resources associated with the page (no external images, javascript, css, etc.).

If you want to test https (SSL) page, make sure you have a version of Apache httpd with ssl support, and use abs instead.