Java and XML Injectable Properties on Spring

Here’s how you can create a property file which can be injected on Java classes as well as on bean XML configuration file.

Firstly ensure annotation config is switched on:

Create your properties file, in this case I create config.properties on my classpath root (src/main/resources/config.properties on Maven-compliant project)

name=Gerry

Register this property file on your spring context using tag.


Whenever you want to inject the value into a Java class, you can use annotation


public class Person {

  ("${name}")
  private String name;

  //...
}

This will only work if your java beans are scanned by the same Spring context. If on different context you will need to create a separate property placeholder

Similarly you can do the same to xml bean config file


Multiple Environment Trick

If the value of your configuration item differ accros multiple environments (JDBC URL and context path are a good example of these), you can use the same method to inject value form environment variable.

Multithreaded Server in Java

In Java, listening over TCP can be simply done using ServerSocket. Example below binds our program to port 5656:

ServerSocket serverSocket = new ServerSocket(5656);

To access the client’s input stream, we first need to accept the connection and obtain the Socket object. This is done through the accept method:

ServerSocket serverSocket = new ServerSocket(5656);
Socket socket = serverSocket.accept();

The program above can only accept 1 client connection. We want to able to accept infinitely many connections, hence we can use an infinite loop to keep accepting new connections:

ServerSocket serverSocket = new ServerSocket(5656);
while(true) {
  Socket socket = serverSocket.accept();
  // process client connection..
}

However once a client is connected our code has to wait until he/she disconnects before we can accept the next one. This might be ok if the work duration is very short, but if it’s very long (eg: a chatting program) then this won’t do. To solve this we can use an ExecutorService which schedules work to be done in the future (in a separate thread) and allowing the calling thread to progress. In our case we will use a fixed thread-pool executor service, which effectively limit how many active connections we can have. We will soon write the ConnectionHandler class below to process the connection.

ExecutorService executorService = Executors.newFixedThreadPool(100);
ServerSocket serverSocket = new ServerSocket(5656);
while(true) {
  Socket socket = serverSocket.accept();
  executorService.execute(new ConnectionHandler(socket));
  // go back to start of infinite loop and listen for next incoming connection
}

The ConnectionHandler class above implements Runnable and does the work of listening & writing to client. Here’s an example of what simple ConnectionHandler that just echoes messages sent by client back:

public class ConnectionHandler implements Runnable {

  private Socket socket;

  public ConnectionHandler(Socket socket) {
    this.socket = socket;
  }

  public void run() {
    BufferedReader reader = null;
    PrintWriter writer = null;
    try {
      reader = new BufferedReader(new InputStreamReader(socket.getInputStream()));
      writer = new PrintWriter(socket.getOutputStream(), true);

      // The read loop. Code only exits this loop if connection is lost / client disconnects
      while(true) {
        String line = reader.readLine();
        if(line == null) break;
        writer.println("Echo: " + line);
      }
    } catch (IOException e) {
      throw new RuntimeException(e);
    } finally {
      try {
        if(reader != null) reader.close();
        if(writer != null) writer.close();
      } catch (IOException e) {
        throw new RuntimeException(e);
      }
    }
  }
}

Keep in mind the run method will run in a separate thread, not the main thread, so make sure you synchronize reads / writes into shared resources.

Socket Timeout

Ok so far so good, we can handle multiple connection simultaneously in separate threads. But our code is still vulnerable. Recall our thread pool setting is capped at 100 which means we can only accept 100 simultaneous connection. This leave us vulnerable to denial-of-service attack, a hacker could easily open 100 connections and leave it be — denying access to other clients. One way to mitigate this is to set socket timeout:

ExecutorService executorService = Executors.newFixedThreadPool(100);
ServerSocket serverSocket = new ServerSocket(5656);
while(true) {
  Socket socket = serverSocket.accept();
  socket.setSoTimeout(3000); // inputstream's read times out if no data came after 3 seconds
  executorService.execute(new ConnectionHandler(socket));
  // go back to start of infinite loop and listen for next incoming connection
}

By setting the socket timeout, the BufferedReader.readLine() method used by ConnectionHandler above will throw SocketTimeoutException if it hasn’t had any data in 3 seconds.

public void run() {
  BufferedReader reader = null;
  PrintWriter writer = null;
  try {
    reader = new BufferedReader(new InputStreamReader(socket.getInputStream()));
    writer = new PrintWriter(socket.getOutputStream(), true);
 
    while(true) {
      // SocketTimeoutException thrown here if nothing read after 3 seconds
      String line = reader.readLine();
      if(line == null) break;
      writer.println("Echo: " + line);
    }
  } catch (SocketTimeoutException e) {
    System.out.println("Connection timed out");
  } catch (IOException e) {
    throw new RuntimeException(e);
  } finally {
    try {
      if(reader != null) reader.close();
      if(writer != null) writer.close();
    } catch (IOException e) {
      throw new RuntimeException(e);
    }
  }
}
Internal SSL (TLS) Certification Authority Using OpenSSL

WARNING
The method described on this article is only intended for low critical testing, not production use. I am not liable for any damages / security breaches caused by following this method.

Scenario

I have few servers for development and testing purpose. I need to setup apache on those servers listening over HTTPS but it will only be used by people in my team, it’ll be a bit overkill to purchase SSL certificate just for this pupose.

I can create a self-signed certificate for each servers, and ask individual user to trust it (or otherwise they’ll get red browser warnings), but this is tedious. A better approach is to create a certificate for each server and chain it to our own internal CA. Each user only need to trust one certificate, and anything chained to it is automatically trusted (this can even be done to the whole network using domain controller auto enrollment).

This article will highlight how to create your own Certification Authority (CA), install it on apache and import it to your Windows / Firefox keystore. The tool I’m using is openssl. Following is the hypothetical setting for example purpose:

  • Company name: Sunny Happy Co Ltd
  • Company e-mail:
  • Server name: shcdev01 (web server will be installed on https://shcdev01)
  • OpenSSL is installed on C:OpenSSL-Win32

Setup openssl

Most UNIX system come with package manager where you can install openssl. If you’re on windows, download and install openssl here.

Setup Certification Authority (CA)

  1. Create directory where user certificates generation / chaining will take place, eg: C:SSLCerts
  2. Create a directory where CA files will be stored: C:\SSLCertsSunnyHappyCA
  3. Copy contents of C:\OpenSSL-Win32binPEMdemoCA to C:\SSLCertsSunnyHappyCA. This folder contains infrastructure file necessary for certificate chaining. This is a sample folder provided by OpenSSL installation so we don’t have to start from scratch
  4. Copy C:\OpenSSL-Win32binopenssl.cfg to C:\SSLCerts. This is the configuration file used when signing certificates. Few values need to be adjusted. Find following configuration keys on openssl.cfg and update it:
    • dir = C:/SSLCerts/SunnyHappyCA (This will be used as a relative path of other config items)
    • default_days = 7300 (Here I’m setting the default validity of chained certificate to be 20 years)
    • default_md = sha1
  5. Create a new folder C:\SSLCertsSunnyHappyCAnewcerts
  6. Create a new file C:\SSLCertsSunnyHappyCAindex.txt.attr and write the value unique_subject = no inside
  7. Open a command prompt with root / Administrator privilege and cd to C:SSLCerts. Tell openssl where your config file is by running set OPENSSL_CONF=C:/SSLCerts/openssl.cfg
  8. Create the CA public / private keypair using following command:
    openssl req -new -x509 -keyout SunnyHappyCA/private/cakey.pem -out SunnyHappyCA/cacert.pem -days 7300

    OpenSSL will prompt you for the key password, make sure you keep it safe since you will be using this again. On the next steps it will prompt you for geographical location and other info, this is what I put:

    c:\SSLCerts>openssl req -new -x509 -keyout SunnyHappyCA/private/cakey.pem -out SunnyHappyCA/cacert.pem -days 7300
    Generating a 1024 bit RSA private key
    .++++++
    ..++++++
    writing new private key to 'SunnyHappyCA/private/cakey.pem'
    Enter PEM pass phrase:
    Verifying - Enter PEM pass phrase:
    -----
    You are about to be asked to enter information that will be incorporated
    into your certificate request.
    What you are about to enter is what is called a Distinguished Name or a DN.
    There are quite a few fields but you can leave some blank
    For some fields there will be a default value,
    If you enter '.', the field will be left blank.
    -----
    Country Name (2 letter code) [AU]:AU
    State or Province Name (full name) [Some-State]:NSW
    Locality Name (eg, city) []:Sydney
    Organization Name (eg, company) [Internet Widgits Pty Ltd]:Sunny Happy Co Ltd
    Organizational Unit Name (eg, section) []:
    Common Name (e.g. server FQDN or YOUR name) []:Sunny Happy Root CA
    Email Address []:
    

    And I (again) set the validity to be 20 years (7300 days). The private key will go to SunnyHappyCA/private/cakey.pem and the public key SunnyHappyCA/cacert.pem. You now have a root CA keypair done!

Server Certificate Generation & Chaining

Server in here means our web / app server for testing purpose. In our case it sits on the unix host schdev01.

  1. Generate private key and certificate request for the server
    openssl req -new -keyout shcdev01_key.pem.orig -out shcdev01_req.pem

    Openssl will again prompt for password but this is different than the CA password. It will also prompt for similar locality information. It’s very important you put the Common Name into the corresponding server DNS name (schdev01 in this case), because this is what will be used on handshake.

    c:SSLCerts>openssl req -new -keyout shcdev01_key.pem.orig -out shcdev01_req.pem
    Generating a 1024 bit RSA private key
    .....................................................++++++
    ..................................++++++
    writing new private key to 'shcdev01_key.pem.orig'
    Enter PEM pass phrase:
    Verifying - Enter PEM pass phrase:
    -----
    You are about to be asked to enter information that will be incorporated
    into your certificate request.
    What you are about to enter is what is called a Distinguished Name or a DN.
    There are quite a few fields but you can leave some blank
    For some fields there will be a default value,
    If you enter '.', the field will be left blank.
    -----
    Country Name (2 letter code) [AU]:
    State or Province Name (full name) [Some-State]:NSW
    Locality Name (eg, city) []:Sydney
    Organization Name (eg, company) [Internet Widgits Pty Ltd]:Sunny Happy Co Ltd
    Organizational Unit Name (eg, section) []:
    Common Name (e.g. server FQDN or YOUR name) []:shcdev01
    Email Address []:
    
    Please enter the following 'extra' attributes
    to be sent with your certificate request
    A challenge password []:
    An optional company name []:
    

    By now we will have 2 additional files on C:SSLCerts: shcdev01_key.pem.orig (the encrypted private key) and shcdev01_req.pem (the certification request).

  2. Run following command to decrypt the user’s private key. This is necessary so we can use it later for chaining purpose.
    openssl rsa -in shcdev01_key.pem.orig -out shcdev01_key.pem
  3. And finally the big step: chaining your certificate to Sunny Happy Root CA. Run this command:
    openssl ca -in shcdev01_req.pem -out shcdev01_cert.pem

    Openssl will ask for the CA key’s password. Once you entered it will also ask you to confirm to certify. Sign it by entering y

    c:SSLCerts>openssl ca -in shcdev01_req.pem -out shcdev01_cert.pem
    Using configuration from C:/SSLCA/openssl.cfg
    Enter pass phrase for C:/SSLCA/SunnyHappyCA/private/cakey.pem:
    Check that the request matches the signature
    Signature ok
    Certificate Details:
            Serial Number: 286 (0x11e)
            Validity
                Not Before: Jan 24 05:00:19 2014 GMT
                Not After : Jan 22 05:00:19 2024 GMT
            Subject:
                countryName               = AU
                stateOrProvinceName       = NSW
                organizationName          = Sunny Happy Co Ltd
                commonName                = shcdev01
                emailAddress              = 
            X509v3 extensions:
                X509v3 Basic Constraints:
                    CA:FALSE
                Netscape Comment:
                    OpenSSL Generated Certificate
                X509v3 Subject Key Identifier:
                    40:27:EF:28:95:26:FF:19:BA:99:92:35:F2:AA:C4:2B:1E:43:77:5E
                X509v3 Authority Key Identifier:
                    keyid:BA:F7:51:AA:23:59:89:27:9A:22:47:49:6C:86:68:2C:4E:34:AD:82
    
    Certificate is to be certified until Jan 22 05:00:19 2024 GMT (3650 days)
    Sign the certificate? [y/n]:y
    
    
    1 out of 1 certificate requests certified, commit? [y/n]y
    Write out database with 1 new entries
    Data Base Updated
    

By the end of these steps, you’ll have a user certificate chained to our CA. You can rename .pem file into .crt and view it using Windows certificate viewer.

You can repeat these steps for as many apache servers you have. You will be using the private key (schdev01_key.pem) and certificate file schdev01_cert.pem on apache config.

Importing Root CA Certificate to Client’s PC

In windows, additional third party Root CA can be added via the certificate manager tool:

  1. Rename your CA certificate file (C:/SSLCerts/SunnyHappyCA/cacert.pem) into .crt file
  2. Open a command prompt as administrator and run certmgr.msc
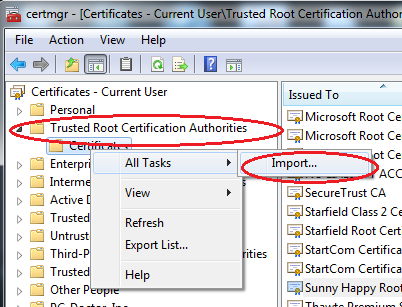
  3. On the left tree select Trusted Root Certification Authorities/Certificates, right click > All Tasks > Import…
    importcacert
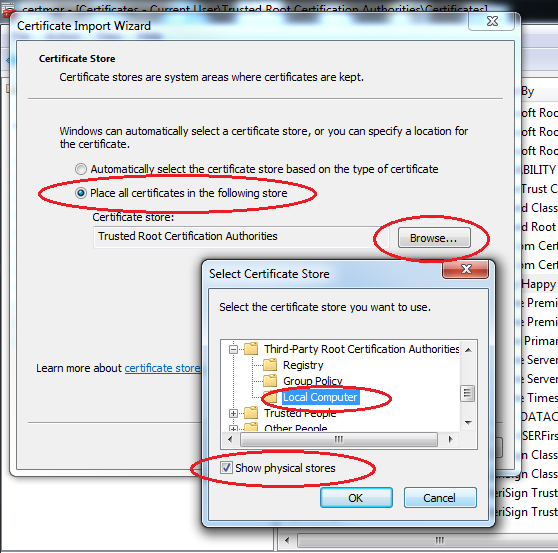
  4. Select the cacert.crt file we generated above when prompted. When the wizard asks where to keep the certificate, choose Place all certificates in the following store, click Browse, make sure Show physical stores is ticked and select Third-Party Root Certification Authorities/Local Computer. See this superuser forum Q&A if you can’t find it.
    savecacert

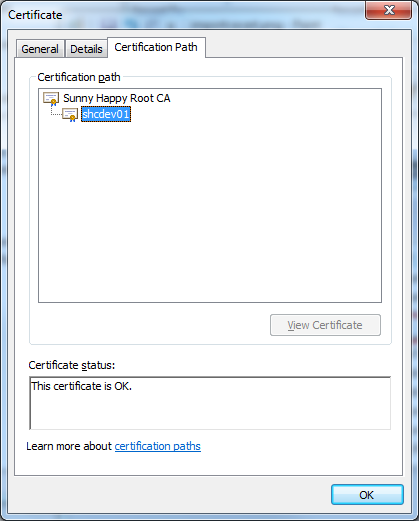
Once you’ve done this, you can inspect your shcdev01_cert.crt (after renaming it from pem) in windows and it will show it is chained to our company’s CA

clientcert

Credits

Thanks to Philippe Camacho for the OpenSSL tutorial from which I based this post.

Returning JSON View on Spring MVC

Another simple way to return JSON object is by using jackson-mapper-asl. Similar to how we can map server-bound post, this method can also be used to write response.

Firstly, on your Spring MVC enabled project, add following maven dependency:


  org.codehaus.jackson
  jackson-mapper-asl
  1.9.12

Spring can automatically convert your POJO into a json string. So say we have this data object we want to return:

public class Customer {
  private String name = "";
  private String email = "";
  // getters & setters...
}

And this is the controller request mapping method. Important bits here is the method returns a POJO object directly, and it is annotated with annotation.

("/customer/{id}")

public Customer getCustomer(("id") long id) {
  Customer customer = // Search customer by given id through repository..
  return customer;
}

On the client side the returned JSON will be something like this:

{
  name = "Tom",
  email = ""
}

Injecting Properties to Spring MVC JSP View

Spring MVC internationalization (i18n) message support can be used for a simple config / property file. Add following bean definition on your container xml config file:


The bean above will read properties key-value pairs from WEB-INF/i18n/site.properties. Make sure you create this file with standard java-style properties:

site.name=Cool Bananas

Then in your JSP views, without any further intervention you can inject the values. Use spring message tag to achieve this

<%@ taglib uri="http://www.springframework.org/tags" prefix="spring" %>

  
    <message code="site.name"></message>


Testing TCP Firewall With Netcat

Simplest way to test if a port is open on firewall is through telnet, but problem with that is what if you don’t have anything listening? What if you’re preparing infrastructure for a new app-server deployment — telnet won’t work unless there’s something listening on the server.

With netcat you can create a simple listener that echoes whatever character passed to it. Netcat should be available on standard UNIX system via nc command.

If you want to test if port 1234 has been allowed through on firewall:

  1. On the server, run nc -l -p 1234. Netcat will wait incoming connection to port 1234.
  2. On the client, simply do telnet 1234 (assuming the server ip is )

If the server is on Windows, there’s even a Windows version of Netcat available.

Downloading Oracle JDK via Shell / Script

The most common reason you’d want to do this is if you have a remote server which you can only access via SSH. Downloading jdk first to your computer then uploading it is an option but often it’s slow. Here’s how you can download it directly from your SSH shell:

  1. Using Google Chrome browser, go to Oracle JDK download page, pick the jdk package you want to download
  2. Press F12 to open Chrome’s developer tools. Go to Network tab. networktab
  3. Accept the user agreement on Oracle’s website, and click the package link
  4. On developer tools window, find the first entry that has your package name. Right click and select Copy as cURL copycurl
  5. Now the curl command required to download the package is in your clipboard. You can paste this to your remote server’s SSH session and use it to download the package directly