Managing Spring Security User Session

Ever wondered who is currently logged in to your app or how to kick them out? Evil_grin_emoticon. You can do it using SessionRegistry.

Screen Shot 2015-08-01 at 11.36.36 pm

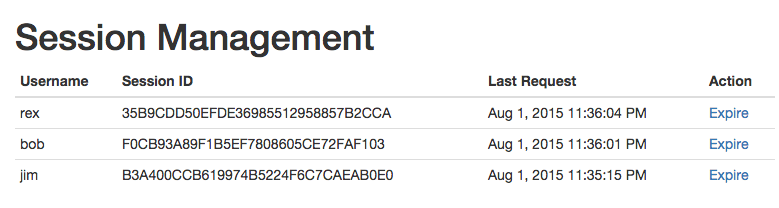
(Disclaimer: UI is self-coded, not provided by Spring)

ntT5yBs

First, setup spring security configuration

Java config:

.and()
  .sessionManagement()
    .maximumSessions(1) // How many session the same user can have? This can be any number you pick
    .expiredUrl("/login?expired")
    .sessionRegistry(sessionRegistry)

And register the sessionRegistry bean:

(name = "sessionRegistry")
public SessionRegistry sessionRegistry() {
  return new SessionRegistryImpl();
}

Or XML config, place this below :


Now you can list currently active sessions

Inject a SessionRegistry and let’s see who’s currently logged in:


private SessionRegistry sessionRegistry;

public List getActiveSessions() {
  List activeSessions = new ArrayList<>();
  for(Object principal : sessionRegistry.getAllPrincipals()) {
    activeSessions.addAll(sessionRegistry.getAllSessions(principal, false));
  }
  return activeSessions;
}

SessionInformation object contains a lot of useful methods such as getPrincipal, getSessionId and getLastRequest. Have a look at the javadoc for more info.

What principal? I’m not in school anymore

Principal is just a fancy word for user in security speak. Note how SessionInformation returns a principal of type Object. If you use Spring Security your principal will most likely be the type of org.springframework.security.core.userdetails.User

Here’s how you can get the username from a User object:

SessionInformation session = ... // get the session info somehow
Object principalObj = session.getPrincipal();
if (principalObj instanceof User) {
  User user = (User) principalObj;
  return user.getUsername();
}

If you need to kick someone out

The use case of this is not just for when you hated a particular user so much, but if user permission is updated, then you have to invalidate all active sessions for it to take effect.

public void logoutSession(String sessionId) {
  SessionInformation session = sessionRegistry.getSessionInformation(sessionId);
  if (session != null) {
    session.expireNow();
  }
}

Enjoy

And thanks to SO user dimas for posting an answer that inspires this post.

Why You Should Use Java 8: NullPointerException Free Object Access Using Optional

If you haven’t you should read Tired of Null Pointer Exceptions? Consider Using Java SE 8’s Optional.

How many times does object traversal code like this frightens you?

String city = personRepository.getByUsername("bob").getAddress().getCity();

Yes it’s a looming NullPointerException bound to happen. Remember Murphy’s Law? Anything that can go wrong, will go wrong.

Here’s how we all used to make it safer in Java 7 <

  String city;
  Person person = personRepository.getByUsername("bob");
  if (person != null) {
    Address address = person.getAddress();
    if (address != null) {
      city = address.getCity();
      if (city == null) {
        city = "Unknown";
      }
    }
  }

whatifmeme

Java 8 lambda to the rescue:

String city = personRepository
                  .findByUsername("bob")
                  .flatMap(Person::getAddress)
                  .flatMap(Address::getCity)
                  .orElse("Unknown")
;

How does this work? flatMap and orElse are methods of Optional interface. In plain english flatMap(Person::getAddress) reads: apply the function getAddress belonging to the class Person and give me whatever return value getAddress has.

Of course we have to wrap the types used to store the values in the object with Option:

public class PersonRepository {
  public Option findByUsername(String username) {
    ...
  }
}

public class Person {
  private Option
address; public Option
getAddress() { return this.address; } } public class Address { private Option city; public Option getCity() { return this.city; } }

No way! I don’t want to have to wrap all my property types with Optional / I’m using a 3rd part library and cannot refactor the types

Not a problem you can wrap them when you traverse the object:

String city = Optional.ofNullable(personRepository.findByUsername("bob"))
                .map(Person::getAddress)
                .map(Address::getCity)
                .orElse("Unknown");
;

Optional.ofNullable will create an Optional object with values that may be null. map is similar to flatMap except this one says: apply function X to this Optional and give me another Optional with whatever X’s return type.

One more reason to convince your boss / architect / team lead to upgrade your code into Java 8 :-). Enjoy.

Using ZeroMQ Java Binding

  1. Ensure you have ZEROMQ_HOME environment variable pointing to the root source package (and compiled jars/dlls). See the compilation guide for more info.
  2. Ensure %ZEROMQ_HOME%\java\lib\zeromq.jar is on the classpath. The best way to achieve this if you’re using Maven is to deploy it to your internal repository so your work colleague can reference it directly.

    To deploy to internal maven repo:

    C:\> cd %ZEROMQ_HOME%\java\lib
    
    C:\zeromq-4.0.5\java\lib> mvn deploy:deploy-file -Dfile=zmq.jar -DgroupId=my.company.zmq -DartifactId=zmq -Dversion=3.1.0 Durl=file:////path/to/my/company/maven_repository
    

    To add this dependency on your project, add this to your pom.xml:

    
      my.company.zmq
      zmq
      3.1.0
    
    
    ...


        my-company-internal
        file:////path/to/my/company/maven_repository


  3. Set java system property java.library.path to %ZEROMQ_HOME%\java\lib. Note that java doesn’t accept environment variable, so you have to resolve it yourself. If you’re running through command line:
    C:\> java -Djava.library.path=C:\zeromq-4.0.5\java\lib
    

    On application servers like tomcat, you’ll have to edit the start script or the Windows service configuration. This system property has to be set before runtime starts, doing System.setProperty(key, value) will not work.

  4. Add %ZEROMQ_HOME%\bin\x64 to PATH env var:
    C:\>SET PATH=%ZEROMQ_HOME%\bin\x64;%PATH%
    

    If deploying on production server, this need to be done via Windows Advanced System Configuration. Make sure you restart any VM so it can pick up the latest env vars

  5. If you’re deploying on production environment, only following folder layout is required:
    C:\zeromq-4.0.5
     +- bin
         +- x64
             +- libzmq.dll
     +- java
         +- lib
             +- jzmq.dll
    

See Also

ZeroMQ Windows Java Binding: Building libzmq.dll, jzmq.dll and zmq.jar Using Visual Studio 2012

Versions used in this article:

  • jzmq-3.1.0
  • ZeroMQ-4.0.5 source
  • jdk 1.6.0 (Update 34), Windows 64bit
  • Visual Studio 2012
  • Windows 7 64bit

Build Steps

  1. Download , inflate it to C:\zeromq-4.0.5 (or other folder to your liking). Set your ZEROMQ_HOME environment variable pointing to this folder.
  2. Download , inflate it to %ZEROMQ_HOME%\java
  3. On %ZEROMQ_HOME%, open Visual Studio solution file builds\msvc\msvc10.sln. Switch the active profile to Release, and platform to x64. Perform Build Solution (F7). If successful you should get bin\x64\libzmq.dll
  4. On %ZEROMQ_HOME%\java, open Visual Studio solution file builds\msvc\msvc.sln. Switch the profile into Release
  5. Go to jzmq project property, edit the VC++ Directories. The include path has to correctly reference your jdk path (you can use environment variable like $(JAVA_HOME)). Similarly it also need reference to $(ZEROMQ_HOME)\include and ..\. ..\ is required so reference to config.hpp is not broken. Your Include Directories should end up similar like this:
    jzmq1
  6. Edit the Library Directories, and add $(JAVA_HOME)\lib and $(ZEROMQ_HOME)\lib. Your Library Directories should end up similar like this:
    jzmq2
  7. Do solution build. If all is successful you should end up with jzmq.dll and zmq.jar on %ZEROMQ_HOME%\java\lib
  8. You can now run the test program as mentioned on ZeroMQ Java Bindings doc:
    C:\>cd %ZEROMQ_HOME%\java\src\main\perf
    
    C:\zeromq-4.0.5\java\src\main\perf>set PATH=%ZEROMQ_HOME%\bin\x64;%PATH%
    
    C:\zeromq-4.0.5\java\src\main\perf>java -Djava.library.path=C:\zeromq-4.0.5\java\lib -classpath C:\zeromq-4.0.5\java\lib\zmq.jar;. local_lat tcp://127.0.0.1:5555 1 100
    

    Source code of these sample codes are available on %ZEROMQ_HOME%\java\src\main\perf in case you’re wondering what they do

See Also

Additional References

Checking for C++ 11 Support

Most c++ compilers define a constant named __cplusplus which indicates C++ 11 support. Hence you can write something like this (thanks Cygon for the SO reply)


#if __cplusplus <= 199711L #error This library needs at least a C++11 compliant compiler #endif [/cpp] On most g++, you can pass -std=c++11 to toggle C++ 11 support:

g++ -std=c++11 main.cpp

This is what I get when I try to output the __cplusplus constant with the flag set:


#include
using namespace std;

int main() {
cout << __cplusplus << endl; return 0; } [/cpp] [text] $ g++ -std=c++11 test.cpp $ ./a.out 201103 [/text] Visual C++ compiler version 2012 or above should come with near-complete C++ 11 support.

Working With Time In C++

Working with time with any programming language is always tricky, C++ is no exception.

Getting Current Time

Use the time function to get the current time. Note that time_t has no timezone information, it’s simply UTC offset from epoch (1 January 1970 00:00:00). In most platform it’s stored as 8 bytes integer.

#include 

int main(int argc, char** argv) {
  time_t now;
  time(&now);
  return 0;
}

Formatting / Printing Time

Use C-style strftime function to format time. Note that strftime takes a struct tm * as parameter, so we have to first convert the time_t. Use localtime to convert it into local time zone.


struct tm * now_tm = localtime(&now);
char now_str[100];
strftime(now_str, sizeof(now_str), “%F %T %z”, now_tm);
cout << now_str << endl [/cpp] The above pattern string will produce a time format like this: [text] 2015-03-12 12:11:45 +1000 [/text] strftime man page has an excellent explanation of the pattern string. If you want to convert into GMT timezone you can also use gmtime

Parsing Time

This is where things get even more trickier. Not until C++11 standard the language come with a built-in way to parse time strings. Prior to that you have to either write your own parsing function or use 3rd party library like boost.

Check here how to enable C++11 in your toolset.

The new C++11 standard comes with get_time function which can be used to parse string into a struct tm:


#include
#include
#include

using namespace std;

int main() {
struct tm tt;
cout << "enter time in YYYY-MM-DD HH:mm format: "; cin >> get_time(&tt, “%Y-%m-%d %H:%M”);
cout << put_time(&tt, “%d %b %Y, %H:%M %z\n”); return 0; } [/cpp] This code will produce output like this: [text] $ ./a.out enter time in YYYY-MM-DD HH:mm format: 2015-06-11 23:44 11 Jun 2015, 23:44 +1000 [/text]

Setting Up ZeroMQ C++ On Visual Studio

This article is tested against following version / configuration:

  • Visual Studio 2012 (V110) Platform Toolset
  • Win32
  • ZeroMQ 4.0.4
  • Runtime Library: Multi-threaded DLL (/MD)

Steps to setup ZeroMQ on a Visual Studio C++ project:

  1. Download and install ZeroMQ-4.0.4~miru1.0-x86.exe (or newer) from http://zeromq.org/distro:microsoft-windows
  2. Set ZEROMQ_HOME environment variable to C:\Program Files (x86)\ZeroMQ 4.0.4 (or wherever you installed it to)
  3. On Visual Studio project configuration, add $(ZEROMQ_HOME)\include to Configuration Properties -> VC++ Directories. Don’t forget to restart Visual Studio so it picks up the new environment variable
  4. Add $(ZEROMQ_HOME)\lib to Linker -> General -> Additional Library Directories
  5. Add libzmq-v110-mt-4_0_4.lib to Linker -> Input -> Additional Dependencies
  6. Get a copy of zmq.hpp from , place this somewhere on your project. This header file references zmq.h located at $(ZEROMQ_HOME)\include
  7. Once you’ve compiled your executable, place libzmq-v110-mt-4_0_4.dll on the same folder, otherwise ZeroMQ initialisation will cause runtime crash

And finally take a look at some excellent tutorial examples from zeromq.org website to get you started, in particular:

See Also

Setting Up Spring Security On Spring Boot Project

Here’s my simple requirements:

  • /admin/** path require ROLE_ADMIN
  • /login/**, /css/**, /js/**, **/favicon.ico can be accessed anonymously
  • any other path required ROLE_USER
  • login form

Here’s how to implement it on your Spring Boot project:

  1. Add the spring boot security starter dependency:
    
      org.springframework.boot
      spring-boot-starter-security
    
    
  2. Add a SecurityConfig class extending WebSecurityConfigurerAdapter and implement the path, user and roles requirements above
    
    (SecurityProperties.ACCESS_OVERRIDE_ORDER)
    public class SecurityConfig extends WebSecurityConfigurerAdapter {
    
      
      protected void configure(HttpSecurity http) throws Exception {
        http
          .authorizeRequests()
            .antMatchers("/admin/**").hasRole("ADMIN")
            .antMatchers("/css/**", "/js/**", "/img/**", "**/favicon.ico").anonymous()
            .anyRequest().hasRole("USER")
            .and()
          .formLogin()
            .permitAll()
        ;
      }
      
      
      public void configure(AuthenticationManagerBuilder auth) throws Exception {
        auth
          .inMemoryAuthentication()
            .withUser("admin").password("admin321").roles("USER", "ADMIN").and()
            .withUser("jim").password("jim321").roles("USER");
      }
    
    }
    

    This setup only works assuming you have on your main configuration class. By default Spring Security will provide a login form at /login but you can implement your own. I’ve also setup two users to test it

Using JSP On Spring Boot App

By default Spring Boot did not come with JSP support. Here’s how to set your app to use JSP:

  1. Set the project to use tomcat7-maven-plugin rather than spring-boot-maven-plugin
  2. Add / ensure following Maven dependencies are setup
    
      org.springframework.boot
      spring-boot-starter-tomcat
      provided
    
    
      org.apache.tomcat
      tomcat-jsp-api
      provided
    
    
      javax.servlet
      jstl
    
    
  3. The Web MVC auto configuration feature of Spring Boot sets you up with a ViewResolver with blank suffix and prefix, hence you can place jsp in src/main/webapp/WEB-INF/test.jsp and have your controller return path to it
    
    ("/test")
    public class TestController {
      (method = GET)
      public String test() {
        return "/WEB-INF/test.jsp";
      }
    }
    

Hope this helps!

JPA Example

Suppose you have a Student and Subject entities and you want to create a many-to-many relationship between them. The database table looks something like this:

CREATE TABLE students (
  `id` BIGINT NOT NULL AUTO_INCREMENT PRIMARY KEY,
  `name` VARCHAR(200)
);

CREATE TABLE subjects (
  `id` BIGINT NOT NULL AUTO_INCREMENT PRIMARY KEY,
  `name` VARCHAR(200)
);

CREATE TABLE students_subjects (
  `student_id` BIGINT NOT NULL,
  `subject_id` BIGINT NOT NULL,
  PRIMARY KEY (`student_id`, `subject_id`),
  FOREIGN KEY (`student_id`) REFERENCES `students` (`id`),
  FOREIGN KEY (`subject_id`) REFERENCES `subjects` (`id`)
);

Here’s how to code your Student JPA entity:


(name = "students")
public class Student {
  @Id
  
  private long id;

  private String name = "";

  (cascade = CascadeType.All)
  (name = "students_subjects",
    joinColumns = (name = "student_id", referencedColumnName = "id"),
    inverseJoinColumns = (name = "subject_id", referencedColumnName = "id"))
  private Set subjects = new HashSet();

  /* getters, setters, equals & hashCode */
}

Note how I used CascadeType.All above, this will case any modification to subjects collections to be cascaded automatically when I saved the student entity object.

Also note the use of Set collection instead of List. This will prevent duplicates when querying since JPA wouldn’t know whether the multiple rows are a result of join or simply multiple entries in the result.

And here’s the Subject JPA entity:


(name = "subjects")
public class Subject {

  @Id
  
  private long id;

  private String name = "";

  (cascade = CascadeType.All)
  (name = "students_subjects",
    joinColumns = (name = "subject_id", referencedColumnName = "id"),
    inverseJoinColumns = (name = "student_id", referencedColumnName = "id"))
  private Set students = new HashSet();

  /* getters, setters, equals & hashCode */
}

Note that the annotation on Subject is similar to Student except the joinColumns and inverseJoinColumns are reversed.

Also since the above example uses HashSet, don’t forget to implement proper equals and hashCode methods.