See here for similar guide on Windows.
After half an hour surfing various pages, I’ve finally figured out how to assign additional IP to a network interface on Mac OS X (thanks to this apple discussion thread: ).
Adding another IP to your network interface is a handy way of running multiple instance of a process listening on the same port (eg: Tomcat container). This is very useful to perform High-Availability (HA) setup locally on laptop.
This guide is written against OS X Mountain Lion (10.8), but hopefully not that much different for older / newer OS X version.
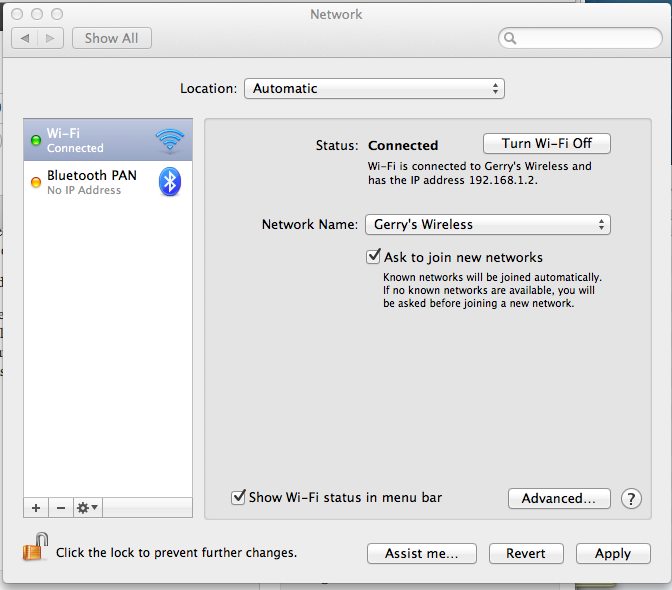
- Open Network Preferences (System Preferences > Network). On the left list box each connection made through available network interfaces are listed. On below screenshot I have two connections configured for my wireless and bluetooth network interface respectively.

- On OS X you need to “duplicate a connection” to add an IP to an existing network interface. Typically you would add additional IP to your primary network interface (eg: your wireless or LAN card) so it’s reachable from other host in your network. In my macbook air, since it doesn’t have a LAN port, I used the wifi network interface. Select your primary network connection (“Wi-Fi” in my case), click on the gear icon at the bottom and select Duplicate Service… You might need to click the padlock icon first to perform administrative task.
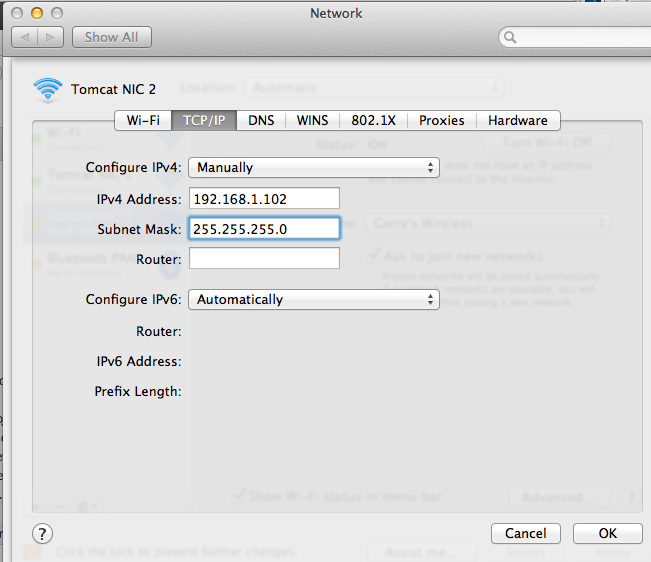
- Enter a name for the new connection, eg: Tomcat NIC 2 and hit Duplicate. The new connection will be created. Although it’s a different connection, it still uses the same network interface (in my case the wifi network interface). Initially the connection might not have an automatically assigned IP.
- If the connection does not have an automatically assigned IP, assign it manually. From Network Preferences, select the new connection, and click Advanced… button. Go to the TCP/IP tab, select Configure IPv4 Manually, provide an IPv4 address and subnet mask. Ensure the IP isn’t already used in your network (you can check it using ping).

You can verify the virtual interface has been created by using ifconfig command. Notice in my case I have got more than 1 IP assigned to my wifi interface (en0)
[sourcecode]
$ ifconfig
lo0: flags=8049
options=3
inet6 fe80::1%lo0 prefixlen 64 scopeid 0x1
inet 127.0.0.1 netmask 0xff000000
inet6 ::1 prefixlen 128
gif0: flags=8010
stf0: flags=0<> mtu 1280
en0: flags=8863
ether 70:56:81:c0:c1:4f
inet6 fe80::7256:81ff:fec0:c14f%en0 prefixlen 64 scopeid 0x4
inet 192.168.1.101 netmask 0xffffff00 broadcast 192.168.1.255
inet 192.168.1.2 netmask 0xffffff00 broadcast 192.168.1.255
inet 192.168.1.102 netmask 0xffffff00 broadcast 192.168.1.255
media: autoselect
status: active
p2p0: flags=8843
ether 02:56:81:c0:c1:4f
media: autoselect
status: inactive
[/sourcecode]
2 thoughts on “How to Add Additional IP to a Network Interface on Mac OS X”