All posts by gerrytan

Programming Basic: Java Multithreading

Multithreading is probably the trickiest basic programming concept to learn. To start with, let’s ask why do we even need multiple threads?

Well, think about stuff you do on daily basis. You’re hungry and you need to cook dinner, so you grabbed a frozen pizza off the fridge and pop it to the oven. And then you realize you have to iron your shirts so you can use them for work next week. You wouldn’t stand idle in your oven while it’s cooking right? You’d typically make the most of your time and iron the shirts while pizza is cooking in the oven. The way your program should work is similar, it shouldn’t waste time idling if it can do something else.

Now let’s say I have these two methods:

[sourcecode language="java"]

static void bakePizza() {

for(int i=0; i<3; ++i) {
System.out.println("Baking pizza");
try {
Thread.sleep(1000);
} catch (InterruptedException e) {
e.printStackTrace();
}
}

System.out.println("Baking pizza done");
}

static void ironShirt() {

for(int i=0; i<3; ++i) {
System.out.println("Ironing shirt");
try {
Thread.sleep(1000);
} catch (InterruptedException e) {
e.printStackTrace();
}
}

System.out.println("Ironing shirt done");
}
[/sourcecode]

For time being don’t worry so much about Thread.sleep(..), just assume it’s there to put 1000 milliseconds (1 second) delay on the code execution. Each method (task) cost about 3 seconds to run. If we call these two functions in order it’s going to cost about 6 seconds.

[sourcecode language="java"]
public static void main(String[] args) {
bakePizza();
ironShirt();
System.out.println("Let’s call it a day");
}
[/sourcecode]

If you run the code above, your output will look like following:

[sourcecode]
Baking pizza
Baking pizza
Baking pizza
Baking pizza done
Ironing shirt
Ironing shirt
Ironing shirt
Ironing shirt done
Let’s call it a day
[/sourcecode]

Now in order to bake pizza and iron your shirts in parallel, we need to run them in a separate Thread. In Java, your main method always runs in the a thread called main thread. A thread is represented by the Thread class. There’s many way to create a thread, here I’ll use an anonymous class extending the Thread class:

[sourcecode language="java"]
Thread bakingPizzaThread = new Thread() {
public void run() {
bakePizza();
}
};

bakingPizzaThread.start();
[/sourcecode]

As soon as you call the start method on your thread object, Java will invoke the run method on a new thread — and your main thread continue its execution. In other word the main thread will not wait until pizza baking is finished.

In below example I run bakePizza() and ironShirt() both in its own thread, this is what I get (result may vary, but notice how the code now only runs for roughly 3 seconds rather than 6. This is because both long running method can be executed simultaneously

[sourcecode language="java"]
public static void main(String[] args) {
Thread bakingPizzaThread = new Thread() {
public void run() {
bakePizza();
}
};

Thread ironingShirtThread = new Thread() {
public void run() {
ironShirt();
}
};

bakingPizzaThread.start();
ironingShirtThread.start();

System.out.println("Let’s call it a day");
}
[/sourcecode]

[sourcecode]
Let’s call it a day
Baking pizza
Ironing shirt
Baking pizza
Ironing shirt
Baking pizza
Ironing shirt
Baking pizza done
Ironing shirt done
[/sourcecode]
 

How to Add Additional IP to Your Network Interface on Windows

This guide applies to Windows 7 and 8 but should be similar for older version of Windows. See here for similar guide on Mac OS X.

  1. Go to Control Panel > Network and Internet > Network and Sharing Center > Change Adapter Settings (on the left menu)
  2. Right click on the adapter you’d like to add IP to and select Properties (typically this is your primary network connection — eg: your LAN or wireless card)
  3. On the This connection uses following items selection, find Internet Protocol Version 4 (TCP/IPv4), select it and hit Properties
  4. Ensure your IP settings is manual (Use the following IP address and Use the following DNS server address radio buttons are selected). If it’s still automatic, change it and fill in your IP details. If you’re not sure what to fill, open command prompt and run the ipconfig /all command, this should show you your current network adapter config
  5. Once set to manual, click Advanced on the bottom right, and on the IP addresses area click Add. It will ask you for IP address and subnet mask. Again consult ipconfig /all command if you need to know. Typically you need to find an IP address which hasn’t been used on your network.

Reverse Proxy and Load Balancing using Apache mod_proxy

Reverse Proxy is a type of proxy server that retrieves the resource on behalf of the client such that the response appears to come from the reverse proxy server itself. One useful application of reverse proxy is when you want to expose a server on your internal network to the internet.

Load Balancing is a technique of distributing requests into several backend servers, hence providing redundancy and scalability. Many Java EE app servers came built-in with clustering feature allowing session to be replicated across all nodes in the cluster.

Apache has few modules that can be used to setup the two above. Following is a guide on how to set it up.

  1. Ensure you have an apache-httpd installed. This guide is written against httpd 2.4. If you’re on OSX most likely you’ve already got httpd installed.
  2. Figure out where is your httpd.conf file located. Typically it’s at $HTTPD_ROOT/conf/httpd.conf.
  3. Enable following modules. Module can be enabled by uncommenting (removing the ‘#’ character at the beginning) the LoadModule directive on your httpd.conf:
    [sourcecode]
    LoadModule proxy_module modules/mod_proxy.so
    LoadModule proxy_http_module modules/mod_proxy_http.so
    LoadModule proxy_balancer_module modules/mod_proxy_balancer.so
    LoadModule slotmem_shm_module modules/mod_slotmem_shm.so
    LoadModule lbmethod_byrequests_module modules/mod_lbmethod_byrequests.so
    [/sourcecode]
  4. (Optional) depending on your operating system setup, you might need to change the user & group httpd will use to start the process. On my OSX I have to change it into my own user / group (or root). Use the User and Group directive for this
    [sourcecode]
    User gerrytan
    Group staff
    [/sourcecode]
  5. Add the following proxy / load balancer configuration
    [sourcecode]

    BalancerMember http://192.168.1.101:8080 route=node1
    BalancerMember http://192.168.1.102:8080 route=node2
    ProxySet stickysession=BALANCEID

    ProxyPassMatch ^(/.*)$ balancer://mycluster$1
    ProxyPassReverse / http://192.168.1.101:8080/
    ProxyPassReverse / http://192.168.1.102:8080/
    ProxyPassReverseCookieDomain 192.168.1.101 localhost
    ProxyPassReverseCookieDomain 192.168.1.102 localhost
    [/sourcecode]

    The  directive specifies we are defining a load balancer with a name balancer://mycluster with two backend servers (each specified by the BalancerMember directive). In my case my backend servers are 192.168.1.101:8080 and 192.168.1.102:8080. You can add additional IPs to your network interface to simulate multiple backend servers running in different hosts. Note the existence of the route attribute which will be explained shortly.

    The ProxySet directive is used to set the stickysession attribute specifying a cookie name that will cause request to be forwarded to the same member. In this case I used BALANCEID, and in my webapp I wrote a code that will set the cookie value to balancer.node1 or balancer.node2 respectively. When apache detects the existence of this cookie, it will only redirect request to BalancerMemeber which route attribute matches the string after the dot (in this case either node1 or node2). Thanks to this blog article for explaining the step: http://www.markround.com/archives/33-Apache-mod_proxy-balancing-with-PHP-sticky-sessions.html.

    The ProxyPassMatch directive is used to capture and proxy the requests that came into the apache httpd server (the proxy server). It takes a regular expression to match the request path. For example, assuming I installed my httpd on localhost:80, and I made a request to http://localhost/foo, then this directive will (internally) forward the request to http://192.168.1.101:8080/foo.

    The ProxyPassReverse directive is used to rewrite http redirect (302) sent by the backend server, so the client does not bypass the reverse proxy.

    ProxyPassReverseCookieDomain is similar to ProxyPassReverse but applied to cookies.

Few words of warning

There are plenty methods of configuring reverse proxy, this guide uses http reverse proxy which might not deliver the best performance. You might also want to consider AJP reverse proxy for better performance.

Installing GNU Toolchain on OS X 10.8

Having GNU Toolchain handy is always a good thing because you’ll never know when you have that urge to “download the source and compile it yourself”. However it took my a while to figure it out the first time I got my macbook air.

A lot of posts and forum threads suggest installing Xcode which come bundled with a set of toolchain, but apparently newer version of Xcode (v 4.4.1 at the time this post is written) no longer installs the binary into the standard location (/usr/bin, /usr/lib and so on) — instead it’s all placed inside /Applications/Xcode.app to fit with newer App Store style packaging. This means you can’t access the toolchain from terminal shell.

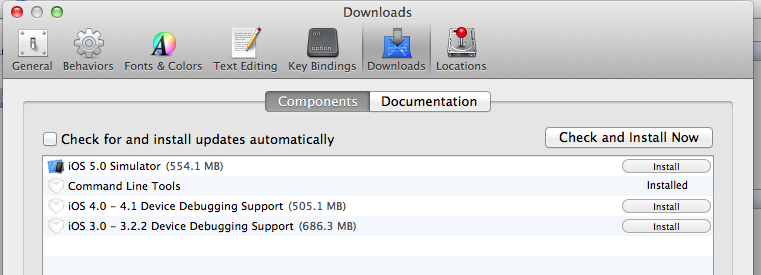
Thanks to http://stackoverflow.com/a/9420451/179630, the trick is once you’ve got Xcode installed, go to Xcode > Preferences > Downloads and install the Command Line Tools component.

How to Add Additional IP to a Network Interface on Mac OS X

See here for similar guide on Windows.

After half an hour surfing various pages, I’ve finally figured out how to assign additional IP to a network interface on Mac OS X (thanks to this apple discussion thread: ).

Adding another IP to your network interface is a handy way of running multiple instance of a process listening on the same port (eg: Tomcat container). This is very useful to perform High-Availability (HA) setup locally on laptop.

This guide is written against OS X Mountain Lion (10.8), but hopefully not that much different for older / newer OS X version.

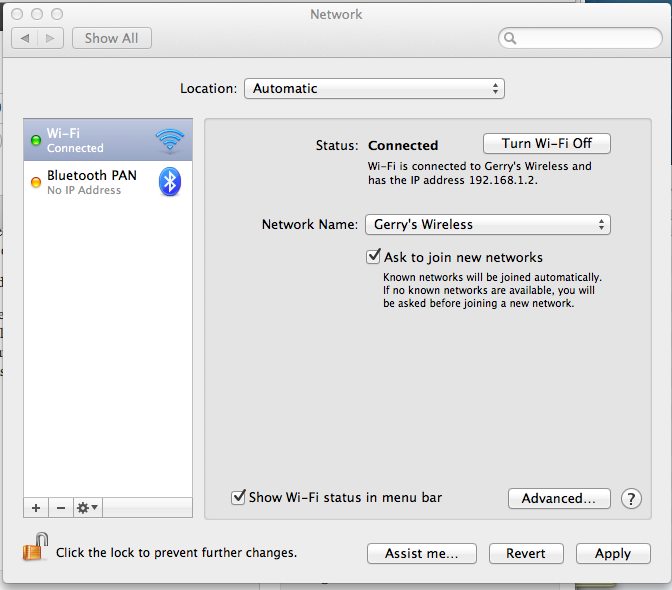
  1. Open Network Preferences (System Preferences > Network). On the left list box each connection made through available network interfaces are listed. On below screenshot I have two connections configured for my wireless and bluetooth network interface respectively.
  2. On OS X you need to “duplicate a connection” to add an IP to an existing network interface. Typically you would add additional IP to your primary network interface (eg: your wireless or LAN card) so it’s reachable from other host in your network. In my macbook air, since it doesn’t have a LAN port, I used the wifi network interface. Select your primary network connection (“Wi-Fi” in my case), click on the gear icon at the bottom and select Duplicate Service… You might need to click the padlock icon first to perform administrative task.
  3. Enter a name for the new connection, eg: Tomcat NIC 2 and hit Duplicate. The new connection will be created. Although it’s a different connection, it still uses the same network interface (in my case the wifi network interface). Initially the connection might not have an automatically assigned IP.
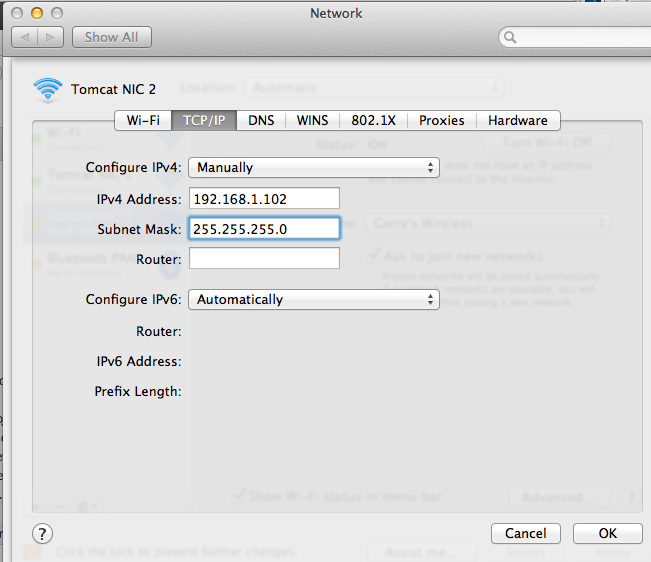
  4. If the connection does not have an automatically assigned IP, assign it manually. From Network Preferences, select the new connection, and click Advanced… button. Go to the TCP/IP tab, select Configure IPv4 Manually, provide an IPv4 address and subnet mask. Ensure the IP isn’t already used in your network (you can check it using ping).

You can verify the virtual interface has been created by using ifconfig command. Notice in my case I have got more than 1 IP assigned to my wifi interface (en0)

[sourcecode]

$ ifconfig
lo0: flags=8049 mtu 16384
options=3
inet6 fe80::1%lo0 prefixlen 64 scopeid 0×1
inet 127.0.0.1 netmask 0xff000000
inet6 ::1 prefixlen 128
gif0: flags=8010 mtu 1280
stf0: flags=0<> mtu 1280
en0: flags=8863 mtu 1500
ether 70:56:81:c0:c1:4f
inet6 fe80::7256:81ff:fec0:c14f%en0 prefixlen 64 scopeid 0×4
inet 192.168.1.101 netmask 0xffffff00 broadcast 192.168.1.255
inet 192.168.1.2 netmask 0xffffff00 broadcast 192.168.1.255
inet 192.168.1.102 netmask 0xffffff00 broadcast 192.168.1.255
media: autoselect
status: active
p2p0: flags=8843 mtu 2304
ether 02:56:81:c0:c1:4f
media: autoselect
status: inactive
[/sourcecode]

Handling Heavy-lifting Job Using Thread Pooling

Your java app server such as Tomcat, JBoss, Websphere and Glassfish are multithreaded — meaning if a user opens a web page (HTTP request submitted), the app server will try to find a free unused thread, and allocate the job of serving the request to it.

One common problem which I recently come accross is when the user performs a long-running task such as reporting or data transformation. If you just simply allow a user to execute a long-running task, your app server is vulnerable to thread starvation — that is genuine user load, or even hackers can issue a massive amount of request causing your server to run out of free threads — hence denying application availability.

One approach is to implement a resource bounding pattern such as thread pooling. The analogy of this pattern is similar like a chef in a restaurant. Say if there is 2 chefs on a restaurant, and each one of them needs 10 minutes to cook an order. Each next free chef will take the order in the order that it arrives, and if all two of them are busy, subsequent order will be queued .

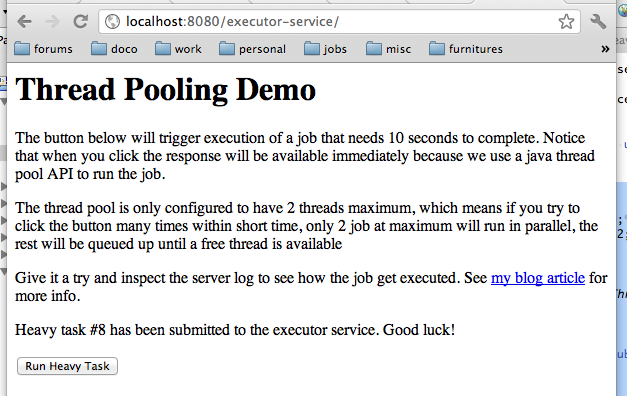
To illustrate this with an example, following is a class that represent a long-running task. Here the task is simply performing 10 seconds delay to simulate the long-run. A log message with task id and the name of the thread running the task is printed when the task begins and ends.

[sourcecode language="java"]
public class HeavyTask implements Runnable {
private static Logger logger = LoggerFactory.getLogger(HeavyTask.class);
private int taskId;

public HeavyTask(int taskId) {
this.taskId = taskId;
}

public void run() {
logger.info(String.format("Task #%s is starting on thread %s…", taskId, Thread.currentThread().getName()));

try {
Thread.sleep(10 * 1000);
} catch (InterruptedException e) {
logger.error(String.format("Task #%s running on thread %s is interrupted", taskId, Thread.currentThread().getName()), e);
}

logger.info(String.format("Task #%s on thread %s finished", taskId, Thread.currentThread().getName()));
}
}
[/sourcecode]

Secondly we have the HeavyTaskRunner class which is a service class that implements business functionality. This class also instantiates the thread pool using Java ExecutorService API with 2 maximum threads by using Executors.newFixedThreadPools() factory method.

[sourcecode language="java"]

public class HeavyTaskRunner {
private ExecutorService executorService;
private static final int NUM_THREADS = 2;
private int taskCounter = 0;

public HeavyTaskRunner() {
executorService = Executors.newFixedThreadPool(NUM_THREADS);
}

/**
* Create a new { HeavyTask} and submit it to thread pool for execution
*/
public int runTask() {
int nextTaskId;
synchronized(this) {
nextTaskId = taskCounter++;
}
executorService.submit(new HeavyTask(nextTaskId));
return nextTaskId;
}
}
[/sourcecode]

And finally I wrapped this in a nice simple Spring MVC web application. You can download the source code from my google code site and run embedded tomcat container using mvn tomcat:run command.

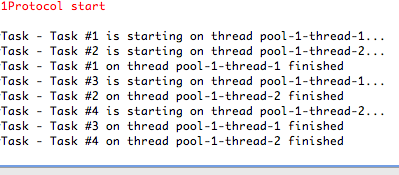
If you look at the server log, this is what it prints after 4 tasks were run in less than 10 seconds. Notice that not more than 2 tasks ever run simultaneously. If all threads are busy the task will be queued until one become free:

This techniques is ofcourse not without downside. Although we have capped the thread (an memory) resource into certain limit, the queue can still grow infinitely, hence our application is still vulnerable to denial of service attack (if a hacker submitted long running tasks for a thousand time, the queue will grow very big causing service unavailability to genuine users)

The concurrency chapter of Java SE tutorial is a good reference if you want to dig more into other techniques of managing threads and long running tasks.

Demo Application Source Code

Source code for the demo application above is available for browsing / checkout via Google Code hosting:

  • Browse: 
  • Checkout:

Ensure you have latest version of JDK and Maven installed. You can run the application using embedded tomcat with mvn tomcat:run command from your shell.

When Your JVM Crashes With OutOfMemoryError

Getting OutOfMemoryError: java heap space is probably one of the most annoying thing to happen to your application server. As application gets more complex and your boss keep pushing you to implement new functionality faster, it’s easy to forget about heap consumption efficiency

Fortunately there are few things you can do to analyze the root cause, and attempt to solve the issue. I stumbled upon a little useful JVM option -XX:+HeapDumpOnOutOfMemoryError when digging Oracle Hotspot VM documentation. What this option will do is to generate a heap dump file something like java_pid1234.hprof right before the java process terminates. You can then load this file into an analysis tool like jvisualvm to have a look at what’s going on.

Let’s give this a go!

Let’s write a tiny little program that leaks a huge amount of memory (let’s hope none of your programmer colleague does anything like this)

[sourcecode language="java"]
public class LittleLeaker {

/**
* A little piece of program that leaks a lot of memory
*/
public static void main(String[] args) {
ArrayList array = new ArrayList();

while (true) {
array.add("Let’s leak some memory here");
}
}

}
[/sourcecode]

Compile it, and run the code with following command

[sourcecode language="text"]
java -XX:-HeapDumpOnOutOfMemoryError LittleLeaker
[/sourcecode]

You shouldn’t have to wait too long until your VM gave up and throw OutOfMemoryError. When it does, notice the hprof file that got created:

[sourcecode language="text"]
192-168-1-3:bin gerrytan$ java -XX:+HeapDumpOnOutOfMemoryError LittleLeaker
java.lang.OutOfMemoryError: Java heap space
Dumping heap to java_pid280.hprof …
Heap dump file created [92624139 bytes in 0.306 secs]
Exception in thread "main" java.lang.OutOfMemoryError: Java heap space
at java.util.Arrays.copyOf(Arrays.java:2760)
at java.util.Arrays.copyOf(Arrays.java:2734)
at java.util.ArrayList.ensureCapacity(ArrayList.java:167)
at java.util.ArrayList.add(ArrayList.java:351)
at LittleLeaker.main(LittleLeaker.java:28)
[/sourcecode]

Let’s Analyze The Heap Dump File

  1. Make sure you have the latest JDK installed and configured on your PATH environment variable. Run jvisualvm program on command line. If this is the first time you’re running it, it might perform some calibration first.
  2. Load the hprof file by using the menu File -> Load. Select the file format to “Heap Dumps” and point to the path of the hprof file generated earlier
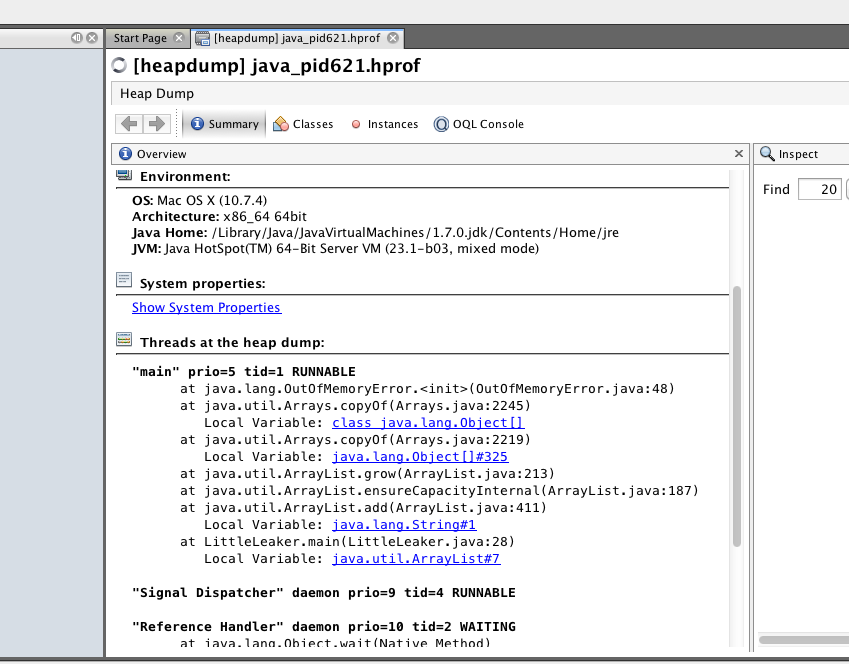
  3. Once loaded, you can see some basic information like when was the dump taken, environment properties, system properties, but most importantly the Threads at the heap dump section. Click the Show Threads link underneath it

    Recall that your virtual machine is a multithreaded environment. In our case, since it’s just a very simple app, you would be interested in the “main”thread.You can trace down in the main thread stack trace the culprit of the OOME.You might be thinking this is not so cool because you’ve already seen the stack trace from the console anyway. But think about if this were your Java EE app server with dozens of threads, getting to know what other threads are doing will be handy
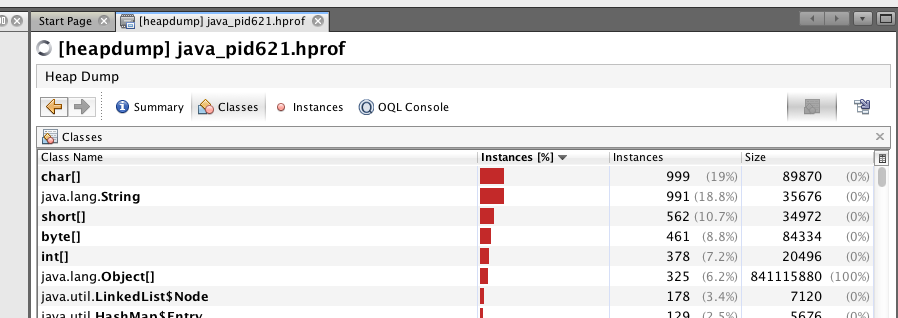
  4. Another interesting analysis to perform is the Classes button at the top. This will show you total number of instances in the heap per classes

    As you can guess, this might not look so interesting since our program is just very simple. But when you have a real ly-complex enterprise application, then this information will be very helpful

There Are Heaps Other Tricks and Techniques

The functionality of Jvisualvm doesn’t stop there. You can also attach it to running JVM to see live monitoring data, obtain thread dump, profiling and plenty others.

This article written by Oracle’s Mandy Chung is a very good reading to deepen your knowledge about java application monitoring.

Mapping JSON Request With Spring MVC

Inspired by , this is a short tutorial on how you can map a request with *.json extension into a JSON view.

This tutorial will demonstrate a small subset of Spring JSON capability using the ‘Spring MVC Project’ template application generated by STS. When you first created a new project from the template, the web app came with a default home page showing ‘Hello World’ and a server time passed via Model attribute.

We will extend this home page a little bit so we can obtain the JSON view. Note that the JSON view will only contain the formatted attributes inside the Model object

By the way, if you haven’t already know — JSON stands for Java Script Object Notation. It’s a textual representation of a Java Script object, and it’s one of the most popular way of transferring information from server to client in modern Ajax application.

Create a new project using a template

  1. Assuming you have SpringSource Tools Suite (STS) installed, create a new project and select Spring Template Project Wizard
  2. Select ‘Spring MVC Project’ from the selection of template, it might prompt you to download if this is the first time you’re using it
  3. Enter a project name and top-level package and hit ‘Finish’

Change the view resolver to ContentNegotiatingViewResolver

ContentNegotiatingViewResolver is a unique resolver which will delegate request to another resolver by the requested media types. There are multiple way it can determine the media type, but here we’ll just use the URL extension method (see the javadoc for more).

On the servlet spring beans configuration (servlet-context.xml), replace the default InternalResourceViewResolver with this:

[sourcecode language="xml"]
If the request has an extension .json, always provide MappingJacksonJsonView regardless –>


[/sourcecode]

In the example above, we define request with the extension “.*json” into “application/json” media type. Normal request is set to “text/html” by the browser by default. When a request came, the list of view resolvers on the “viewResolver” property will be consulted, and if it supports the requested  media type, that view resolver will be used.

The “defaultViews” property specifies the view that will be override the ones provided by matching resolvers (even if none matches) — regardless of the view name returned by the controller. This however only hold true if the View supports the requested media type.

For example, if “/home” path is requested with Accept header “text/html”, ContentNegotiatingViewResolver will set the media type to “text/html”, consult InternalResoursceViewResolver bean (which supports text/html) and use it. If “/home.json” path is requested, the media type is set to “application/json” (not supported by InternalResourceViewResolver), and since the specified default view MappingJacksonJsonView supports it, it will be used. This is sufficient for common usage because all JSON view can be rendered in the same fashion

Have a look at for more info.

Change the Controller mapping

STS Spring MVC new project template mapped the MainController into “/”, however for our demonstration purpose, let’s map it to “/home”, so we can compare the different media type easily.

[sourcecode language="java"]
/**
* Handles requests for the application home page.
*/

public class HomeController {

private static final Logger logger = LoggerFactory.getLogger(HomeController.class);

/**
* Simply selects the home view to render by returning its name.
*/
(value = "/home", method = RequestMethod.GET)
public String home(Locale locale, Model model) {
logger.info("Welcome home! the client locale is "+ locale.toString());

Date date = new Date();
DateFormat dateFormat = DateFormat.getDateTimeInstance(DateFormat.LONG, DateFormat.LONG, locale);

String formattedDate = dateFormat.format(date);

model.addAttribute("serverTime", formattedDate );

return "home";
}

}
[/sourcecode]

Add Jackson dependency to your classpath

The MappingJacksonJsonView requires Jackson library in your classpath. This library will help you to transform java objects into JSON representation. Add the following dependency to your pom.xml

[sourcecode language="xml"]

org.codehaus.jackson
jackson-mapper-lgpl
1.2.1

[/sourcecode]

Ready to go

Fire up embedded tomcat using mvn package tomcat:run goals, and:

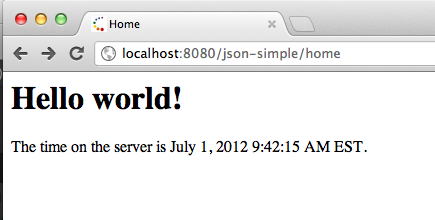
  1. Point your browser to http://localhost:8080/json-simple/home. Inspect you are getting the normal hello world page with server time
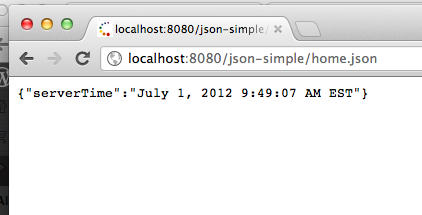
  2. Point your browser to http://localhost:8080/json-simple/home.json. Inspect you are getting the json representation of the model object

The sourcecode for this tutorial is available:

  • For browsing: http://code.google.com/p/gerrytan/source/browse/#svn%2Ftrunk%2Fjson-simple
  • For checkout: /json-simple

Eclipse Tips and Tricks

Eclipse is such a great tool for Java developer, but many of its feature is hidden and could be a while for a newbie to uncover it. Following is my favourite tips and tricks.

Note: The shortcuts in this post is applicable to Windows only

Type / Resource Searching

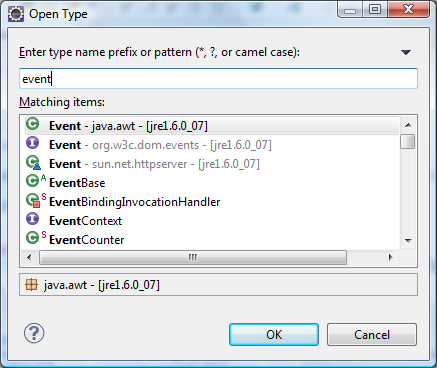
With a large project, often it’s tricky to find a particular class, XML file or other resources. Use CTRL+Shift+T to show the Open Type box, or CTRL+Shift+R for Open Resource box. Open types allows you to search for Java classes while open resources behaves more like a filesystem search, typically you would use this to look for XML, HTML, javascript, properties and so on.

You can also do wildcard searching. For example if you’re trying to find a class related to the keyword “Cat”, you can search *Cat*

Declaration /References Searching

While looking at existing program, It’s very common we need to lookup the declaration or a class or variable or search all locations where a particular class or variable is used (reference searching).

To open a declaration of a variable/type: highlight a variable or class/type reference and press F3 or right-click -> Go to declaration

To find references of a variable/type: right click a variable/type and go to the references menu

Keyboard Shortcuts

When you’re doing the same task a million times, cutting the cost of few extra mouse clicks does matter! Shortcuts in eclipse can be viewed/configured via Preferences (General -> Keys). Following are some of my favourite shortcuts:

Action Windows Shortcut Mac Shortcut Note
Toggle comment (on highlighted text) Ctrl+Shift+C Command+C In java this will toggle double forward-slashes comment (//), in XML the syntax per-line
Toggle block comment (on highlighted text) Ctrl+Shift+/ Command+/ In java, enclose the highlighted text with /* comment */, in XML
Switch active view Ctrl+F7 Ctrl+F7 Allow you to switch from Editor to Console, or any other open Views
Switch perspective Ctrl+F8 Ctrl+F8
Run preconfigured maven goals Alt+Shift+X, M Alt+Shit+X, M You can configure the maven goals via Run configuration (Run -> Run Configuration…). You have to focus on a project on the Project Explorer, or an editor window of the project’s resource
Run Unit Test Alt+Shift+X, T Alt+Shit+X, T

* Function keys on Mac require “fn” modifier. Eg: to press F6, press fn+F6

Method Call Hierarchy

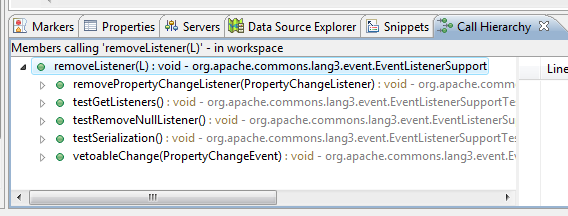
This feature allows you to see what other classes calls a particular method. This is very useful when tracing down an exception, or listing the potentially impacted classes when refactoring a method.

Right click on a method, choose open call hierarchy or use CTRL+Alt+H shortcut. When you open the call hierarchy window, you can also expand each node to further drill down who called that method.

Code Generation

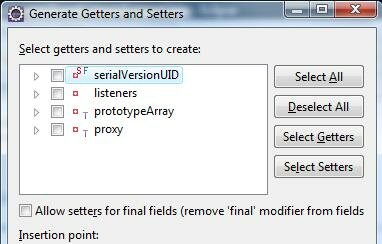
Eclipse came with pretty impressive code generation support. Some of my favourites are: getters/setters generators, toString generators, constructor generators, exeception try/catch block generators.

Most of this code generators feature can be accessed via Source menu or CTRL+Alt+S shortcut.

Java Code Template

If you have to include your company’s copyright policy, or some open source license header on every new java class you create, you can setup a code template. From Preferences, go to Java -> Code Style -> Code Template. On “Configure generated code and comments” select box, go to Code -> New Java files. You can insert additional comments on the top.

Configure SVN support

Eclipse doesn’t come with SVN support by default (due to some licensing restriction I think), and configuring one isn’t a straight forward task. Eclipse come with a concept of SVN provider and connector which has to be installed separately, and there are plenty possible options out there (which don’t always work).

To configure SVN support with Subversive provider and SVNKit connector:

  1. Go to Help -> Install New Software -> Select “Indigo” from “work with” dropdown list. This will cause Eclipse to first check all available plugins, and what has already installed (could take 15 min+)
  2. Open the “Collaboration” tree, and search for “Subversive SVN Team Provider”. Tick and continue with the installation process. Eclipse will ask for a restart when it’s done
  3. Installing the provider it’s a bit tricky. Once eclipse has restarted, open the “SVN Repositories” view by going to Windows -> Show View ->Other -> Search for SVN Repositories, and attempt to register / checkout a new repository. Subversive will realize you haven’t got any connector installed, and will show connector installation dialog. Pick the latest version SVNKit connector and install it

Optimistic Locking with JPA

A pretty common web-application problem is concurrent transaction handling. If you have a form to view and edit an entity, you need to consider if multiple user is going to be editing at the same time, and how to handle them

There are two popular approaches of solving concurrency problem: pessimistic locking, and optimistic locking. Pessimistic locking means access to shared resources is explicitly restricted until the transaction finishes. This is commonly achieved using two-phase locking algorithm found in most database products.

Consider one bank account owned jointly by one lovely couple Jim and Sue. Jim walk into an ATM wanting to see how much money he got, then withdraw $10 (represented by T1). About the same time Sue also want to withdraw $20 from another ATM. (It is assumed both T1 and T2 uses READ COMITTED isolation level which is the default level of many dbms, and the first select acquires exclusive write, eg: select-for-update in Oracle):

Time Jim (T1) Sue (T2)
t=1 select balance from account where account_id = 1
t=2 select balance from account where account_id = 1
t=3 * ATM waits for Jim to input how much he would like to withdraw * * blocked waiting T1 to commit *
t=4 update account set balance = balance – 10 where account_id = 1 * blocked waiting T1 to commit *
t=5 commit
t=6 * ATM waits for Sue to input how much she would like to withdraw *
t=7 update account set balance = balance – 20 where account_id = 1

At t=2 T2 will be blocked waiting until T1 commits. This is because T2 tries to read accound id 1 which had been changed by T1 but not yet comitted. Only by t=5 T2 is able to progress again. This might not be ideal, especially if Jim takes a while to think how much money he would like to withdraw, Sue might not be very happy thinking why her ATM machine just seem to hung.

With optimistic locking, as the terminology says, we’re being an optimist. We just simply assume a best case scenario where no other transaction is going to modify the object except us. However if another transaction happen to execute on the same time, only by then we do something about it.

Row versioning is a common strategy to achieve optimistic locking. With row versioning, each row is given a version number which gets incremented everytime it’s updated. Each transaction that performs read-then-update operation remembers the version of the row it’s reading, and perform a check on the update that it’s indeed still the same version.

The same example would look like following with row versioning optimistic locking:

Time Jim (T1) Sue (T2)
t=1 select balance, version from account where account_id = 1 (retrieved version = 0)
t=2 select balance, version from account where account_id = 1 (retrieved version = 0)
t=3 * ATM waits for Jim to input how much he would like to withdraw * * ATM waits for Sue to input how much she would like to withdraw *
t=4 update account set balance = balance – 10, version = version + 1 where account_id = 1 and version = 0 (update count = 1, version updated to 1)
t=5  update account set balance = balance – 20, version = version + 1 where account_id = 1 and version = 0 (this will wait until T1 commits)
t=6  commit
t=7 Update count of the update at t=5 is 0 beacuse T1 got in first. ATM could inform Sue that the account balance has changed since she checked it, and she should get the latest balance and try again.

Note that the most important thing here is Sue (T2) doesn’t have to wait Jim (T1) for his input — which can potentially be a long time.

JPA provide automatic support of row versioning via the annotation. When you have entity with annotated field or property, optimistic locking will be enabled automatically.

Following is example of a simplified bank account JPA entity with version field:

[sourcecode language="java"]

public class Account {
@Id private long id;
private String name;
private double balance;
long version;

// Getters and setters omitted for brevity
}
[/sourcecode]

Having a annotated field allow JPA to detect if the entity is stale when it’s about to synchronize the change back to database. An OptimisticLockException will be thrown if update to a stale entity is made:

[sourcecode language="java"]
public void withdraw (long accountId, double amount) {
em.getTransaction().begin();

// Retrieve the account row from the database
Account account = em.find(Account.class, accountId);

// Check the account has enough money. Let’s assume another transaction had updated the account at this point, and our account entity object is now stale
Assert.isTrue(amount
// Withdraw the amount from the account
account.setBalance(account.getBalance() – amount);

// OptimisticLockException will be thrown here because we’re trying to update stale object
em.getTransaction().commit();
}
[/sourcecode]