Tag Archives: email

Setup IMAP on Exchange Server 2013

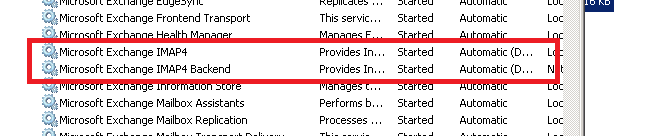
Turn On IMAP Services

On the windows server where exchange runs, ensure Microsoft Exchange IMAP4 and Microsoft Exchange IMAP4 Backend started and set the mode to automatic.

imap-svc

Setup Firewall / NAT Port Forwarding On The Router

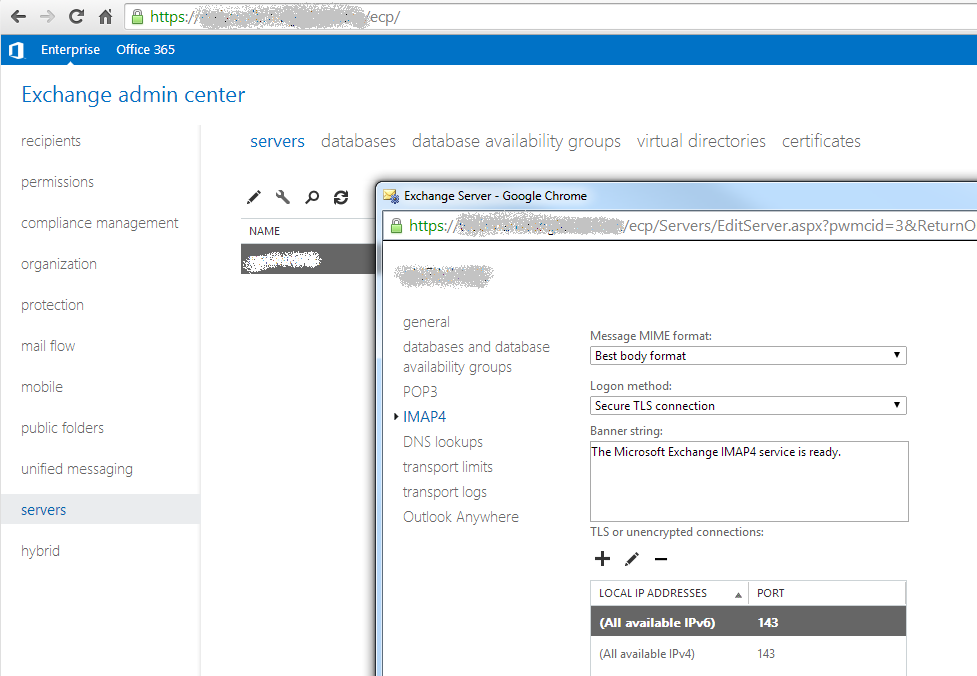
By default IMAP listens to port 143 and 993 (SSL), the idea here is by setting up port forwarding, packets that hits your office IP will be translated and forwarded into the exchange server. There are no generic instruction on how to do this as each router type is different, however conceptually you want to setup a rule to this effect:

When a packet arrives to to port 143 and/or 993, translate it into and forward it to port 143 and/or 993

Keep in mind the Windows server has its own firewall so you might need to open the ports there too

Setup DNS Alias

Typically you would want imap.mycompany.com to point to the Windows server that hosts Exchange. This can be achieved by adding a DNS A Record on your internet domain manager (provided by your domain hosting).

Observe IMAP Settings on Exchange Admin Center (EAC)

Make sure you have it enabled, selected login method to your liking etc:

exchange-eac

And Finally Setup IMAP on Your Phone / Email Client

Depending on your setting, the IMAP details might look like this:

  • IMAP server: imap.mycompany.com
  • Port: 143
  • Enable TLS: true
  • Username:
  • Password:

hMailServer for Outbound Only SMTP Server

If you ever needed to write program that sends email, most likely you’ll need a SMTP server. Here’s how you can configure one on a Windows box using hMailServer.

New Domain

After downloading and installing, you need to add a new domain to hMailServer. In my case I will not be using hMailServer to accept incoming email, hence I did not put the company’s email domain. Doing so will cause email to your colleague to be routed locally and likely fails.

So go ahead add a new domain, and just give it the local machine name (eg: devbox01.local). You have to pick a name that resembles an actual domain (with a dot and suffix), otherwise hMailServer will rejects it.

New Account

Once you’ve setup the domain, create a new account

hmail

Set a password, and that’s it you’re done. You can now use the SMTP server for outbound email

  • Username:
  • Password: whatever password you put in
  • SMTP host: devbox01
  • SMTP port: 25

Important

Now what’s left to do is configuring firewall. If you program runs on the same box you might not need to do anything. However it’s good to check that no outside traffic from internet can connect to port 25 so no-one can abuse your SMTP server.

And as a last word of warning, do not assume all mails will be delivered. This SMTP setup is very basic. Depending on the content you send, SPF, reverse DNS entry, spam filtering of receipient, and gazillion other things, your email might not go through


Sending E-Mail Using GMail SMTP via Apache Commons Emails

GMail provides a handy and reliable SMTP mail server for your program / script. Following are GMail SMTP configuration settings:

  • SMTP Host Name: smtp.gmail.com
  • SMTP Port: 587
  • TLS Enabled: Yes
  • Username:
  • Password:

In Java you can use commons-email to simply send an E-Mail using your GMail account.

First add commons-email jar into your classpath. If you use Maven, simply add following dependency (or newer version if any):


  org.apache.commons
  commons-email
  1.3.1

Following example assumes your GMail email is and password abcd1234.

Email email = new SimpleEmail();
email.setSmtpPort(587);
email.setHostName("smtp.gmail.com");
email.setAuthentication("", "abcd1234");
email.setStartTLSEnabled(true);
email.setFrom("", "John Doe");
email.setSubject("Hi this is testing email only");
email.setMsg("Hello there testing to send email from GMail");
email.addTo("");
email.send();

Note that by default GMail only allows email to be sent from your address (), you cannot send as somebody else for security reason. You need to perform additional configuration to allow external email to be sent via your GMail account.

DNS SPF Record to Reduce Rejection Rate of Your E-Mail

E-mail (and internet) was invented long time ago with the assumption only very few people will do evil, but it’s not the case nowadays. It is possible to send e-mail to anyone posing as anyone else (ie: if you own the domain apple.com, you can send email as banana.com).

SPF stands for Sender Policy Framework. Long story short, it is set on the DNS zone record to configure What host is allowed to send email as your domain

Testing If Your Domain Is Setup Properly

The openspf website has list of tools you can use to check if your domain already has SPF setup properly. For example:

  1. Go to http://www.openspf.org/Why
  2. Enter the email address you’re sending as on MAIL FROM field and your smtp server under Sender's IP address (eg: smtp.apple.com)
  3. The tool was originally designed to debug rejection.. so although it passes it will say “your mail server rejected a message because”. If you read further, if your SPF record was correct it should say The domain mycompany.com has authorized to send mail on its behalf, so the message should have been accepted. It is impossible for us to say why it was rejected., whereas if it’s incorrect it will say The domain mycompany.com has not published an SPF policy. It is possible that the receiving mail server refuses all mail from domains that do not have an SPF policy.

Configuring SPF Record on Your DNS Zone

This can be done on your domain hosting. Add following DNS record to you domain name (eg: mycompany.com)

v=spf1 a mx ?all

This syntax basically says:

  1. Authorize the IP specified by A record as outbound mailer
  2. Authorize the IP specified by MX record as outbound mailer
  3. Mark everything else as Neutral

More Examples

Further Reading

  • SPF Syntax:
  • Excellent article by Jeff Attwood on his Coding Horror blog about sending email through code: http://www.codinghorror.com/blog/2010/04/so-youd-like-to-send-some-email-through-code.html
  • http://aplawrence.com/Blog/B961.html