Suppose you have a Student and Subject entities and you want to create a many-to-many relationship between them. The database table looks something like this:
(name = "students")
public class Student {
  @Id

  private long id;

  private String name = "";

  (cascade = CascadeType.All)
  (name = "students_subjects",
    joinColumns = (name = "student_id", referencedColumnName = "id"),
    inverseJoinColumns = (name = "subject_id", referencedColumnName = "id"))
  private Set subjects = new HashSet();

  /* getters, setters, equals & hashCode */
}
Note how I used CascadeType.All above, this will case any modification to subjects collections to be cascaded automatically when I saved the student entity object.
Also note the use of Set collection instead of List. This will prevent duplicates when querying since JPA wouldn’t know whether the multiple rows are a result of join or simply multiple entries in the result.
And here’s the Subject JPA entity:
(name = "subjects")
public class Subject {

  @Id

  private long id;

  private String name = "";

  (cascade = CascadeType.All)
  (name = "students_subjects",
    joinColumns = (name = "subject_id", referencedColumnName = "id"),
    inverseJoinColumns = (name = "student_id", referencedColumnName = "id"))
  private Set students = new HashSet();

  /* getters, setters, equals & hashCode */
}
Note that the annotation on Subject is similar to Student except the joinColumns and inverseJoinColumns are reversed.
Also since the above example uses HashSet, don’t forget to implement proper equals and hashCode methods.
What is this fancy words “Declarative Transaction Management” (DTM) ? Well.. basically it’s the “magic” behind the annotation in Spring.
By default Spring will use JDK Proxy for DTM, but it’s not without a big (yes BIG) gotchas.. Let’s take a look at below cliche example of transferring money from a bank account to another with slight variation — here several transfer requests are processed together by processBatch method:
public class AccountService {

public void processBatch(List xferReqs) {
    for(TransferReq xferReq : xferReqs) {
      transfer(xferReq.getAmount(),
               xferReq.getFromAccountNo(),
               xferReq.getToAccountNo());
    }
  }


  public void transfer(double amount, long fromAccountNo, long toAccountNo) {
    checkBalanceIsGreaterThan(fromAccountNo, amount);
    withdraw(fromAccountNo, amount);
    deposit(toAccountNo, amount);
  }


  public void checkBalanceIsGreaterThan(long accountNo, double amount) {
    ...
  }


  public void withdraw(long fromAccountNo, double amount) {
    ...
  }


  public void deposit(long toAccountNo, double amount) {
    ...
  }

}
When another class invokes processBatch, you’d expect the database transaction to happen like this:
begin
req1 transfer
req1 checkBalanceIsGreaterThan
req1 withdraw
req1 deposit
commit

begin
req2 transfer
req2 checkBalanceIsGreaterThan
req2 withdraw
req2 deposit
commit
...
But it’s NOT! This is a big hidden pitfall that I’ve fallen into (had to learn the hard way right?). Here’s why..
In JDK Proxy Spring did the “magic trick” by automatically creating a subclass with extra DTM functionality (hence the name “proxy”) in place of the original transactional class. The subclass method actually do the transaction management before calling the underlying method.
This has the implication that transaction management will only occur if the method you invoke from a different class is a method.
Since in above example the processBatch method invoked is not a method, transaction management will not be performed!
Here’s a rough example of what the auto-created JDK proxy class might look like:
public class AccountServiceProxy extends AccountService {
public void processBatch(List xferReqs) {
super(xferReqs); // <-- Superclass method is invoked here,
// the below transfer method will NOT execute
}
public void transfer(double amount, long fromAccountNo, long toAccountNo) {
// Code to "check if transaction exist, if not create one" goes here..
So yes your database transaction is a mess. Every single statement would be executed in its own transaction (oh no!)..
So How To Fix It?
Well you have several option. First is to keep using JDK Proxy but structure your class such that the first method invokes is a method. In the above example, the processBatch method can be moved into a different class AccountBatchProcessorService, hence when it invokes the proxy class’ transfer method DTM occurs.
Or you leave the code as it is and use the almighty AspectJ..
AspectJ Declarative Transaction Management
With AspectJ, DTM is not done by subclass “proxy”, but there’s a unicorn hiding beneath the cloud that adds DTM code to your method just before it’s compiled (sometimes it’s called “compile-time weaving”).
Here’s how you can enable AspectJ DTM for your project:
On the old-fashioned Spring xml configuration (don’t ask me the new-style annotation config yet, haven’t RTFM), to enable annotation you would have something like this:
  ...

  ...
You need to set it into aspectj mode
Then in your pom.xml, add dependency to spring-aspects
At this point your STS/eclipse project might throw error saying Maven configuration is not up to date. If so do right click on the project -> Maven -> Update project. If the setup is good in STS/eclipse you should see a half circle arrow on methods.
Voila! Your bank transfer should work as expected now
Debugging Database Transaction
Lastly if you’re using Hibernate and log4j, you can get it to spit the SQL statements and ‘begin’ and ‘commit’ log by setting following loggers into DEBUG
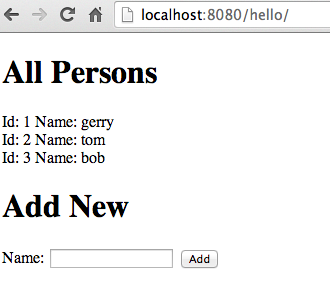
The goal of this article is to create a bare minimum Spring MVC project with JPA (with Hibernate provider) as persistence provider and MySQL as the DBMS. To test everything works I’ll also add a form page allowing you to list all entities and add a new one.
Environment:
jdk 6
Spring 3.2.8.RELEASE
Hibernate 4.3.3.Final
STS 3.4.0.RELEASE
MySQL database running on localhost port 3306. The database name is hello with username root and no password.
Steps:
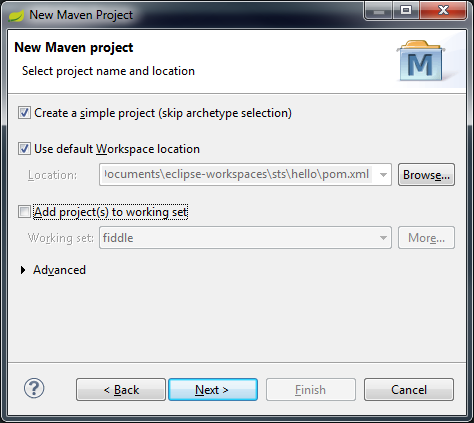
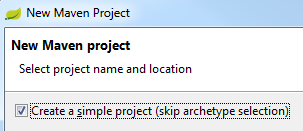
From STS, create a new Maven Project. Since we’re starting from scratch, tick Create a simple project (skip archetype selection). Hit Next.
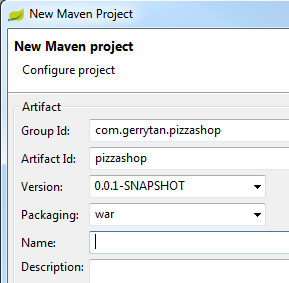
On the next New Maven Project dialog that comes up, give it a group id, artifact id and set the packaging to war. A minimal maven project will be setup for you when you hit Finish
The default maven project is setup to use jdk 1.5, to switch it to 1.6, open pom.xml and add following xml section under the element.
maven-compiler-plugin1.61.6
Right click the project on Package Explorer -> Maven -> Update Project.. once this is done to update the eclipse build path into jdk 1.6
Add maven dependencies for Spring, JPA, Hibernate, Java EE, MySQL and other supporting jars. Again this goes to your pom.xml
Create the web deployment descriptor src/main/webapp/WEB-INF/web.xml. We will setup Spring MVC here with bean context configuration xml file set to /WEB-INF/spring-context.xml
Create a Spring Bean Configuration File placed on src/main/webapp/spring-context.xml. There are plenty important setups here including annotation-based MVC controller, view resolver, transaction config, data source, entityManagerFactory and transaction manager.
Create src/main/resources/META-INF/persistence.xml. This is the persistence unit configuration. It tells JPA what provider will be used, persistence unit type and hibernate configs.
org.hibernate.ejb.HibernatePersistence
Create a simple entity class to test our setup. Let’s call this entity Person. It has an id and name field.
package hello;


(name = "person")
public class Person {

  @Id

  private int id;

  private String name;

  /* getters & setters */

}
And setup mysql database and table to store this entity. The table columns correspond to the Person class fields above. Also note we inform JPA of mysql AUTO_INCREMENT by using annotation:
CREATE DATABASE IF NOT EXISTS hello;

USE hello;

CREATE TABLE person (
  id INT PRIMARY KEY AUTO_INCREMENT,
  name VARCHAR(50)
);
Create a simple service to list all and add a Person entity
package hello;


public class PersonService {

  // An EntityManager will be automatically injected from EntityManagerFactory setup on
  // spring-context.xml
  ext
  private EntityManager em;

  // Since we've setup  and transaction manager on spring-context.xml,
  // any bean method annotated with  will cause Spring to magically call
  // begin() and commit() at the start/end of the method. If exception occurs it will also
  // call rollback()

  public List getAll() {
    List result = em.createQuery("SELECT p FROM Person p", Person.class).getResultList();
    return result;
  }


  public void add(Person p) {
    em.persist(p);
  }
}
Create a HomeController class to map HTTP requests. The package name I used is hello:
package hello;


("/")
public class HomeController {

   private PersonService personSvc;

  /**
   * Requests to http://localhost:8080/hello will be mapped here.
   * Everytime invoked, we pass list of all persons to view
   */
  (method = RequestMethod.GET)
  public String listAll(Model model) {
    model.addAttribute("persons", personSvc.getAll());
    return "home";
  }

  /**
   * POST requests to http://localhost:8080/hello/addPerson goes here.
   * The new person data is passed from HTML from and bound into the
   * Person object.
   */
  (value = "/addPerson", method = RequestMethod.POST)
  public String addPerson( Person person) {
    personSvc.add(person);
    return "redirect:/";
  }
}
Finally add the form jsp file located on src/main/webapp/WEB-INF/home.jsp
This article is tested against Java EE 6, Hibernate 4.2.2.
One To Many Unidirectional Relationship
Unidirectional here means you can only obtain related entities from one side. For example supposed we have one to many Customer --> Account relationship, here’s what Customer entity look like
public class Customer {

  @Id

  private long id;

  private String name;


  (name = "customer_id")
  private Set accounts;

  // getters & setters..
}
Instead of Set, you can use List, however if you have more than one relationship in your entity class, you will get MultipleBagFetchException.
And This is what Account looks like. Notice there’s no reference to Customer object from Account.
public class Account {

  @Id

  private long id;

  private double balance;

  // Getters & Setters ..
}
One To Many Bidirectional Relationship
Similar to unidirectional except you can obtain relation from both direction. This is what Customer and Account look like:
public class Customer {

  @Id

  private long id;

  private String name;

  (mappedBy = "customer")
  private Set accounts;

  // getters & setters..
}
The “customer” on (mappedBy = "customer") refers to customer java property on Account entity.
public class Account {

  @Id

  private long id;

  private double balance;


  (name = "customer_id")
  private Customer customer;

  // Getters & Setters ..
}
The (name = "customer_id") annotation sets the database foreign key column name to be “customer_id”.
Lazy / Eager Loading
Lazy / Eager refers to when does entity relationship get populated. Eager means it will get populated as soon as the entity is obtained from database, where in Lazy it’s only populated when you request the relationship for the first time.
The default value for is LAZY, but for it’s EAGER. It’s a good practice to explicitly configure it so your code is easier to understand
public class Customer {
  ...
  (mappedBy = "customer", fetch = FetchType.LAZY)
  private Set accounts;
  ...
}
public class Account {
  ...
  (fetch = FetchType.EAGER)
  (name = "customer_id")
  private Customer customer;
  ...
}
LazyInitializationException: could not initialize proxy – no Session
Almost every Hibernate/JPA noobie struggle with this exception when they started learning (including myself). This is basically saying you’re tring to access unfetched data after transaction has been closed.
If you use Spring declarative transaction management, transaction start and finish mark are declared by simply annotating DAO method with . Let’s see a common failure where LazyInitializationException can happen.
Here’s your CustomerDAO class:
public class CustomerDAO {

  ext private EntityManager em;


  public List getAllCustomers() {
    List customers = em.createQuery("select c from Customer",
      Customer.class).getResultList();
    return customers;
  }
Then on your controller you populate your Model object with list of Customers, and on your view your JSP tried to access Accounts associated with each customer:
Since the transaction is already closed when CustomerDAO.getAllCustomers() method returns, this will throw LazyInitializationException.
My preferred strategy to overcome this problem is to prefetch the related entities on the DAO, so all the information we need is available on view level in detached state. Other strategy being opening a transaction / session while view is being generated (see: ). To achieve this, change the getAllCustomers() DAO method to use JPQL left join fetch syntax like this:
public class CustomerDAO {
  ...

  public List getAllCustomers() {
    List customers = em.createQuery(
      "select distinct c from Customer " +
      "left join fetch c.accounts",
      Customer.class).getResultList();
    return customers;
  }
  ...
}
Now you can iterate and access all related accounts entities without exceptions.
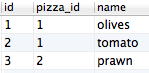
Let’s assume you want to add a new table called topping, each pizza can have several toppings (one to many relationship).
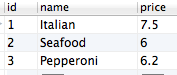
Pizza table
Topping table
First code the Topping entity class:
(name = "topping")
public class Topping {
  @Id

  private long id;

  private String name;


  (name = "pizza_id", referencedColumnName = "id")
  private Pizza pizza;

  // getters & setters..
}
Notice the usage of and annotation. This allows the owning Pizza to be queried from the Topping. This also says “in order to find pizza that owns this topping, have a look at pizza_id column on topping table, match it with id column on pizza table”
And let’s have a look at our modified Pizza entity class:
(name = "pizza")
public class Pizza {
  @Id  private long id;
  private String name;
  private double price;

  (mappedBy = "pizza", fetch = FetchType.LAZY)
  private List toppings;

  // getters & setters
}
This setups a bi-directional relationship where you can obtain list of toppings from a Pizza object, and the owning Pizza from a Topping object. The mappedBy attribute refers to the java property name of Pizza reference on the Topping class.
The FetchType.LAZY setting tells Hibernate not to bother populating the toppings unless we ask it to (this is handy to conserve memory if you have a long chains of relationships with thousands of objects on it).
Next if I want to list my pizzas with its topping, I can write following method on my DAO class:
public List findAllWithToppings() {
  Session session = sessionFactory.getCurrentSession();
  List pizzas = session.createQuery("select distinct p from Pizza as p left join fetch p.toppings").list();
  return pizzas;
}
The above hibernate query will roughly translate into following SQL:
select * from pizza p left outer join topping t on p.id = t.pizza_id;
This is a tutorial to build a very simple pizzashop Spring MVC, Hibernate and MySQL application. The main page shows all pizza rows stored on a database table:
Technology in Java world moves very fast. Using straight Hibernate might no longer be preferable since Java EE 5 introduces JPA (Java Persistence API) but it’s still good to learn anyway. Spring MVC and Hibernate is one of the most popular Java libraries used out there.
Tools / Environment Required
If you’re just starting fresh and don’t have most of the tools below just install JDK, STS (Springsource Tools Suite) and MySQL server, everything else is bundled within them.
First, create new Maven project on STS. Skip archetype selection. Pick maven group id, artifact id and select packaging to war.
By default Maven will use JDK 1.5, re-configure it to use 1.6. Add following maven-compiler-plugin section to pom.xml under element. Ensure the change takes effect by updating maven project settings (right click on project -> Maven -> Update project…).
Now all the boilerplate code done, we can start coding the business functionality. For this simple app we will have a pizza database table with just id, name and price column. Create the Pizza entity class representing the table
package com.gerrytan.pizzashop;
// imports ..


(name = "pizza")
public class Pizza {
  @Id  private long id;
  private String name;
  private double price;
  /* getters & setters */
}
Create a DAO class to obtain Pizza entity persisted on database. Note that we won’t create service layer classes for the sake of simplicity (on real-life complex business application adding service layer is a good practice).
package com.gerrytan.pizzashop;
// imports..


s({"unchecked", "rawtypes"})
public class PizzaDAO {
   private SessionFactory sessionFactory;

  /**
   *  annotation below will trigger Spring Hibernate transaction manager to automatically create
   * a hibernate session. See src/main/webapp/WEB-INF/servlet-context.xml
   */

  public List findAll() {
    Session session = sessionFactory.getCurrentSession();
    List pizzas = session.createQuery("from Pizza").list();
    return pizzas;
  }
}
Create a Spring MVC controller to handle request from the main page. Note that PizzaDAO reference is injected, and after collection of Pizza entity objects are obtained it’s passed to the view using Model object.
package com.gerrytan.pizzashop;
// imports..


("/")
public class PizzaController {

   private PizzaDAO pizzaDAO;

  /**
   * This handler method is invoked when
   * http://localhost:8080/pizzashop is requested.
   * The method returns view name "index"
   * which will be resolved into /WEB-INF/index.jsp.
   *  See src/main/webapp/WEB-INF/servlet-context.xml
   */
  (method = RequestMethod.GET)
  public String list(Model model) {
    List pizzas = pizzaDAO.findAll();
    model.addAttribute("pizzas", pizzas);
    return "index";
  }
}
Add a JSP view to list all the pizza entities passed by the controller src/main/webapp/WEB-INF/index.jsp
It is assumed you have MySQL server running on your local machine (localhost) on the default port 3306. The name of the schema is pizzashop and table pizza. Have a look at Spring beans configuration section above to reconfigure this.
Running The Code
The easiest way to run your code is using in-memory Maven Tomcat plugin. It will launch on-the-fly Tomcat server with your code deployed. Make sure your project is selected on the project exploded and setup a maven run configuration on STS. Go to Run -> Run Configurations.. and create a new maven build entry like this:
Click Run and navigate your browser to http://localhost:8080/pizzashop
Well done on making it this far. Hopefully that was a quick and nice introduction to Spring MVC + Hibernate + MySQL and you can see how the tedious database to java class mapping is now simplified. You might have lots of questions in your mind by now — feel free to ask in the comment section below. Following are few official references and community article links you can browse around:
I just a hard time trying to enable transactions logging for hibernate. Checked many times and it said the logger name is
org.hibernate.transaction=DEBUG
But not a single logging output is given.
I then dig a bit deeper into the source code. Realized my hibernate version is 4.2.2 (latest doc as of writing this post is 4.2.1) and they seem to have refactored the package name into
org.hibernate.engine.transaction=DEBUG
And yes finally I can see my transactions being logged.
One of the trickiest thing to do when developing database-backed application is deciding when and where to start and finish the transaction (eg: where should you draw the transaction boundary line).
Consider a very simple banking application with an AccountService class having getBalance(), debit(), credit() and transfer() methods. Transfer() calls getBalance() to validate the from-account has enough money, and then debit() the from-account and credit() the to-account.
All of the business steps of transfer() method have to be done in one transaction right? (why? — c’mon.. if you don’t do it in one transaction then it’s possible the balance got changed by another transaction between checking for sufficient money, debiting & crediting. The bank will lose reputation and have apologize to the poor customer.).
Pseudocode/sql for each method on AccountService class look somewhat like following:
If you programatically hard-code the transaction boundary into getBalance(), debit() and credit() method, then it might look something like this:
  public void debit(long accountId, double amount) {
    em.getTransaction().begin(); // start a new transaction
    Account account = em.find(Account.class, accountId);
    account.setBalance(account.getBalance() - amount);
    em.getTransaction().commit(); // commit
  }
But hangon, now you need to invoke all those 3 methods within 1 single transaction, your code might need to do something more complicated than that. If you change the transaction boundary into the transfer() method, then other clients that have been using getBalance(), debit(), credit() methods happily for other stuffs will be impacted — they now have to manually open and close transaction before calling those method (ugly).
Even worse, you may be considering to copy & paste the inside of getBalance(), debit() and credit() code into the transfer() method.. PLEASE DON’T!.. Remember Don’t Repeat Yourself principle!
Fortunately Spring provides a much better way of figuring out transaction boundary. All you need to do is to declare that your method needs an active transaction to be open. You do this by adding annotation to your method, plus bootstrapping few configurations
Your AccountService methods look like following now:
  public double getBalance(long accountId) {
     // do stuff here
  }


  public void debit(long accountId, double amount) {
    // do stuff here
  }


  public void credit(long accountId, double amount) {
    // do stuff here
  }


  public void transfer(long fromAccountId, long toAccountId, double amount) {
    // call getBalance(), check from account has enough money

    // call debit()

    // call credit
  }
And the magic happens! When you call the transfer() method, Spring detects you don’t have an open transaction, so it creates a new one. When transfer() calls getBalance(), Spring won’t create a new transaction because it detects there’s a currently open one. It will assign the open transaction into getBalance() method instead. The same applies to debit() and credit(). This is also known as Transaction Propagation.
Spring does this magic via a technique called AOP (Aspect Oriented Programming). Simply speaking, Spring transaction manager will be notified everytime annotated method is invoked / returned, and take action (start new transaction, assign existing one, close, etc.)
I’ve created a demo project with a unit test so you can try this yourself. Make sure you have jdk 1.6 and Maven 3 installed. SVN Checkout , have a feel around the classes and run mvn test. The output will be available at target/surefire-reports/com.wordpress.gerrytan.springtx.AccountServiceTest-output.txt. I’ve configured the logging such that you can see when hibernate (JPA) creates / commit / rollback transaction, and issues SQL to synchronize the persistence context.
2012-05-31 01:06:26,430 [main] DEBUG com.wordpress.gerrytan.springtx.AccountServiceTest - ----- Transfer $20 from account 2 to 1 -----
2012-05-31 01:06:26,430 [main] DEBUG org.hibernate.transaction.JDBCTransaction - begin
2012-05-31 01:06:26,431 [main] DEBUG org.hibernate.transaction.JDBCTransaction - current autocommit status: true
2012-05-31 01:06:26,431 [main] DEBUG org.hibernate.transaction.JDBCTransaction - disabling autocommit
2012-05-31 01:06:26,431 [main] DEBUG org.hibernate.SQL - select account0_.id as id0_0_, account0_.balance as balance0_0_, account0_.name as name0_0_, account0_.version as version0_0_ from account account0_ where account0_.id=?
2012-05-31 01:06:26,432 [main] DEBUG org.hibernate.SQL - select account0_.id as id0_0_, account0_.balance as balance0_0_, account0_.name as name0_0_, account0_.version as version0_0_ from account account0_ where account0_.id=?
2012-05-31 01:06:26,433 [main] DEBUG org.hibernate.transaction.JDBCTransaction - commit
2012-05-31 01:06:26,437 [main] DEBUG org.hibernate.SQL - update account set balance=?, name=?, version=? where id=? and version=?
2012-05-31 01:06:26,437 [main] DEBUG org.hibernate.SQL - update account set balance=?, name=?, version=? where id=? and version=?
2012-05-31 01:06:26,438 [main] DEBUG org.hibernate.transaction.JDBCTransaction - re-enabling autocommit
2012-05-31 01:06:26,438 [main] DEBUG org.hibernate.transaction.JDBCTransaction - committed JDBC Connection
2012-05-31 01:06:26,438 [main] DEBUG com.wordpress.gerrytan.springtx.AccountServiceTest - ----- Completed Transfer $20 from account 1 to 2 -----
Following are useful resources for further learning:
Spring Framework Reference Doc – Chapter 11 Transaction Management:
Spring Roo Reference Doc (Roo is a cool Spring source-code rapid generation tool I used for the demo code. Roo can generate a Spring-JPA-Maven source code for you in a zap!):
Gerry's software development journey of trial, errors and re-trials