In case you haven’t heard what Websocket is, long story short it’s a brand new cool technique of asynchronous client-server communication for web application. Instead of periodic / long ajax polling, newer browsers allow you to have a persistent socket (almost like TCP) where both client and server can send messages anytime.
Yes the all-new Spring 4 came with shiny Websocket support! Here’s a stock ticker app to get you started (thanks to raymondhlee’s article for the inspiration). This app will let you add/remove a stock code and update its price every second (by randomly adding / subtracting some percentage)
Environment / Tools
Java 7
Tomcat 7.0.47
Servlet API 3
Spring Framework 4.0.2.RELEASE
Maven Dependencies
Most dependencies are similar to Spring MVC but there’s few addition required to support websocket. You also need to use Servlet 3.
Setup Websocket Message Broker On Servlet Context XML
Apart from the standard Spring MVC config, one new stuff we’re introducing is the Websocket Message Broker. The message broker will help us listening, mapping and sending messages. Note that as suggested by Spring docs we’re using STOMP message protocol and SockJS to support non-websocket browser.
Stock class is a simple POJO with code, price and time fields. I’ve also added getTimeStr() to format the time as string and additional constructor.
package com.gerrydevstory.stockticker;

import java.io.Serializable;
import java.text.DateFormat;
import java.text.SimpleDateFormat;
import java.util.Date;

public class Stock implements Serializable {

  private static final long serialVersionUID = 1L;
  private String code = "";
  private double price = 0.0;
  private Date time = new Date();

  public Stock() {

  }

  public Stock(String code, double price) {
    this.code = code;
    this.price = price;
  }

  private DateFormat df = new SimpleDateFormat("dd MMM yyyy, HH:mm:ss");

  public String getTimeStr() {
    return df.format(time);
  }

  /* standard getters & setters */

}
Broadcast Prices And Add / Remove Stock
At the core of this app is the HomeController class. There’s a updatePriceAndBroadcast() method which is scheduler to run every 1 second using TaskScheduler. This controller also has websocket handler method to add new stock and remove all. Note the usage of annotation, it will make more sense once we go through the javascript part below.
package com.gerrydevstory.stockticker;


public class HomeController {

   private SimpMessagingTemplate template;
  private TaskScheduler scheduler = new ConcurrentTaskScheduler();
  private List stockPrices = new ArrayList();
  private Random rand = new Random(System.currentTimeMillis());

  /**
   * Iterates stock list, update the price by randomly choosing a positive
   * or negative percentage, then broadcast it to all subscribing clients
   */
  private void updatePriceAndBroadcast() {
    for(Stock stock : stockPrices) {
      double chgPct = rand.nextDouble() * 5.0;
      if(rand.nextInt(2) == 1) chgPct = -chgPct;
      stock.setPrice(stock.getPrice() + (chgPct / 100.0 * stock.getPrice()));
      stock.setTime(new Date());
    }
    template.convertAndSend("/topic/price", stockPrices);
  }

  /**
   * Invoked after bean creation is complete, this method will schedule
   * updatePriceAndBroacast every 1 second
   */

  private void broadcastTimePeriodically() {
    scheduler.scheduleAtFixedRate(new Runnable() {
       public void run() {
        updatePriceAndBroadcast();
      }
    }, 1000);
  }

  /**
   * Handler to add one stock
   */
  ("/addStock")
  public void addStock(Stock stock) throws Exception {
    stockPrices.add(stock);
    updatePriceAndBroadcast();
  }

  /**
   * Handler to remove all stocks
   */
  ("/removeAllStocks")
  public void removeAllStocks() {
    stockPrices.clear();
    updatePriceAndBroadcast();
  }

  /**
   * Serve the main page, view will resolve to /WEB-INF/home.jsp
   */
  (value = "/", method = RequestMethod.GET)
  public String home() {
    return "home";
  }

}
Client Side Stuff
To render the stock prices, I created an empty HTML table. The idea is we will empty the table and fill it in with new prices per update
Code
Price
Time
Underneath that, I’ll also add few form input so you can add a new stock and remove everything
Code:
Price:
The javascript stuff is a bit complicated. Apart from JQuery, there are 2 libraries used here: StompJS and SockJS. As opposed of using direct API, SockJS provides fallback for older browser not supporting websocket. StompJS provides higher level abstraction of sending and receiving messages in STOMP protocol.
StompJS did not come with CDN, so I had to manually download it and place it on src/main/webapp/resources/stomp.js
Next is the inline script block. Here I used SockJS to connect to the Spring websocket STOMP endpoint /ws (recall servlet-context.xml above). My webapp context path is /stockticker.
//Create stomp client over sockJS protocol
var socket = new SockJS("/stockticker/ws");
var stompClient = Stomp.over(socket);

// Callback function to be called when stomp client is connected to server
var connectCallback = function() {
  stompClient.subscribe('/topic/price', renderPrice);
};

// Callback function to be called when stomp client could not connect to server
var errorCallback = function(error) {
  alert(error.headers.message);
};

// Connect to server via websocket
stompClient.connect("guest", "guest", connectCallback, errorCallback);
The connectCallback function above registers renderPrice callback when a message is sent to /topic/price. This function empties the result HTML table and re-add the cells with new stock price
// Render price data from server into HTML, registered as callback
// when subscribing to price topic
function renderPrice(frame) {
var prices = JSON.parse(frame.body);
$('#price').empty();
for(var i in prices) {
var price = prices[i];
$('#price').append(
$('
').append(
$('
').html(price.code),
$('
').html(price.price.toFixed(2)),
$('
').html(price.timeStr)
)
);
}
}
And lastly, utilising JQuery let’s create handlers for adding and removig stocks
// Register handler for add button
$(document).ready(function() {
$('.add').click(function(e){
e.preventDefault();
var code = $('.new .code').val();
var price = Number($('.new .price').val());
var jsonstr = JSON.stringify({ 'code': code, 'price': price });
stompClient.send("/app/addStock", {}, jsonstr);
return false;
});
});
// Register handler for remove all button
$(document).ready(function() {
$('.remove-all').click(function(e) {
e.preventDefault();
stompClient.send("/app/removeAllStocks");
return false;
});
});
Download And Try The Source Code
The source code of this demo app . Clone it using git:
git clone .git
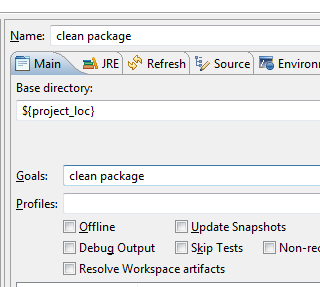
Import it as Existing Maven Project in STS (File > Import > Existing Maven Project) and run on in-memory Tomcat 7.0.47 using following Run Configuration (Run > Run Configurations…):
And this Tomcat container has to run on Java 7 to enable Websocket support.
Session based shopping cart can be implemented in Spring MVC without much complicated HttpSession read/write. The small web-app we’ll build is like following. The main page will list the cart content plus there’s a form at the bottom allowing you to add new product to the cart:
First let’s create our Product domain class (don’t forget to make it Serializable since we’ll be storing it in session):
package com.gerrydevstory.shoppingcart;
public class Product implements Serializable {
private static final long serialVersionUID = 1L;
private String name;
private double price;
/* getters & setters */
}
We will define shopping cart as a collection of Product. Here I will simply use an ArrayList to implement my shopping cart. I will utilize Spring MVC’s and e annotation in my controller:
package com.gerrydevstory.shoppingcart;
("/")
es({"cart"})
public class HomeController {
/**
* Creates a new cart if one does not exist in session.
*/
(method = RequestMethod.GET)
public String get(Model model) {
if(!model.containsAttribute("cart")) {
model.addAttribute("cart", new ArrayList());
}
return "home";
}
/**
* The shopping cart (list of products) is stored in session. Simply inject it using
* method argument
*/
(value = "addProduct", method = RequestMethod.POST)
public String addProduct( Product product,
("cart") List cart) {
cart.add(product);
return "redirect:/";
}
}
The trick here is there are 2 important things happening every time a handler method is invoked. First Spring will attempt to populate the model from session (if one not already provided in the request). And when the handler method exits, the attributed will be saved to session.
And finally the JSP form to list and add the product:
Encountered a strange problem with Spring MVC running on Tomcat 7 today. I had a with 1 max thread capacity on my application which wasn’t working as it supposed to. My Runnable task look something like this:
public class LongRunningTask implements Runnable {
private HttpServletRequest request;
public LongRunningTask(HttpServletRequest request) {
this.request = request;
}
public void run() {
// do something ..
}
}
Notice I originally added a reference to HttpServletRequest with the intention of obtaining the remote host and address of the client. My controller class look something like this:
public class HomeController {
private ThreadPoolTaskExecutor taskExecutor;
(...)
public String schedule(HttpServletRequest req, ...) {
taskExecutor.submit(new LongRunningTask(req));
}
}
With the hope that user’s get their response immediately while the actual work is still queued on the background.
Turns out this caused all sorts of strange behavior. Sometime the task will run, most of the time it will just sit in the queue forever / won’t even queue at all.
After further research and trial and error, I figured out this was because my runnable is holding a reference to HttpServletRequest. When I refactored the code the task executor work as per normal again.
I’ve came into a conclusion that holding to a HttpServletRequest object for longer than necessary is not a good practice.
If you use full Java EE container such as JBoss or Glassfish — and you (are fortunate enough) to use Maven. Here’s a simple way to pull all Java EE dependencies into your classpath. Add following dependency into your pom.xml:
javaxjavaee-api6.0provided
Notice the scope is set to provided, this is important because on runtime all those classes will be provided by your container.
Also the above is for Java EE 6. You can use following for Java EE 7:
Still on the Java EE 7 hype, here’s a quick cheat sheet on how to create a minimal Java EE 7 ready maven project:
Ensure you have Eclipse Indigo installed with m2e (maven connector). If not you can drag and drop this logo into running Eclipse instance (thanks m2e team)
Create new maven project, tick Create a simple project (skip archetype selection), on the next screen provide Group Id, Artifact Id, and set Packaging to war. Hit Finish
Open pom.xml, switch to source view. Add Java EE 7 dependency. Set the scope to provided so that it is included at compile time, but not on the war bundle (because it should be provided by container)
Tell Maven to compile using JDK 7, otherwise the deafault is JDK 5
maven-compiler-plugin3.11.71.7
And finally prevent maven-war-plugin from complaining because of missing web.xml. New Java EE 7 style provides good annotation support, web.xml can be omitted for a simple project
maven-war-plugin2.3false
Right click on the project -> Maven -> Update Project… -> OK. This will cause m2e to synchronize with all changes we made
Test your new project by running clean package
You should end up with a war bundle with your project name under target directory
With the new launch of Java EE 7, I felt the quickest way to get a taste of it is to use Glassfish (Java EE reference implementation). Here’s how to get started with Glassfish and Eclipse:
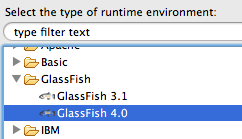
Ensure you have Eclipse installed. First we’ll add Glassfish runtime environment. On Eclipse, go to Preferences -> Server -> Runtime Environments -> Add and select Glassfish -> Glassfish 4.0 (Select Download additional server adapter if you can’t find it).
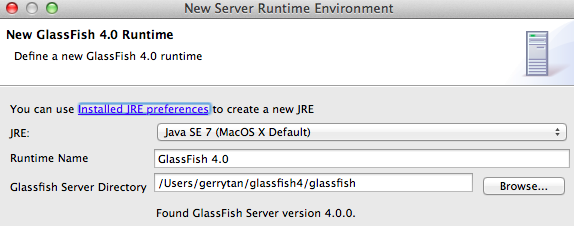
Hit Next, select Java 7 runtime and glassfish directory (On windows this is normally C:glassfish4glassfish)
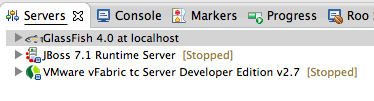
Next, create a new Glassfish server. Ctrl+N (or Cmd+N on Mac) and select Server -> Server. Select server type GlassFish -> GlassFish 4.0. Accept all defaults and hit Finish. You should now have a Glassfish server on your Servers tab on eclipse:
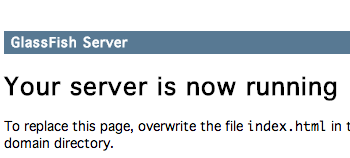
To test your server, select the Glassfish 4.0 Server from Eclipse server tab and right click -> Start. Glassfish server will output few messages to the console, and you can verify by opening http://localhost:8080 on your browser, you will see something like this:
Right click the server -> Stop to stop the server.
Create New Glassfish Application Project
Now we have eclipse wired to Glassfish, we can begin coding the application.
Create a new dynamic web project: Ctrl+N (or Cmd+N on Mac) -> Select Web -> Dynamic web project. Configure it like following:
Accept all default (or configure if you need to) and hit Finish
One of the trickiest thing to do when developing database-backed application is deciding when and where to start and finish the transaction (eg: where should you draw the transaction boundary line).
Consider a very simple banking application with an AccountService class having getBalance(), debit(), credit() and transfer() methods. Transfer() calls getBalance() to validate the from-account has enough money, and then debit() the from-account and credit() the to-account.
All of the business steps of transfer() method have to be done in one transaction right? (why? — c’mon.. if you don’t do it in one transaction then it’s possible the balance got changed by another transaction between checking for sufficient money, debiting & crediting. The bank will lose reputation and have apologize to the poor customer.).
Pseudocode/sql for each method on AccountService class look somewhat like following:
If you programatically hard-code the transaction boundary into getBalance(), debit() and credit() method, then it might look something like this:
public void debit(long accountId, double amount) {
em.getTransaction().begin(); // start a new transaction
Account account = em.find(Account.class, accountId);
account.setBalance(account.getBalance() - amount);
em.getTransaction().commit(); // commit
}
But hangon, now you need to invoke all those 3 methods within 1 single transaction, your code might need to do something more complicated than that. If you change the transaction boundary into the transfer() method, then other clients that have been using getBalance(), debit(), credit() methods happily for other stuffs will be impacted — they now have to manually open and close transaction before calling those method (ugly).
Even worse, you may be considering to copy & paste the inside of getBalance(), debit() and credit() code into the transfer() method.. PLEASE DON’T!.. Remember Don’t Repeat Yourself principle!
Fortunately Spring provides a much better way of figuring out transaction boundary. All you need to do is to declare that your method needs an active transaction to be open. You do this by adding annotation to your method, plus bootstrapping few configurations
Your AccountService methods look like following now:
public double getBalance(long accountId) {
// do stuff here
}
public void debit(long accountId, double amount) {
// do stuff here
}
public void credit(long accountId, double amount) {
// do stuff here
}
public void transfer(long fromAccountId, long toAccountId, double amount) {
// call getBalance(), check from account has enough money
// call debit()
// call credit
}
And the magic happens! When you call the transfer() method, Spring detects you don’t have an open transaction, so it creates a new one. When transfer() calls getBalance(), Spring won’t create a new transaction because it detects there’s a currently open one. It will assign the open transaction into getBalance() method instead. The same applies to debit() and credit(). This is also known as Transaction Propagation.
Spring does this magic via a technique called AOP (Aspect Oriented Programming). Simply speaking, Spring transaction manager will be notified everytime annotated method is invoked / returned, and take action (start new transaction, assign existing one, close, etc.)
I’ve created a demo project with a unit test so you can try this yourself. Make sure you have jdk 1.6 and Maven 3 installed. SVN Checkout , have a feel around the classes and run mvn test. The output will be available at target/surefire-reports/com.wordpress.gerrytan.springtx.AccountServiceTest-output.txt. I’ve configured the logging such that you can see when hibernate (JPA) creates / commit / rollback transaction, and issues SQL to synchronize the persistence context.
2012-05-31 01:06:26,430 [main] DEBUG com.wordpress.gerrytan.springtx.AccountServiceTest - ----- Transfer $20 from account 2 to 1 -----
2012-05-31 01:06:26,430 [main] DEBUG org.hibernate.transaction.JDBCTransaction - begin
2012-05-31 01:06:26,431 [main] DEBUG org.hibernate.transaction.JDBCTransaction - current autocommit status: true
2012-05-31 01:06:26,431 [main] DEBUG org.hibernate.transaction.JDBCTransaction - disabling autocommit
2012-05-31 01:06:26,431 [main] DEBUG org.hibernate.SQL - select account0_.id as id0_0_, account0_.balance as balance0_0_, account0_.name as name0_0_, account0_.version as version0_0_ from account account0_ where account0_.id=?
2012-05-31 01:06:26,432 [main] DEBUG org.hibernate.SQL - select account0_.id as id0_0_, account0_.balance as balance0_0_, account0_.name as name0_0_, account0_.version as version0_0_ from account account0_ where account0_.id=?
2012-05-31 01:06:26,433 [main] DEBUG org.hibernate.transaction.JDBCTransaction - commit
2012-05-31 01:06:26,437 [main] DEBUG org.hibernate.SQL - update account set balance=?, name=?, version=? where id=? and version=?
2012-05-31 01:06:26,437 [main] DEBUG org.hibernate.SQL - update account set balance=?, name=?, version=? where id=? and version=?
2012-05-31 01:06:26,438 [main] DEBUG org.hibernate.transaction.JDBCTransaction - re-enabling autocommit
2012-05-31 01:06:26,438 [main] DEBUG org.hibernate.transaction.JDBCTransaction - committed JDBC Connection
2012-05-31 01:06:26,438 [main] DEBUG com.wordpress.gerrytan.springtx.AccountServiceTest - ----- Completed Transfer $20 from account 1 to 2 -----
Following are useful resources for further learning:
Spring Framework Reference Doc – Chapter 11 Transaction Management:
Spring Roo Reference Doc (Roo is a cool Spring source-code rapid generation tool I used for the demo code. Roo can generate a Spring-JPA-Maven source code for you in a zap!):
Gerry's software development journey of trial, errors and re-trials