Yes you can create your own javascript engine in Java. This is a cool feature I never knew existed. I don’t know how long it’s been around, I’m guessing Java 6.
Well the title lied, there’s no such thing as in-memory MySQL database (or at least I won’t be using it for this article). Instead I will use H2 in-memory database setup to run in “MySQL mode”
If your app just uses plain jdbc then adding above datasource to your test context would be sufficient, but if you use JPA/Hibernate the cost of table setup, scanning etc could be quite significant.
To overcome this you can split the test context using y annotation.
In the example below I have unit tests for two DAOs: AccountDAOTest and CustomerDAOTest:
y({
  ation("/test-root-context.xml"),
  ation("AccountDAOTest-context.xml")
})
(SpringJUnit4ClassRunner.class)
public class AccountDAOTest {
}
y({
  ation("/test-root-context.xml"),
  ation("CustomerDAOTest-context.xml")
})
(SpringJUnit4ClassRunner.class)
public class CustomerDAOTest {
}
By doing this Spring test-root-context.xml will be setup once and reused accross all unit tests. Only put components common to all tests in test-root-context.xml. In my case I put the following:
DataSource
EntityManagerFactory
TransactionManager
All test specific components go into their respective context.
Don’t forget to add if your DAO uses it. This can’t be placed on test-root-context.xml because I don’t scan all my DAOs there.
And lastly — ofcourse — you need to make sure your pom.xml has dependency to spring-test, junit and h2
Asking your user to login immediately after he/she registers might be tedious. Here’s how you can log them in immediately using Spring Security (thanks to this SO thread).
Typically you will have some sort of registration form with a backing controller like this:
("/register")
public class RegisterController {
  ...
  (method = POST)
  public String register( User user) {
    // perform registration logic..
    // redirect back to login page
    return "redirect:/login";
  }
  ...
}
("/register")
public class RegisterController {
  ...
   ("authMgr") private AuthenticationManager authMgr;
   private UserDetailsService userDetailsSvc;

  (method = POST)
  public String register( User user) {
    // perform registration logic..

    // perform login authentication
    try {
      UserDetails userDetails = userDetailsSvc.loadUserByUsername(username);
      UsernamePasswordAuthenticationToken auth = new UsernamePasswordAuthenticationToken(userDetails, password, userDetails.getAuthorities());
      authMgr.authenticate(auth);

      // redirect into secured main page if authentication successful
      if(auth.isAuthenticated()) {
        SecurityContextHolder.getContext().setAuthentication(auth);
        return "redirect:/";
      }
    } catch (Exception e) {
      logger.debug("Problem authenticating user" + username, e);
    }

    return "redirect:/error";
  }
  ...
}
Note that in above code the AuthenticationManager injection is qualified by ("authMgr"). This is to avoid multiple beans ambiguity. In effect in the xml context configuration (if you use one) an id attribute has to be set:
  ...

    ...


    ...

  ...
Also in order for this setup to work, the registration page has to be filtered by spring security
Often you’ll want a particular model attribute to be available everywhere (eg: application version, name, etc). Doing model.addAttribute() everytime is a really bad idea, if you have to refactor it down the track you could end up with hundreds of line modification scattered everywhere.
Using ControllerAdvice
One simple way to achieve this as outlined by Spring documentation is by using Spring 3.1′s e annotation.
Create a new class like this:
e
public class PopulateGlobalAttribute {
("appversion")
public String getAppVersion() {
return "1.0";
}
}
And the getAppVersion() will be used to help each handler method in all controllers to add additional stuff to Model object.
However this method poses one problem. If the handler method is returning a redirect view, the model attributes will be exposed as a query string on the browser URL.
This is my own version of HandlerInterceptor which is based from Josh’s:
public class PopulateGlobalAttrInterceptor implements HandlerInterceptor {
private Map properties = new HashMap();
/**
* This method ensures the global attributes are added only for non-redirection view / view name
*/
public void postHandle(HttpServletRequest req, HttpServletResponse res, Object handler,
ModelAndView mav) throws Exception {
if(mav == null) return;
boolean isRedirectView = mav.getView() instanceof RedirectView;
boolean isViewObject = mav.getView() != null;
boolean viewNameStartsWithRedirect = (mav.getViewName() == null ? true :
mav.getViewName().startsWith(UrlBasedViewResolver.REDIRECT_URL_PREFIX));
if(mav.hasView() && (
( isViewObject && !isRedirectView) ||
(!isViewObject && !viewNameStartsWithRedirect))){
addCommonModelData(mav);
}
}
private void addCommonModelData(ModelAndView mav) {
mav.getModel().putAll(properties);
}
public void afterCompletion(HttpServletRequest req, HttpServletResponse res, Object handler,
Exception ex) throws Exception {
}
public boolean preHandle(HttpServletRequest req, HttpServletResponse res, Object handler)
throws Exception {
return true;
}
/* getters & setters */
}
In SpringMVC HandlerInterceptors are similar like servlet filters, it will be used to filter (intercept) through every requests. Similar like ControllerAdvice, the postHandle method will be invoked by all handlers to help populate the model.
Once you have this you need to register this interceptors. If you use xml based configuration you can do something like this:
  ...


  ...
Now without any additional code, you’re guaranteed ${appversion} is available everywhere on your jsp view.
In case you haven’t heard what Websocket is, long story short it’s a brand new cool technique of asynchronous client-server communication for web application. Instead of periodic / long ajax polling, newer browsers allow you to have a persistent socket (almost like TCP) where both client and server can send messages anytime.
Yes the all-new Spring 4 came with shiny Websocket support! Here’s a stock ticker app to get you started (thanks to raymondhlee’s article for the inspiration). This app will let you add/remove a stock code and update its price every second (by randomly adding / subtracting some percentage)
Environment / Tools
Java 7
Tomcat 7.0.47
Servlet API 3
Spring Framework 4.0.2.RELEASE
Maven Dependencies
Most dependencies are similar to Spring MVC but there’s few addition required to support websocket. You also need to use Servlet 3.
Setup Websocket Message Broker On Servlet Context XML
Apart from the standard Spring MVC config, one new stuff we’re introducing is the Websocket Message Broker. The message broker will help us listening, mapping and sending messages. Note that as suggested by Spring docs we’re using STOMP message protocol and SockJS to support non-websocket browser.
Stock class is a simple POJO with code, price and time fields. I’ve also added getTimeStr() to format the time as string and additional constructor.
package com.gerrydevstory.stockticker;

import java.io.Serializable;
import java.text.DateFormat;
import java.text.SimpleDateFormat;
import java.util.Date;

public class Stock implements Serializable {

  private static final long serialVersionUID = 1L;
  private String code = "";
  private double price = 0.0;
  private Date time = new Date();

  public Stock() {

  }

  public Stock(String code, double price) {
    this.code = code;
    this.price = price;
  }

  private DateFormat df = new SimpleDateFormat("dd MMM yyyy, HH:mm:ss");

  public String getTimeStr() {
    return df.format(time);
  }

  /* standard getters & setters */

}
Broadcast Prices And Add / Remove Stock
At the core of this app is the HomeController class. There’s a updatePriceAndBroadcast() method which is scheduler to run every 1 second using TaskScheduler. This controller also has websocket handler method to add new stock and remove all. Note the usage of annotation, it will make more sense once we go through the javascript part below.
package com.gerrydevstory.stockticker;


public class HomeController {

   private SimpMessagingTemplate template;
  private TaskScheduler scheduler = new ConcurrentTaskScheduler();
  private List stockPrices = new ArrayList();
  private Random rand = new Random(System.currentTimeMillis());

  /**
   * Iterates stock list, update the price by randomly choosing a positive
   * or negative percentage, then broadcast it to all subscribing clients
   */
  private void updatePriceAndBroadcast() {
    for(Stock stock : stockPrices) {
      double chgPct = rand.nextDouble() * 5.0;
      if(rand.nextInt(2) == 1) chgPct = -chgPct;
      stock.setPrice(stock.getPrice() + (chgPct / 100.0 * stock.getPrice()));
      stock.setTime(new Date());
    }
    template.convertAndSend("/topic/price", stockPrices);
  }

  /**
   * Invoked after bean creation is complete, this method will schedule
   * updatePriceAndBroacast every 1 second
   */

  private void broadcastTimePeriodically() {
    scheduler.scheduleAtFixedRate(new Runnable() {
       public void run() {
        updatePriceAndBroadcast();
      }
    }, 1000);
  }

  /**
   * Handler to add one stock
   */
  ("/addStock")
  public void addStock(Stock stock) throws Exception {
    stockPrices.add(stock);
    updatePriceAndBroadcast();
  }

  /**
   * Handler to remove all stocks
   */
  ("/removeAllStocks")
  public void removeAllStocks() {
    stockPrices.clear();
    updatePriceAndBroadcast();
  }

  /**
   * Serve the main page, view will resolve to /WEB-INF/home.jsp
   */
  (value = "/", method = RequestMethod.GET)
  public String home() {
    return "home";
  }

}
Client Side Stuff
To render the stock prices, I created an empty HTML table. The idea is we will empty the table and fill it in with new prices per update
Code
Price
Time
Underneath that, I’ll also add few form input so you can add a new stock and remove everything
Code:
Price:
The javascript stuff is a bit complicated. Apart from JQuery, there are 2 libraries used here: StompJS and SockJS. As opposed of using direct API, SockJS provides fallback for older browser not supporting websocket. StompJS provides higher level abstraction of sending and receiving messages in STOMP protocol.
StompJS did not come with CDN, so I had to manually download it and place it on src/main/webapp/resources/stomp.js
Next is the inline script block. Here I used SockJS to connect to the Spring websocket STOMP endpoint /ws (recall servlet-context.xml above). My webapp context path is /stockticker.
//Create stomp client over sockJS protocol
var socket = new SockJS("/stockticker/ws");
var stompClient = Stomp.over(socket);

// Callback function to be called when stomp client is connected to server
var connectCallback = function() {
  stompClient.subscribe('/topic/price', renderPrice);
};

// Callback function to be called when stomp client could not connect to server
var errorCallback = function(error) {
  alert(error.headers.message);
};

// Connect to server via websocket
stompClient.connect("guest", "guest", connectCallback, errorCallback);
The connectCallback function above registers renderPrice callback when a message is sent to /topic/price. This function empties the result HTML table and re-add the cells with new stock price
// Render price data from server into HTML, registered as callback
// when subscribing to price topic
function renderPrice(frame) {
var prices = JSON.parse(frame.body);
$('#price').empty();
for(var i in prices) {
var price = prices[i];
$('#price').append(
$('
').append(
$('
').html(price.code),
$('
').html(price.price.toFixed(2)),
$('
').html(price.timeStr)
)
);
}
}
And lastly, utilising JQuery let’s create handlers for adding and removig stocks
// Register handler for add button
$(document).ready(function() {
$('.add').click(function(e){
e.preventDefault();
var code = $('.new .code').val();
var price = Number($('.new .price').val());
var jsonstr = JSON.stringify({ 'code': code, 'price': price });
stompClient.send("/app/addStock", {}, jsonstr);
return false;
});
});
// Register handler for remove all button
$(document).ready(function() {
$('.remove-all').click(function(e) {
e.preventDefault();
stompClient.send("/app/removeAllStocks");
return false;
});
});
Download And Try The Source Code
The source code of this demo app . Clone it using git:
git clone .git
Import it as Existing Maven Project in STS (File > Import > Existing Maven Project) and run on in-memory Tomcat 7.0.47 using following Run Configuration (Run > Run Configurations…):
And this Tomcat container has to run on Java 7 to enable Websocket support.
Session based shopping cart can be implemented in Spring MVC without much complicated HttpSession read/write. The small web-app we’ll build is like following. The main page will list the cart content plus there’s a form at the bottom allowing you to add new product to the cart:
First let’s create our Product domain class (don’t forget to make it Serializable since we’ll be storing it in session):
package com.gerrydevstory.shoppingcart;
public class Product implements Serializable {
private static final long serialVersionUID = 1L;
private String name;
private double price;
/* getters & setters */
}
We will define shopping cart as a collection of Product. Here I will simply use an ArrayList to implement my shopping cart. I will utilize Spring MVC’s and e annotation in my controller:
package com.gerrydevstory.shoppingcart;
("/")
es({"cart"})
public class HomeController {
/**
* Creates a new cart if one does not exist in session.
*/
(method = RequestMethod.GET)
public String get(Model model) {
if(!model.containsAttribute("cart")) {
model.addAttribute("cart", new ArrayList());
}
return "home";
}
/**
* The shopping cart (list of products) is stored in session. Simply inject it using
* method argument
*/
(value = "addProduct", method = RequestMethod.POST)
public String addProduct( Product product,
("cart") List cart) {
cart.add(product);
return "redirect:/";
}
}
The trick here is there are 2 important things happening every time a handler method is invoked. First Spring will attempt to populate the model from session (if one not already provided in the request). And when the handler method exits, the attributed will be saved to session.
And finally the JSP form to list and add the product:
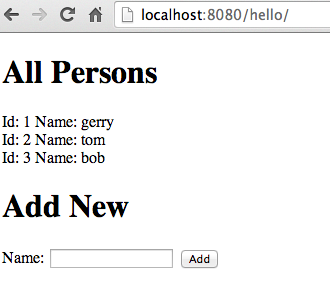
The goal of this article is to create a bare minimum Spring MVC project with JPA (with Hibernate provider) as persistence provider and MySQL as the DBMS. To test everything works I’ll also add a form page allowing you to list all entities and add a new one.
Environment:
jdk 6
Spring 3.2.8.RELEASE
Hibernate 4.3.3.Final
STS 3.4.0.RELEASE
MySQL database running on localhost port 3306. The database name is hello with username root and no password.
Steps:
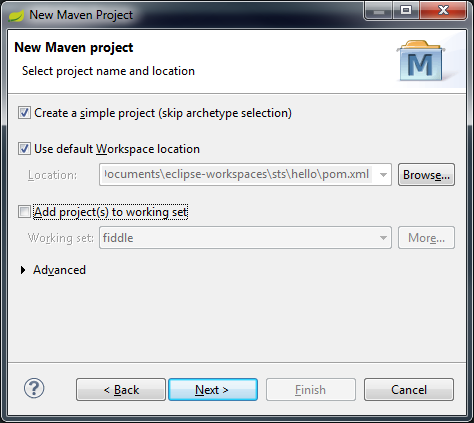
From STS, create a new Maven Project. Since we’re starting from scratch, tick Create a simple project (skip archetype selection). Hit Next.
On the next New Maven Project dialog that comes up, give it a group id, artifact id and set the packaging to war. A minimal maven project will be setup for you when you hit Finish
The default maven project is setup to use jdk 1.5, to switch it to 1.6, open pom.xml and add following xml section under the element.
maven-compiler-plugin1.61.6
Right click the project on Package Explorer -> Maven -> Update Project.. once this is done to update the eclipse build path into jdk 1.6
Add maven dependencies for Spring, JPA, Hibernate, Java EE, MySQL and other supporting jars. Again this goes to your pom.xml
Create the web deployment descriptor src/main/webapp/WEB-INF/web.xml. We will setup Spring MVC here with bean context configuration xml file set to /WEB-INF/spring-context.xml
Create a Spring Bean Configuration File placed on src/main/webapp/spring-context.xml. There are plenty important setups here including annotation-based MVC controller, view resolver, transaction config, data source, entityManagerFactory and transaction manager.
Create src/main/resources/META-INF/persistence.xml. This is the persistence unit configuration. It tells JPA what provider will be used, persistence unit type and hibernate configs.
org.hibernate.ejb.HibernatePersistence
Create a simple entity class to test our setup. Let’s call this entity Person. It has an id and name field.
package hello;
(name = "person")
public class Person {
@Id
private int id;
private String name;
/* getters & setters */
}
And setup mysql database and table to store this entity. The table columns correspond to the Person class fields above. Also note we inform JPA of mysql AUTO_INCREMENT by using annotation:
CREATE DATABASE IF NOT EXISTS hello;
USE hello;
CREATE TABLE person (
id INT PRIMARY KEY AUTO_INCREMENT,
name VARCHAR(50)
);
Create a simple service to list all and add a Person entity
package hello;
public class PersonService {
// An EntityManager will be automatically injected from EntityManagerFactory setup on
// spring-context.xml
ext
private EntityManager em;
// Since we've setup and transaction manager on spring-context.xml,
// any bean method annotated with will cause Spring to magically call
// begin() and commit() at the start/end of the method. If exception occurs it will also
// call rollback()
public List getAll() {
List result = em.createQuery("SELECT p FROM Person p", Person.class).getResultList();
return result;
}
public void add(Person p) {
em.persist(p);
}
}
Create a HomeController class to map HTTP requests. The package name I used is hello:
package hello;
("/")
public class HomeController {
private PersonService personSvc;
/**
* Requests to http://localhost:8080/hello will be mapped here.
* Everytime invoked, we pass list of all persons to view
*/
(method = RequestMethod.GET)
public String listAll(Model model) {
model.addAttribute("persons", personSvc.getAll());
return "home";
}
/**
* POST requests to http://localhost:8080/hello/addPerson goes here.
* The new person data is passed from HTML from and bound into the
* Person object.
*/
(value = "/addPerson", method = RequestMethod.POST)
public String addPerson( Person person) {
personSvc.add(person);
return "redirect:/";
}
}
Finally add the form jsp file located on src/main/webapp/WEB-INF/home.jsp
Found a really tricky and obscure problem. Whenever running my Spring MVC project it fail at startup with this exception:
org.xml.sax.SAXParseException: cos-all-limited.1.2: An ''all'' model group must appear in a particle with '{'min occurs'}'='{'max occurs'}'=1, and that particle must be part of a pair which constitutes the '{'content type'}' of a complex type definition.
I don’t trust debugging Maven unit tests straight using Eclipse’s JUnit plugin, sometime it’s buggy and the classpath don’t match with Maven.
Here’s how you can attach eclipse debugger straight from Maven process. First setup few breakpoints of the suspicious code as per normal, and setup a Maven run configuration like this:
When you run this configuration, Maven will halt right before unit tests are run:
Now create a Remote Java Application Debug configuration pointing to localhost port 5050
This is basically your elementary school rounding. If the fractions to be rounded are equidistant from its neighbor, then round them into the upper neighbour. In other words, if we’re rounding 1 digit after decimal, then if it ends with .5 just add .5. For example:
Fractional Number
Rounded
0.1
0
0.5
1
1.3
1
1.5
2
HALF_EVEN
Similar like HALF_UP, except if the fraction is equidistant, round them into nearest even neighbor. For example:
Fractional Number
Rounded
0.1
0
0.5
0
1.3
1
1.5
2
Why Bother With HALF_EVEN?
Why don’t we just stick with what’s learned in elementary school? Well here’s one good reason: accumulative error. Error here means “How much did we lose/gain by rounding the number?”. Let’s take a look again to both table with its rounding error displayed
Fractional Number
HALF_UP rounding
HALF_UP rounding error
HALF_EVEN rounding
HALF_EVEN rounding error
0.0
0
0.0
0
0.0
0.1
0
-0.1
0
-0.1
0.2
0
-0.2
0
-0.2
0.3
0
-0.3
0
-0.3
0.4
0
-0.4
0
-0.4
0.5
1
0.5
0
-0.5
0.6
1
0.4
1
0.4
0.7
1
0.3
1
0.3
0.8
1
0.2
1
0.2
0.9
1
0.1
1
0.1
1.0
1
0.0
1
0.0
1.1
1
-0.1
1
-0.1
1.2
1
-0.2
1
-0.2
1.3
1
-0.3
1
-0.3
1.4
1
-0.4
1
-0.4
1.5
2
0.5
2
0.5
1.6
2
0.4
2
0.4
1.7
2
0.3
2
0.3
1.8
2
0.2
2
0.2
1.9
2
0.1
2
0.1
2.0
2
0.0
2
0.0
Total
1
0
0
As you can see the accumulative errors for HALF_UP is incrementally higher whereas HALF_EVEN averages out. This is why HALF_EVEN is often called “Banker’s rounding” because given a large amount of data the bank should not gain/loss money because of rounding.
More Surprises With printf
Don’t yet assume all programming language defaults into HALF_EVEN, try below examples of printf in your shell:
Wait.. what? Isn’t 1.000045 supposed to be rounded to 1.00004? Well in floating point realm the reality is more complicated than that, taking into account floating point is often never accurate in the first place.
Try printing 1.000045 with long enough digits after decimal:
Now you can see computers can’t always store accurate value of real numbers in floating point types. (And you should now see why it’s rounded into 1.00005)