The method described on this article is only intended for low critical testing, not production use. I am not liable for any damages / security breaches caused by following this method.
Scenario
I have few servers for development and testing purpose. I need to setup apache on those servers listening over HTTPS but it will only be used by people in my team, it’ll be a bit overkill to purchase SSL certificate just for this pupose.
I can create a self-signed certificate for each servers, and ask individual user to trust it (or otherwise they’ll get red browser warnings), but this is tedious. A better approach is to create a certificate for each server and chain it to our own internal CA. Each user only need to trust one certificate, and anything chained to it is automatically trusted (this can even be done to the whole network using domain controller auto enrollment).
This article will highlight how to create your own Certification Authority (CA), install it on apache and import it to your Windows / Firefox keystore. The tool I’m using is openssl. Following is the hypothetical setting for example purpose:
- Company name: Sunny Happy Co Ltd
- Company e-mail:
- Server name: shcdev01 (web server will be installed on https://shcdev01)
- OpenSSL is installed on C:OpenSSL-Win32
Setup openssl
Most UNIX system come with package manager where you can install openssl. If you’re on windows, download and install openssl here.
Setup Certification Authority (CA)
- Create directory where user certificates generation / chaining will take place, eg: C:SSLCerts
- Create a directory where CA files will be stored: C:SSLCertsSunnyHappyCA
- Copy contents of C:OpenSSL-Win32binPEMdemoCA to C:SSLCertsSunnyHappyCA. This folder contains infrastructure file necessary for certificate chaining. This is a sample folder provided by OpenSSL installation so we don’t have to start from scratch
- Copy C:OpenSSL-Win32binopenssl.cfg to C:SSLCerts. This is the configuration file used when signing certificates. Few values need to be adjusted. Find following configuration keys on openssl.cfg and update it:
- dir = C:/SSLCerts/SunnyHappyCA (This will be used as a relative path of other config items)
- default_days = 7300 (Here I’m setting the default validity of chained certificate to be 20 years)
- default_md = sha1
- Create a new folder C:SSLCertsSunnyHappyCAnewcerts
- Create a new file C:SSLCertsSunnyHappyCAindex.txt.attr and write the value unique_subject = no inside
- Open a command prompt with root / Administrator privilege and cd to C:SSLCerts. Tell openssl where your config file is by running set OPENSSL_CONF=C:/SSLCerts/openssl.cfg
- Create the CA public / private keypair using following command:
openssl req -new -x509 -keyout SunnyHappyCA/private/cakey.pem -out SunnyHappyCA/cacert.pem -days 7300
OpenSSL will prompt you for the key password, make sure you keep it safe since you will be using this again. On the next steps it will prompt you for geographical location and other info, this is what I put:
c:SSLCerts>openssl req -new -x509 -keyout SunnyHappyCA/private/cakey.pem -out SunnyHappyCA/cacert.pem -days 7300
Generating a 1024 bit RSA private key
.++++++
..++++++
writing new private key to 'SunnyHappyCA/private/cakey.pem'
Enter PEM pass phrase:
Verifying - Enter PEM pass phrase:
-----
You are about to be asked to enter information that will be incorporated
into your certificate request.
What you are about to enter is what is called a Distinguished Name or a DN.
There are quite a few fields but you can leave some blank
For some fields there will be a default value,
If you enter '.', the field will be left blank.
-----
Country Name (2 letter code) [AU]:AU
State or Province Name (full name) [Some-State]:NSW
Locality Name (eg, city) []:Sydney
Organization Name (eg, company) [Internet Widgits Pty Ltd]:Sunny Happy Co Ltd
Organizational Unit Name (eg, section) []:
Common Name (e.g. server FQDN or YOUR name) []:Sunny Happy Root CA
Email Address []:
And I (again) set the validity to be 20 years (7300 days). The private key will go to SunnyHappyCA/private/cakey.pem and the public key SunnyHappyCA/cacert.pem. You now have a root CA keypair done!
Server Certificate Generation & Chaining
Server in here means our web / app server for testing purpose. In our case it sits on the unix host schdev01.
- Generate private key and certificate request for the server
openssl req -new -keyout shcdev01_key.pem.orig -out shcdev01_req.pem
Openssl will again prompt for password but this is different than the CA password. It will also prompt for similar locality information. It’s very important you put the Common Name into the corresponding server DNS name (schdev01 in this case), because this is what will be used on handshake.
c:SSLCerts>openssl req -new -keyout shcdev01_key.pem.orig -out shcdev01_req.pem
Generating a 1024 bit RSA private key
.....................................................++++++
..................................++++++
writing new private key to 'shcdev01_key.pem.orig'
Enter PEM pass phrase:
Verifying - Enter PEM pass phrase:
-----
You are about to be asked to enter information that will be incorporated
into your certificate request.
What you are about to enter is what is called a Distinguished Name or a DN.
There are quite a few fields but you can leave some blank
For some fields there will be a default value,
If you enter '.', the field will be left blank.
-----
Country Name (2 letter code) [AU]:
State or Province Name (full name) [Some-State]:NSW
Locality Name (eg, city) []:Sydney
Organization Name (eg, company) [Internet Widgits Pty Ltd]:Sunny Happy Co Ltd
Organizational Unit Name (eg, section) []:
Common Name (e.g. server FQDN or YOUR name) []:shcdev01
Email Address []:

Please enter the following 'extra' attributes
to be sent with your certificate request
A challenge password []:
An optional company name []:
By now we will have 2 additional files on C:SSLCerts: shcdev01_key.pem.orig (the encrypted private key) and shcdev01_req.pem (the certification request).
- Run following command to decrypt the user’s private key. This is necessary so we can use it later for chaining purpose.
openssl rsa -in shcdev01_key.pem.orig -out shcdev01_key.pem
- And finally the big step: chaining your certificate to Sunny Happy Root CA. Run this command:
openssl ca -in shcdev01_req.pem -out shcdev01_cert.pem
Openssl will ask for the CA key’s password. Once you entered it will also ask you to confirm to certify. Sign it by entering y
c:SSLCerts>openssl ca -in shcdev01_req.pem -out shcdev01_cert.pem
Using configuration from C:/SSLCA/openssl.cfg
Enter pass phrase for C:/SSLCA/SunnyHappyCA/private/cakey.pem:
Check that the request matches the signature
Signature ok
Certificate Details:
        Serial Number: 286 (0x11e)
        Validity
            Not Before: Jan 24 05:00:19 2014 GMT
            Not After : Jan 22 05:00:19 2024 GMT
        Subject:
            countryName               = AU
            stateOrProvinceName       = NSW
            organizationName          = Sunny Happy Co Ltd
            commonName                = shcdev01
            emailAddress              =
        X509v3 extensions:
            X509v3 Basic Constraints:
                CA:FALSE
            Netscape Comment:
                OpenSSL Generated Certificate
            X509v3 Subject Key Identifier:
                40:27:EF:28:95:26:FF:19:BA:99:92:35:F2:AA:C4:2B:1E:43:77:5E
            X509v3 Authority Key Identifier:
                keyid:BA:F7:51:AA:23:59:89:27:9A:22:47:49:6C:86:68:2C:4E:34:AD:82

Certificate is to be certified until Jan 22 05:00:19 2024 GMT (3650 days)
Sign the certificate? [y/n]:y


1 out of 1 certificate requests certified, commit? [y/n]y
Write out database with 1 new entries
Data Base Updated
By the end of these steps, you’ll have a user certificate chained to our CA. You can rename .pem file into .crt and view it using Windows certificate viewer.
You can repeat these steps for as many apache servers you have. You will be using the private key (schdev01_key.pem) and certificate file schdev01_cert.pem on apache config.
Importing Root CA Certificate to Client’s PC
In windows, additional third party Root CA can be added via the certificate manager tool:
- Rename your CA certificate file (C:/SSLCerts/SunnyHappyCA/cacert.pem) into .crt file
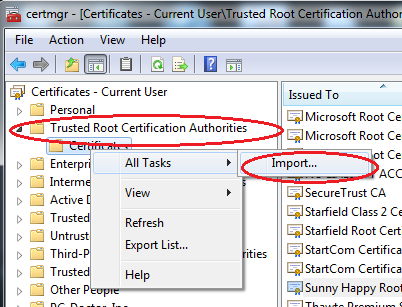
- Open a command prompt as administrator and run certmgr.msc
- On the left tree select Trusted Root Certification Authorities/Certificates, right click > All Tasks > Import…
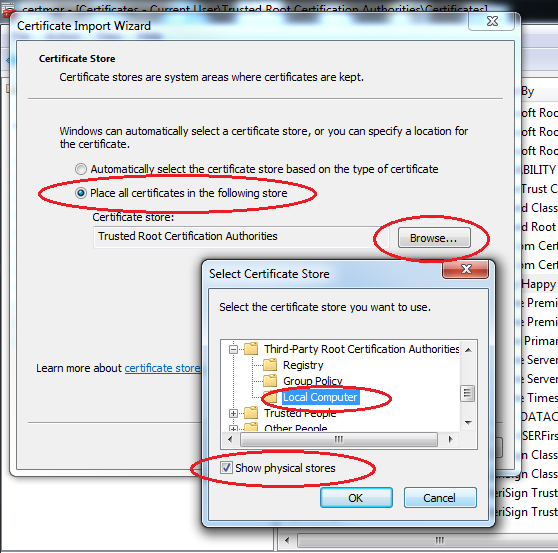
- Select the cacert.crt file we generated above when prompted. When the wizard asks where to keep the certificate, choose Place all certificates in the following store, click Browse, make sure Show physical stores is ticked and select Third-Party Root Certification Authorities/Local Computer. See this superuser forum Q&A if you can’t find it.
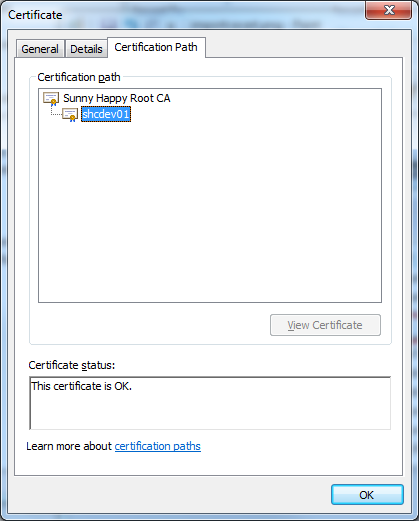
Once you’ve done this, you can inspect your shcdev01_cert.crt (after renaming it from pem) in windows and it will show it is chained to our company’s CA
Credits
Thanks to Philippe Camacho for the OpenSSL tutorial from which I based this post.