Tag Archives: spring framework

Using SessionAttribute In Spring MVC To Implement A Shopping Cart

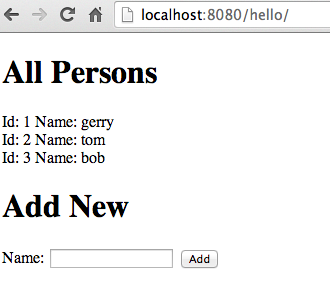
Session based shopping cart can be implemented in Spring MVC without much complicated HttpSession read/write. The small web-app we’ll build is like following. The main page will list the cart content plus there’s a form at the bottom allowing you to add new product to the cart:

cart1

First let’s create our Product domain class (don’t forget to make it Serializable since we’ll be storing it in session):

package com.gerrydevstory.shoppingcart;

public class Product implements Serializable {

  private static final long serialVersionUID = 1L;
  
  private String name;
  private double price;
  
  /* getters & setters */  
}

We will define shopping cart as a collection of Product. Here I will simply use an ArrayList to implement my shopping cart. I will utilize Spring MVC’s and e annotation in my controller:

package com.gerrydevstory.shoppingcart;


("/")
es({"cart"})
public class HomeController {

  /**
   * Creates a new cart if one does not exist in session.
   */
  (method = RequestMethod.GET)
  public String get(Model model) {
    if(!model.containsAttribute("cart")) {
      model.addAttribute("cart", new ArrayList());
    }
    return "home";
  }
  
  /**
   * The shopping cart (list of products) is stored in session. Simply inject it using
   * method argument
   */
  (value = "addProduct", method = RequestMethod.POST)
  public String addProduct( Product product,
      ("cart") List cart) {
    cart.add(product);
    return "redirect:/";
  }

}

The trick here is there are 2 important things happening every time a handler method is invoked. First Spring will attempt to populate the model from session (if one not already provided in the request). And when the handler method exits, the attributed will be saved to session.

And finally the JSP form to list and add the product:

<%@ taglib uri="http://java.sun.com/jsp/jstl/core" prefix="c"%>
<%@ taglib uri="http://java.sun.com/jsp/jstl/fmt" prefix="fmt"%>
<%@ taglib uri="http://www.springframework.org/tags/form" prefix="form"%>


Shopping Cart


Your Shopping Cart

Name: ${product.name}, Price:

Add Product

Name: Price:

Try The Source Code

The source code of this demo is :

git clone https:///gerrytan/shoppingcart.git

Creating a Minimal Spring MVC, JPA / Hibernate and MySQL Project

The goal of this article is to create a bare minimum Spring MVC project with JPA (with Hibernate provider) as persistence provider and MySQL as the DBMS. To test everything works I’ll also add a form page allowing you to list all entities and add a new one.

Environment:

  • jdk 6
  • Spring 3.2.8.RELEASE
  • Hibernate 4.3.3.Final
  • STS 3.4.0.RELEASE
  • MySQL database running on localhost port 3306. The database name is hello with username root and no password.

Steps:

  1. From STS, create a new Maven Project. Since we’re starting from scratch, tick Create a simple project (skip archetype selection). Hit Next.
    jpaminimal0
  2. On the next New Maven Project dialog that comes up, give it a group id, artifact id and set the packaging to war. A minimal maven project will be setup for you when you hit Finish
  3. The default maven project is setup to use jdk 1.5, to switch it to 1.6, open pom.xml and add following xml section under the element.


          maven-compiler-plugin
          
            1.6
            1.6


    Right click the project on Package Explorer -> Maven -> Update Project.. once this is done to update the eclipse build path into jdk 1.6

  4. Add maven dependencies for Spring, JPA, Hibernate, Java EE, MySQL and other supporting jars. Again this goes to your pom.xml


        org.springframework
        spring-context
        3.2.8.RELEASE


        org.springframework
        spring-webmvc
        3.2.8.RELEASE


        org.springframework
        spring-orm
        3.2.8.RELEASE


        org.hibernate
        hibernate-core
        4.3.3.Final


        org.hibernate
        hibernate-entitymanager
        4.3.3.Final


        javax.servlet
        servlet-api
        2.5
        provided


        javax.servlet.jsp
        jsp-api
        2.1
        provided


        javax.servlet
        jstl
        1.2


        mysql
        mysql-connector-java
        5.1.29


        commons-dbcp
        commons-dbcp
        1.4


        xerces
        xercesImpl
        2.11.0


  5. Create the web deployment descriptor src/main/webapp/WEB-INF/web.xml. We will setup Spring MVC here with bean context configuration xml file set to /WEB-INF/spring-context.xml


        appServlet
        org.springframework.web.servlet.DispatcherServlet
        
          contextConfigLocation
          /WEB-INF/spring-context.xml
        
        1


        appServlet
        /


  6. Create a Spring Bean Configuration File placed on src/main/webapp/spring-context.xml. There are plenty important setups here including annotation-based MVC controller, view resolver, transaction config, data source, entityManagerFactory and transaction manager.


  7. Create src/main/resources/META-INF/persistence.xml. This is the persistence unit configuration. It tells JPA what provider will be used, persistence unit type and hibernate configs.


      org.hibernate.ejb.HibernatePersistence


  8. Create a simple entity class to test our setup. Let’s call this entity Person. It has an id and name field.

    package hello;
    
    
    (name = "person")
    public class Person {
    
      @Id
      
      private int id;
    
      private String name;
      
      /* getters & setters */
    
    }
    
  9. And setup mysql database and table to store this entity. The table columns correspond to the Person class fields above. Also note we inform JPA of mysql AUTO_INCREMENT by using annotation:

    CREATE DATABASE IF NOT EXISTS hello;
    
    USE hello;
    
    CREATE TABLE person (
      id INT PRIMARY KEY AUTO_INCREMENT,
      name VARCHAR(50)
    );
    
  10. Create a simple service to list all and add a Person entity

    package hello;
    
    
    public class PersonService {
      
      // An EntityManager will be automatically injected from EntityManagerFactory setup on
      // spring-context.xml
      ext
      private EntityManager em;
      
      // Since we've setup  and transaction manager on spring-context.xml,
      // any bean method annotated with  will cause Spring to magically call
      // begin() and commit() at the start/end of the method. If exception occurs it will also
      // call rollback()
      
      public List getAll() {
        List result = em.createQuery("SELECT p FROM Person p", Person.class).getResultList();
        return result;
      }
      
      
      public void add(Person p) {
        em.persist(p);
      }
    }
    
  11. Create a HomeController class to map HTTP requests. The package name I used is hello:
    package hello;
    
    
    ("/")
    public class HomeController {
    
       private PersonService personSvc;
      
      /**
       * Requests to http://localhost:8080/hello will be mapped here.
       * Everytime invoked, we pass list of all persons to view
       */
      (method = RequestMethod.GET)
      public String listAll(Model model) {
        model.addAttribute("persons", personSvc.getAll());
        return "home";
      }
      
      /**
       * POST requests to http://localhost:8080/hello/addPerson goes here.
       * The new person data is passed from HTML from and bound into the
       * Person object.
       */
      (value = "/addPerson", method = RequestMethod.POST)
      public String addPerson( Person person) {
        personSvc.add(person);
        return "redirect:/";
      }
    }
    
  12. Finally add the form jsp file located on src/main/webapp/WEB-INF/home.jsp
    <%@ page language="java" contentType="text/html; charset=ISO-8859-1" pageEncoding="ISO-8859-1"%>
    <%@ taglib uri="http://java.sun.com/jsp/jstl/core" prefix="c" %>


    Hello


    All Persons

    Id: ${p.id} Name: ${p.name}

    Add New

    Name:

    This is a simple form which will list all persons and allow you to add one

    Screen Shot 2014-03-03 at 9.51.39 pm

Check Out The Source

You can browse / clone the source code of this article on github. To run this on STS:

  1. Clone it using git
    git clone :gerrytan/jpaminimal.git
  2. On STS, do File > Import > Existing Maven Projects
  3. Create run configuration (Run > Run Configurations…) like this
    mvn-run-config
  4. Make sure the project is selected on the project explorer and run it. This will fire up in-memory tomcat7 server at http://localhost:8080

Spring xercesImpl SAXParseException Problem

Found a really tricky and obscure problem. Whenever running my Spring MVC project it fail at startup with this exception:

org.xml.sax.SAXParseException: cos-all-limited.1.2: An ''all'' model group must appear in a particle with '{'min occurs'}'='{'max occurs'}'=1, and that particle must be part of a pair which constitutes the '{'content type'}' of a complex type definition.

Thanks to this Graham Hacking’s blog article, I figured out this was because commons-dbcp pulling and older version of xercesImpl.

The solution was to add newer version of xercesImpl on pom:


  xerces
  xercesImpl
  2.11.0

Posting JSON to Spring MVC Controller

Spring MVC can be setup to automatically bind incoming JSON string into a Java object. Firstly, ensure you have jackson-mapper-asl included on the classpath:


  org.codehaus.jackson
  jackson-mapper-asl
  1.9.13

Assuming the JSON string we want to bind represent a person object like this:

{
  name: "Gerry",
  age: 20,
  city: "Sydney"
}

Which will be bound into following Java class:

public class Person {
  private String name;
  private int age;
  private String city;
  // getters & setters ...
}

Declare the Spring MVC controller handler method like below. The handler method is mapped into path “addPerson” with method POST.

(value = "/addPerson", 
                method = RequestMethod.POST,
                headers = {"Content-type=application/json"})

public JsonResponse addPerson( Person person) {
  logger.debug(person.toString());
  return new JsonResponse("OK","");
}

Also pay attention to and the returned JsonResponse object. Here JsonResponse is a class to return the result of the addPerson operation.

public class JsonResponse {

  private String status = "";
  private String errorMessage = "";

  public JsonResponse(String status, String errorMessage) {
    this.status = status;
    this.errorMessage = errorMessage;
  }
}

When converted to JSON this will look like this:

{
  status : "OK",
  errorMessage : ""
}

Below is an example jQuery based javascript handler that posts into the above Spring MVC handler and observe the returned value:

$.ajax({
  type: "POST",
  url: "addPerson",
  data: JSON.stringify({ name: "Gerry", age: 20, city: "Sydney" }),
  contentType: 'application/json',
  success: function(data) {
    if(data.status == 'OK') alert('Person has been added');
    else alert('Failed adding person: ' + data.status + ', ' + data.errorMessage);
  }
});

Spring MVC Executor Service Anomaly Due to Holding HttpServletRequest for too Long

Encountered a strange problem with Spring MVC running on Tomcat 7 today. I had a with 1 max thread capacity on my application which wasn’t working as it supposed to. My Runnable task look something like this:

public class LongRunningTask implements Runnable {

  private HttpServletRequest request;
  
  public LongRunningTask(HttpServletRequest request) {
    this.request = request;
  }
  
  
  public void run() {
    // do something ..
  }

}

Notice I originally added a reference to HttpServletRequest with the intention of obtaining the remote host and address of the client. My controller class look something like this:


public class HomeController {

   private ThreadPoolTaskExecutor taskExecutor;

  (...)
  public String schedule(HttpServletRequest req, ...) {
    taskExecutor.submit(new LongRunningTask(req));
  }
}

With the hope that user’s get their response immediately while the actual work is still queued on the background.

Turns out this caused all sorts of strange behavior. Sometime the task will run, most of the time it will just sit in the queue forever / won’t even queue at all.

After further research and trial and error, I figured out this was because my runnable is holding a reference to HttpServletRequest. When I refactored the code the task executor work as per normal again.

I’ve came into a conclusion that holding to a HttpServletRequest object for longer than necessary is not a good practice.

Using Spring Data MongoDB

a great third party support based on standard MongoDB Java Driver.

Dependencies

Following dependencies are required. Check for latest version via Nexus Central Repository:

  1. spring-data-mongodb
    
      org.springframework.data
      spring-data-mongodb
      1.2.1.RELEASE
    
    
  2. mongo-java-driver
    
      org.mongodb
      mongo-java-driver
      2.11.1


Setup Mongo Connection, Template and Repository Scanning

This is similar idea with setting up db datasource. In this example the mongo database server is located at localhost:27017 (default). The MongoDB database name used is enrollment. The tag specifies the base package to scan for repository classes


Domain / Entity Class

Example on this post will be based on a simple Student entity class with only id and name field:

import org.springframework.data.annotation.Id;

public class Student {
  @Id private String id;
  private String name;
  // getters & setters..
}

Without explicit configuration this entity class will be mapped into MongoDB collection name student. To override this default behavior use (collection = "...") annotation.

Repository Class

Simply add an interface extending Spring Data Repository interface. Below sample uses PagingAndSortingRepository, which extends CrudRepository which provides most basic operation. The type parameter specifies this repository operates over Student entity, with the ID type being String. Spring Data will automatically generate an implementation of this interface.

public interface StudentRepository extends PagingAndSortingRepository {

}

This repository can now be injected into controllers:


("/student")
public class StudentController {

   private StudentRepository studentRepository;

  (method = GET)
  public String get(Model model) {
    Iterable students = studentRepository.findAll();
    return "student";
  }

  (value = "/new", method = POST)
  public String addNew(("student") Student student) {
    studentRepository.save(student);
  }

  ...
}

Read More

Learn more about Spring Data and MongoDB:

  • Spring Data MongoDB Reference Manual – http://static.springsource.org/spring-data/data-mongodb/docs/current/reference/html/index.html
  • MongoDB Manual – http://docs.mongodb.org/manual/

Cross Site Request Forgery (CSRF) Protection in Spring 3.1

Eyal Lupu has written an excellent article in his blog about mitigating Cross Site Request Forgery (CSRF) attack.

CSRF allows an attacker to create a fake form / link posting to a secured website. It exploits the fact you might have an active session from a secured website. For example, an attacker can create a fake form / link with all the data required to transfer money to his / her account without you realizing it.

This CSRF prevention techniques involes two components:

  1. Rendering a hidden form field with randomly generated token stored in session
  2. Ensuring the next post request came with matching token

The sample source code of this solution can be obtained from:

git clone https://github.com/eyal-lupu/eyallupu-blog.git

Session Scoped Beans in Spring

If your Spring application context is associated with a Java EE container (eg: created via ), you can set your bean in a session scope. This means every user starting a new http session will obtain a different copy of your bean.

Let’s see this in action. Below I have a ShoppingCart bean

public class ShoppingCart implements Serializable {
  private int userId;
  private List products;
  // getters & setters ...
}

Configure this to be a session scoped bean in spring xml configuration file:


The tag will cause Spring to create a proxy class over the ShoppingCart bean. This is critical because we want to inject our ShoppingCart to a singleton class (eg: Service / Controller classes) yet each user’s http session should get its own copy of the data.

In order for proxying to take effect you also need to include cglib library into your classpath.

I can now inject the ShoppingCart into HomeController:


("/home")
public class HomeController {

   private ShoppingCart shoppingCart;

  ...
}

One way to think about this is the proxy is actually a singleton mirror image of the ShoppingCart class, except each user coming from different HttpSession will see different data when they invoke the public methods. For each new HttpSession, on the first time user invokes one of the proxied method a new actual ShoppingCart bean instance is created behind the screen.

Entity Relationship On Hibernate JPA

This article is tested against Java EE 6, Hibernate 4.2.2.

One To Many Unidirectional Relationship

Unidirectional here means you can only obtain related entities from one side. For example supposed we have one to many Customer --> Account relationship, here’s what Customer entity look like


public class Customer {

  @Id
  
  private long id;

  private String name;

  
  (name = "customer_id")
  private Set accounts;

  // getters & setters..
}

Instead of Set, you can use List, however if you have more than one relationship in your entity class, you will get MultipleBagFetchException.

And This is what Account looks like. Notice there’s no reference to Customer object from Account.


public class Account {

  @Id
  
  private long id;
  
  private double balance;

  // Getters & Setters ..
}

One To Many Bidirectional Relationship

Similar to unidirectional except you can obtain relation from both direction. This is what Customer and Account look like:


public class Customer {

  @Id
  
  private long id;

  private String name;

  (mappedBy = "customer")
  private Set accounts;

  // getters & setters..
}

The “customer” on (mappedBy = "customer") refers to customer java property on Account entity.


public class Account {

  @Id
  
  private long id;
  
  private double balance;

  
  (name = "customer_id")
  private Customer customer;

  // Getters & Setters ..
}

The (name = "customer_id") annotation sets the database foreign key column name to be “customer_id”.

Lazy / Eager Loading

Lazy / Eager refers to when does entity relationship get populated. Eager means it will get populated as soon as the entity is obtained from database, where in Lazy it’s only populated when you request the relationship for the first time.

The default value for is LAZY, but for it’s EAGER. It’s a good practice to explicitly configure it so your code is easier to understand


public class Customer {
  ...
  (mappedBy = "customer", fetch = FetchType.LAZY)
  private Set accounts;
  ...
}

public class Account {
  ...
  (fetch = FetchType.EAGER)
  (name = "customer_id")
  private Customer customer;
  ...
}

LazyInitializationException: could not initialize proxy – no Session

Almost every Hibernate/JPA noobie struggle with this exception when they started learning (including myself). This is basically saying you’re tring to access unfetched data after transaction has been closed.

If you use Spring declarative transaction management, transaction start and finish mark are declared by simply annotating DAO method with . Let’s see a common failure where LazyInitializationException can happen.

Here’s your CustomerDAO class:


public class CustomerDAO {
  
  ext private EntityManager em;

  
  public List getAllCustomers() {
    List customers = em.createQuery("select c from Customer", 
      Customer.class).getResultList();
    return customers;
  }

Then on your controller you populate your Model object with list of Customers, and on your view your JSP tried to access Accounts associated with each customer:

Customer Info

Id: ${customer.id} Name: ${customer.name} Accounts:
  • Acc Id: ${acc.id}, Balance: ${acc.balance}

Since the transaction is already closed when CustomerDAO.getAllCustomers() method returns, this will throw LazyInitializationException.

My preferred strategy to overcome this problem is to prefetch the related entities on the DAO, so all the information we need is available on view level in detached state. Other strategy being opening a transaction / session while view is being generated (see: ). To achieve this, change the getAllCustomers() DAO method to use JPQL left join fetch syntax like this:


public class CustomerDAO {
  ...
  
  public List getAllCustomers() {
    List customers = em.createQuery(
      "select distinct c from Customer " +
      "left join fetch c.accounts", 
      Customer.class).getResultList();
    return customers;
  }
  ...
}

Now you can iterate and access all related accounts entities without exceptions.

Unit Testing Spring Bean Service With Mockito

The main idea of unit testing is quick compile-time checking that your code (somewhat) fulfills the business requirement.

A good unit testing practice is to not depend on any external system / dependencies. One way to substitute this external dependency is by using mocking tehcniques. Here I’ll go through unit testing a Spring bean service using .

Assuming you have a BankingService class that comes with a method to transfer money from one account to another. The method finds the Account object by its id using AccountsDAO repository class:


public class BankingService {

   private AccountsDAO accountsDAO;
  
  public void transfer(long fromAccountId, long toAccountId, double amount) throws Exception {
    Account fromAccount = accountsDAO.findById(fromAccountId);
    Account toAccount = accountsDAO.findById(toAccountId);
    
    fromAccount.setBalance(fromAccount.getBalance() - amount);
    toAccount.setBalance(toAccount.getBalance() + amount);
  }
}

AccountsDAO obtain the information from a persistent data store (most likely database), hence it is an external dependency. Here’s how to unit test this class:

  1. Ensure junit, spring-test and mockito dependencies are on the classpath
    
      junit
      junit
      4.7
      test
    
    
      org.springframework
      spring-test
      3.2.3.RELEASE
      test
    
    
      org.mockito
      mockito-core
      1.9.5
      test


  2. Setup BankingServiceTest.xml spring beans configuration file specific for our unit test. Note in here we created a mock AccountsDAO using Mockito. The order of mock creation here is important, if you place it at the bottom you will get autowiring error. I think this is because Spring couldn’t pre-determine the resulting type of the Mock object (it only looks as if it’s a org.mockito.Mockito bean type).


  3. Setup the unit test class. Notice the BankingService to test and the mock AccountsDAO are autowired into the unit test class
    (SpringJUnit4ClassRunner.class)
    ation("/BankingServiceTest.xml")
    public class BankingServiceTest {
    
       private BankingService bankingService;
       private AccountsDAO mockAccountsDAO;
      
      
      public void testTransfer() throws Exception {
        // Setup 2 accounts
        Account acc1 = new Account();
        acc1.setBalance(800.00);
        Account acc2 = new Account();
        acc2.setBalance(200.00);
        
        // Tell mock DAO to return above accounts when 1011 or 2041 is queried respectively
        when(mockAccountsDAO.findById(1011)).thenReturn(acc1);
        when(mockAccountsDAO.findById(2041)).thenReturn(acc2);
        
        // Invoke the method to test
        bankingService.transfer(1011, 2041, 500.00);
        
        // Verify the money has been transferred
        assertEquals(300.00, acc1.getBalance(), 0.001);
        assertEquals(700.00, acc2.getBalance(), 0.001);
      }
    }
    

  4. The when(..).thenReturn(..) syntax is where the magic happen. It will cause the mock object to return the Account we setup (as opposed of calling SQL to fetch it from database).

There are heaps more magic stuff you can do with Mockito. Checkout .

Source Code

Source code of this demo can be downloaded via git:

git clone https:///gerrytan/mycoolbank.git