Tag Archives: spring security

Managing Spring Security User Session

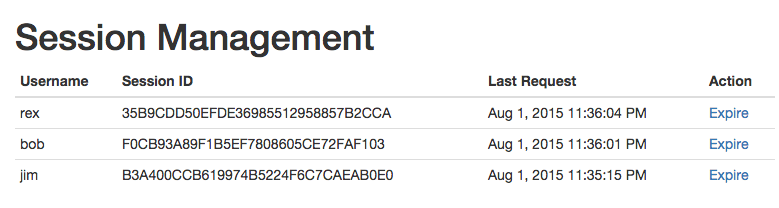
Ever wondered who is currently logged in to your app or how to kick them out? Evil_grin_emoticon. You can do it using SessionRegistry.

Screen Shot 2015-08-01 at 11.36.36 pm

(Disclaimer: UI is self-coded, not provided by Spring)

ntT5yBs

First, setup spring security configuration

Java config:

.and()
  .sessionManagement()
    .maximumSessions(1) // How many session the same user can have? This can be any number you pick
    .expiredUrl("/login?expired")
    .sessionRegistry(sessionRegistry)

And register the sessionRegistry bean:

(name = "sessionRegistry")
public SessionRegistry sessionRegistry() {
  return new SessionRegistryImpl();
}

Or XML config, place this below :


Now you can list currently active sessions

Inject a SessionRegistry and let’s see who’s currently logged in:

private SessionRegistry sessionRegistry;

public List getActiveSessions() {
  List activeSessions = new ArrayList<>();
  for(Object principal : sessionRegistry.getAllPrincipals()) {
    activeSessions.addAll(sessionRegistry.getAllSessions(principal, false));
  }
  return activeSessions;
}

SessionInformation object contains a lot of useful methods such as getPrincipal, getSessionId and getLastRequest. Have a look at the javadoc for more info.

What principal? I’m not in school anymore

Principal is just a fancy word for user in security speak. Note how SessionInformation returns a principal of type Object. If you use Spring Security your principal will most likely be the type of org.springframework.security.core.userdetails.User

Here’s how you can get the username from a User object:

SessionInformation session = ... // get the session info somehow
Object principalObj = session.getPrincipal();
if (principalObj instanceof User) {
  User user = (User) principalObj;
  return user.getUsername();
}

If you need to kick someone out

The use case of this is not just for when you hated a particular user so much, but if user permission is updated, then you have to invalidate all active sessions for it to take effect.

public void logoutSession(String sessionId) {
  SessionInformation session = sessionRegistry.getSessionInformation(sessionId);
  if (session != null) {
    session.expireNow();
  }
}

Enjoy

And thanks to SO user dimas for posting an answer that inspires this post.

Setting Up Spring Security On Spring Boot Project

Here’s my simple requirements:

  • /admin/** path require ROLE_ADMIN
  • /login/**, /css/**, /js/**, **/favicon.ico can be accessed anonymously
  • any other path required ROLE_USER
  • login form

Here’s how to implement it on your Spring Boot project:

  1. Add the spring boot security starter dependency:
    
      org.springframework.boot
      spring-boot-starter-security
    
    
  2. Add a SecurityConfig class extending WebSecurityConfigurerAdapter and implement the path, user and roles requirements above
    (SecurityProperties.ACCESS_OVERRIDE_ORDER)
    public class SecurityConfig extends WebSecurityConfigurerAdapter {
    
      
      protected void configure(HttpSecurity http) throws Exception {
        http
          .authorizeRequests()
            .antMatchers("/admin/**").hasRole("ADMIN")
            .antMatchers("/css/**", "/js/**", "/img/**", "**/favicon.ico").anonymous()
            .anyRequest().hasRole("USER")
            .and()
          .formLogin()
            .permitAll()
        ;
      }
      
      
      public void configure(AuthenticationManagerBuilder auth) throws Exception {
        auth
          .inMemoryAuthentication()
            .withUser("admin").password("admin321").roles("USER", "ADMIN").and()
            .withUser("jim").password("jim321").roles("USER");
      }
    
    }
    

    This setup only works assuming you have on your main configuration class. By default Spring Security will provide a login form at /login but you can implement your own. I’ve also setup two users to test it

RESTful Web Service With Spring Data Rest and Spring Security

Source code of this article is available on github:

This article is written against following versions

  • Spring 4.1.4.RELEASE
  • Spring Boot 1.2.1.RELEASE
  • Spring Security 3.2.5.RELEASE

Table of Content

Spring Security comes handy when you need to secure your RESTful web service. Let’s give this a go! In this example I’ll create a REST service exposing a Cat entity. It simply have name and colour field

{
  "name" : "Tom",
  "colour" : "Black"
};

Creating the Service

Setup a new maven project with following pom.xml. We’ll leverage Spring Boot to simplify the work.


  4.0.0
  
  
    org.springframework.boot
    spring-boot-starter-parent
    1.2.1.RELEASE
  
  
  com.gerrydevstory.rest1
  rest1
  0.0.1-SNAPSHOT
  war


      org.springframework.boot
      spring-boot-starter-web
    
    
      org.springframework.boot
      spring-boot-starter-data-jpa
    
    
      org.springframework.boot
      spring-boot-starter-data-rest
    
    
      org.hsqldb
      hsqldb
      runtime


        org.springframework.boot
        spring-boot-maven-plugin
      
      
        org.apache.maven.plugins
        maven-compiler-plugin
        
          7
          7


Setup a main configuration class. This substitutes the old-fashioned spring context xml. Spring Boot will do a lot of under-the-hood work to setup various bits and pieces using auto configuration

guration

public class Application {

  public static void main(String[] args) throws Exception {
    SpringApplication.run(Application.class, args);
  }
  
}

Now let’s create our Cat JPA entity

public class Cat {

  @Id
  
  private long id;
  
  private String name = "";
  
  private String colour = "";

  /* .. getters & setters omitted .. */
}

Since we included dependency to spring-boot-starter-data-jpa, Spring Boot will automatically set us up with JPA with Hibernate implementation. Also note that on pom.xml we declared a dependency to hsqldb which will automatically give us datasource to an embedded HSQL database.

Next, let’s create a Spring Data repository for Cat.

esource
public interface CatRepository extends PagingAndSortingRepository {

}

Again, spring-boot-starter-data-jpa will auto setup spring-data-jpa for me, and it will automatically provide an implementation of the repository interface at runtime.

Take a note at the esource annotation. This annotation tells Spring Data REST to expose the repository as REST service as well.

Testing the Service

Now you’re ready to run the app using the embedded tomcat container. Run following maven command

mvn clean test spring-boot:run

Your app will start at http://localhost:8080

Let’s try some cats operation using curl (Windows version of curl is available at http://curl.haxx.se/download.html)

Get all cats:

$ curl http://localhost:8080/cats
{
  "_links" : {
    "self" : {
      "href" : "http://localhost:8080/cats{?page,size,sort}",
      "templated" : true
    }
  },
  "page" : {
    "size" : 20,
    "totalElements" : 0,
    "totalPages" : 0,
    "number" : 0
  }
}

-i option will display HTTP response headers.

There’s nothing there since we haven’t added any cat.

Now let’s try add a cat named “Tom” with colour “black”:

$ curl -i -X POST -d '{"name" : "Tom", "colour" : "black"}' -H 'Content-Type: application/json' http://localhost:8080/cats
HTTP/1.1 201 Created
Server: Apache-Coyote/1.1
X-Content-Type-Options: nosniff
X-XSS-Protection: 1; mode=block
Cache-Control: no-cache, no-store, max-age=0, must-revalidate
Pragma: no-cache
Expires: 0
X-Frame-Options: DENY
Location: http://localhost:8080/cats/1
Content-Length: 0
Date: Wed, 14 Jan 2015 03:52:47 GMT
  • -i option shows

There’s also plenty other operation you can use to update, replace and delete. See more on the Spring Data REST documentation: http://docs.spring.io/spring-data/rest/docs/2.2.1.RELEASE/reference/html/#repository-resources.item-resource

Securing the Service

Spring Boot greatly simplifies the task of installing Spring Security. Simply add following dependency on pom.xml

                                           
  org.springframework.boot          
  spring-boot-starter-security
                                          

Next, configure Spring Security so /cats/** path are protected to users with ROLE_USER only. We also setup two in-memory users: bob with ROLE_USER and admin with ROLE_USER and ROLE_ADMIN

ty
public class SecurityConfig extends WebSecurityConfigurerAdapter {
  
  
  protected void configure(HttpSecurity http) throws Exception {
    http
      .authorizeRequests()
        .antMatchers("/cats/**").hasRole("USER")
        .anyRequest().anonymous().and()
      .httpBasic().and()
      .csrf().disable();
  }
  
  
  protected void configure(AuthenticationManagerBuilder auth) throws Exception {
    auth
      .inMemoryAuthentication()
        .withUser("bob").password("bob123").authorities("ROLE_USER").and()
        .withUser("admin").password("admin123").authorities("ROLE_USER", "ROLE_ADMIN");
  }
}

Don’t forget to recompile and restart the app. Now you can test querying the cats repository will be forbidden for non-authenticated (anonymous) users:

$ curl -i http://localhost:8080/cats
HTTP/1.1 401 Unauthorized
Server: Apache-Coyote/1.1
X-Content-Type-Options: nosniff
X-XSS-Protection: 1; mode=block
Cache-Control: no-cache, no-store, max-age=0, must-revalidate
Pragma: no-cache
Expires: 0
X-Frame-Options: DENY
Set-Cookie: JSESSIONID=6F0779172E8FD7DCCFA2A71EEAB5022A; Path=/; HttpOnly
WWW-Authenticate: Basic realm="Realm"
Content-Type: application/json;charset=UTF-8
Transfer-Encoding: chunked
Date: Wed, 14 Jan 2015 23:18:27 GMT

{"timestamp":1421277506968,"status":401,"error":"Unauthorized","message":"Full authentication is required to access this resource","path":"/cats"}

Let’s try authenticating using HTTP Basic as bob (password is bob123):

$ curl -i -H 'Authorization: Basic Ym9iOmJvYjEyMw==' http://localhost:8080/cats
HTTP/1.1 200 OK
Server: Apache-Coyote/1.1
X-Content-Type-Options: nosniff
X-XSS-Protection: 1; mode=block
Cache-Control: no-cache, no-store, max-age=0, must-revalidate
Pragma: no-cache
Expires: 0
X-Frame-Options: DENY
Set-Cookie: JSESSIONID=A981526C9E1723F75DC553B55CCAF467; Path=/; HttpOnly
Content-Type: application/hal+json;charset=UTF-8
Transfer-Encoding: chunked
Date: Wed, 14 Jan 2015 23:19:51 GMT

{
  "_links" : {
    "self" : {
      "href" : "http://localhost:8080/cats{?page,size,sort}",
      "templated" : true
    }
  },
  "page" : {
    "size" : 20,
    "totalElements" : 0,
    "totalPages" : 0,
    "number" : 0
  }
}

The -H option passes a HTTP header as part of the request. Also note that the username and password joined by colon (:) is encoded into Base64 resulting in the string Ym9iOmJvYjEyMw==. This is the string “bob:bob123″ in plain text. You can use an to try it yourself.

Also note that similar to web browser the server gave us a JSESSIONID Cookie:

Set-Cookie: JSESSIONID=A981526C9E1723F75DC553B55CCAF467; Path=/; HttpOnly

This cookie can be used in subsequent request so you don’t have to keep re-authenticating. Let’s try creating a new Cat again to test this:

$ curl -i -X POST -d '{"name":"Tom","colour":"black"}' -H 'Cookie: JSESSIONID=A981526C9E1723F75DC553B55CCAF467' -H 'Content-Type: application/json' http://localhost:8080/cats
HTTP/1.1 201 Created
Server: Apache-Coyote/1.1
X-Content-Type-Options: nosniff
X-XSS-Protection: 1; mode=block
Cache-Control: no-cache, no-store, max-age=0, must-revalidate
Pragma: no-cache
Expires: 0
X-Frame-Options: DENY
Location: http://localhost:8080/cats/1
Content-Length: 0
Date: Wed, 14 Jan 2015 23:26:12 GMT

Different Security Permission for Read / Update Operations

What if you want to give ROLE_USER read-only access and full read/write to ROLE_ADMIN?

This can be achieved by using Spring Data Repository event handler class. You can invoke custom code prior / after certain operations executed on the repository. Let’s see how this works.

First enable method security on our SecurityConfig class. Add the hodSecurity(securedEnabled = true) annotation to SecurityConfig class:

ty
hodSecurity(securedEnabled = true)
public class SecurityConfig extends WebSecurityConfigurerAdapter {
 ...
}

Create a new CatEventHandler class annotated with Handler(Cat.class)

Handler(Cat.class)
("ROLE_ADMIN")
public class CatEventHandler {

  private static final Logger LOG = LoggerFactory.getLogger(CatEventHandler.class);
  
  e
  public void handleBeforeSave(Cat c) {
    LOG.debug("Before save " + c);
  }
  
  ate
  public void handleBeforeCreate(Cat c) {
    LOG.debug("Before create " + c);
  }
  
  kSave
  public void handleBeforeLinkSave(Cat c) {
    LOG.debug("Before link save " + c);
  }
  
  ete
  public void handleBeforeDelete(Cat c) {
    LOG.debug("Before delete " + c);
  }
  
  kDelete
  public void handleBeforeLinkDelete(Cat c) {
    LOG.debug("Before link delete " + c);
  }
}

Few important things happening here:

  • All the .. methods will be invoked before the corresponding response is given to users
  • The (“ROLE_ADMIN”) annotation will ensure only users with ROLE_ADMIN can invoke all those methods in the class (although the method has nothing in it except a logging statement)

Let’s give this a try. Authenticate as bob:bob123 again and try creating a new Cat. Error will be presented:

$ curl -i -H 'Authorization: Basic Ym9iOmJvYjEyMw==' http://localhost:8080/cats HTTP/1.1 200 OK
Server: Apache-Coyote/1.1
X-Content-Type-Options: nosniff
X-XSS-Protection: 1; mode=block
Cache-Control: no-cache, no-store, max-age=0, must-revalidate
Pragma: no-cache
Expires: 0
X-Frame-Options: DENY
Set-Cookie: JSESSIONID=796DC99B95180BCA3E10700BCA4E8BD2; Path=/; HttpOnly
Content-Type: application/hal+json;charset=UTF-8
Transfer-Encoding: chunked
Date: Wed, 14 Jan 2015 23:34:09 GMT

{
  "_links" : {
    "self" : {
      "href" : "http://localhost:8080/cats{?page,size,sort}",
      "templated" : true
    }
  },
  "page" : {
    "size" : 20,
    "totalElements" : 0,
    "totalPages" : 0,
    "number" : 0
  }
}

$ curl -i -X POST -d '{"name":"Tom","colour":"black"}' -H 'Cookie: JSESSIONID=796DC99B95180BCA3E10700BCA4E8BD2' -H 'Content-Type: application/json' http://localhost:8080/cats
HTTP/1.1 403 Forbidden
Server: Apache-Coyote/1.1
X-Content-Type-Options: nosniff
X-XSS-Protection: 1; mode=block
Cache-Control: no-cache, no-store, max-age=0, must-revalidate
Pragma: no-cache
Expires: 0
X-Frame-Options: DENY
Content-Type: application/json;charset=UTF-8
Transfer-Encoding: chunked
Date: Wed, 14 Jan 2015 23:34:33 GMT

{"timestamp":1421278473943,"status":403,"error":"Forbidden","exception":"java.lang.IllegalStateException","message":"Access is denied","path":"/cats"}

But admin:admin123 will be able to do so just fine:

$ curl -i -H 'Authorization: Basic YWRtaW46YWRtaW4xMjM=' http://localhost:8080/cats
HTTP/1.1 200 OK
Server: Apache-Coyote/1.1
X-Content-Type-Options: nosniff
X-XSS-Protection: 1; mode=block
Cache-Control: no-cache, no-store, max-age=0, must-revalidate
Pragma: no-cache
Expires: 0
X-Frame-Options: DENY
Set-Cookie: JSESSIONID=F64FE2FD9D6C9D47853B2BB03795B961; Path=/; HttpOnly
Content-Type: application/hal+json;charset=UTF-8
Transfer-Encoding: chunked
Date: Wed, 14 Jan 2015 23:35:53 GMT

{
  "_links" : {
    "self" : {
      "href" : "http://localhost:8080/cats{?page,size,sort}",
      "templated" : true
    }
  },
  "page" : {
    "size" : 20,
    "totalElements" : 0,
    "totalPages" : 0,
    "number" : 0
  }
}

$ curl -i -X POST -d '{"name":"Tom","colour":"black"}' -H 'Cookie: JSESSIONID=F64FE2FD9D6C9D47853B2BB03795B961' -H 'Content-Type: application/json' http://localhost:8080/cats
HTTP/1.1 201 Created
Server: Apache-Coyote/1.1
X-Content-Type-Options: nosniff
X-XSS-Protection: 1; mode=block
Cache-Control: no-cache, no-store, max-age=0, must-revalidate
Pragma: no-cache
Expires: 0
X-Frame-Options: DENY
Location: http://localhost:8080/cats/1
Content-Length: 0
Date: Wed, 14 Jan 2015 23:36:18 GMT

Let’s Make Login Easier

I find it annoying to keep having to encode our username and password into Base64. I wanted a more simplified login such as posting u=bob&p=bob123 to http://localhost:8080/login.

Let’s try doing this.

Borrowing idea from , let’s create a LoginController

("/login")
public class LoginController {

  
  private SecurityConfig securityConfig;
  
  private AuthenticationDetailsSource authenticationDetailsSource = new WebAuthenticationDetailsSource();
  
  private static final Logger LOG = LoggerFactory.getLogger(LoginController.class);
  
  (method = RequestMethod.POST)
  public String login(("u") String username,
    ("p") String password,
    HttpServletRequest req) throws Exception {
    
    // Force session creation so it's available to Spring Security post processor filter
    req.getSession(true);
    
    // Authenticate using AuthenticationManager configured on SecurityContext
    AuthenticationManager authMgr = securityConfig.authenticationManagerBean();
    UsernamePasswordAuthenticationToken authReq = new UsernamePasswordAuthenticationToken(username, password);
    authReq.setDetails(authenticationDetailsSource.buildDetails(req));
    Authentication authResp = authMgr.authenticate(authReq);
    
    // If successful add the authentication response to context so the post processor filter
    // can save it to session
    SecurityContextHolder.getContext().setAuthentication(authResp);
    
    return "Authentication successful";
  }
  
  ...
}

Also create some exception handlers so login failure will produce 401 – Unauthorized HTTP status code.

  r(BadCredentialsException.class)
  (HttpStatus.UNAUTHORIZED)
  public String badCredentialsExceptionHandler(BadCredentialsException e) {
    LOG.debug("Authentication failed", e);
    return "Authentication failed: " + e.getMessage();
  }
  
  r(Exception.class)
  (HttpStatus.INTERNAL_SERVER_ERROR)
  public String exceptionHandler(Exception e) {
    LOG.debug("Authentication error", e);
    return "Authentication error: " + e.getMessage();
  }

Let’s give this baby a go:

$ curl -i -X POST -d 'u=bob&p=bob123' http://localhost:8080/login
HTTP/1.1 200 OK
Server: Apache-Coyote/1.1
X-Content-Type-Options: nosniff
X-XSS-Protection: 1; mode=block
Cache-Control: no-cache, no-store, max-age=0, must-revalidate
Pragma: no-cache
Expires: 0
X-Frame-Options: DENY
Set-Cookie: JSESSIONID=A65016A06E912612701A00C51A10FE01; Path=/; HttpOnly
Accept-Charset: big5, big5-hkscs, ...
Content-Type: text/plain;charset=UTF-8
Content-Length: 25
Date: Wed, 14 Jan 2015 23:44:45 GMT

Authentication successful

Yay! Well done on making it this far. Hope you get a pretty decent looking REST API with minimal effort thanks to Spring. Don’t forget to always serve your API in HTTPS if deploying in production environment and secure it further with firewall if applicable.

As always you can browse the source code of this article on github:

Or clone it directly:

$ git clone https://github.com/gerrytan/rest1.git

Enjoy!

Using Custom Role Populator On Spring Security LDAP

Here’s how you can use Spring Security LDAP just for password authentication, but use your own database for assigning role / authorities.

First on your context xml define an LDAP server context bean as per normal:


Then define LDAPAuthenticationProvider bean:


If you noticed at the bottom we set authoritiesPopulator into myLDAPAuthPopulator bean which we’ll define next. This is where you can lookup your database using jdbc or other method to populate the roles given an authenticated username:

("myLDAPAuthPopulator")
public class MyLdapAuthoritiesPopulator implements LdapAuthoritiesPopulator {

  
  public Collection extends GrantedAuthority> getGrantedAuthorities(DirContextOperations userData, String username) {
    List authorities = new ArrayList();
    User user = userDAO.findByUsername(username);
    for(String role : user.getRoles()) {
      authorities.add(new SimpleGrantedAuthority(role));
    }
    return authorities;
  }

}

And finally register this authentication provider in the authentication manager:


Showing Spring Security Principal and Conditional Logic on JSP

If your app is setup with Spring Security, you can show currently logged in user in JSP by using:

${pageContext.request.userPrincipal.name}

You can also check if the user has enough right to access a resource. This example ensures user has enough rights to access /admin or else the link won’t be rendered:


  • Admin Home
  • Make sure you have spring-security-taglibs on your classpath:

    
      org.springframework.security
      spring-security-taglibs
      ${org.springframework.security-version}


    And the tag prefix declared on top of the JSP page:

    <%@ taglib prefix="sec" uri="http://www.springframework.org/security/tags" %>
    

    Spring Security Auto Login After Successful Registration

    Asking your user to login immediately after he/she registers might be tedious. Here’s how you can log them in immediately using Spring Security (thanks to this SO thread).

    Typically you will have some sort of registration form with a backing controller like this:

    ("/register")
    public class RegisterController {
      ...
      (method = POST)
      public String register( User user) {
        // perform registration logic..
        // redirect back to login page
        return "redirect:/login";
      }
      ...
    }
    

    But a server-side login can be done by autowiring UserDetailService and AuthenticationManager:

    ("/register")
    public class RegisterController {
      ...
       ("authMgr") private AuthenticationManager authMgr;
       private UserDetailsService userDetailsSvc;
    
      (method = POST)
      public String register( User user) {
        // perform registration logic..
    
        // perform login authentication
        try {
          UserDetails userDetails = userDetailsSvc.loadUserByUsername(username);
          UsernamePasswordAuthenticationToken auth = new UsernamePasswordAuthenticationToken(userDetails, password, userDetails.getAuthorities());
          authMgr.authenticate(auth);
    
          // redirect into secured main page if authentication successful
          if(auth.isAuthenticated()) {
            SecurityContextHolder.getContext().setAuthentication(auth);
            return "redirect:/";
          }
        } catch (Exception e) {
          logger.debug("Problem authenticating user" + username, e);
        }
    
        return "redirect:/error";
      }
      ...
    }
    

    Note that in above code the AuthenticationManager injection is qualified by ("authMgr"). This is to avoid multiple beans ambiguity. In effect in the xml context configuration (if you use one) an id attribute has to be set:

      ...
      
        ...


        ...
      
      ...
    

    Also in order for this setup to work, the registration page has to be filtered by spring security

      ...


      ...
    

    See Also

    Installing Spring Security On Spring MVC Project

    Installing Spring Security On Spring MVC Project

    These are steps required to install Spring Security for a form authentication implementation on a Spring MVC project.

    1. Maven Dependencies.

      
              org.springframework.security
              spring-security-core
              3.1.4.RELEASE
      
      
              org.springframework.security
              spring-security-config
              3.1.4.RELEASE
      
      
              org.springframework.security
              spring-security-web
              3.1.4.RELEASE
      
      
    2. Add Spring Security filter to web.xml
      
      
              springSecurityFilterChain
              org.springframework.web.filter.DelegatingFilterProxy


              springSecurityFilterChain
              /*
      
      
    3. Add a security-context.xml spring beans config file. You can place all your security config on root application context xml but separating it would produce clearer code without namespace prefix clutter


    4. Add basic HTTP form authentication and provider as seen on Spring reference manual