This is a tutorial to build a very simple pizzashop Spring MVC, Hibernate and MySQL application. The main page shows all pizza rows stored on a database table:
Technology in Java world moves very fast. Using straight Hibernate might no longer be preferable since Java EE 5 introduces JPA (Java Persistence API) but it’s still good to learn anyway. Spring MVC and Hibernate is one of the most popular Java libraries used out there.
Tools / Environment Required
If you’re just starting fresh and don’t have most of the tools below just install JDK, STS (Springsource Tools Suite) and MySQL server, everything else is bundled within them.
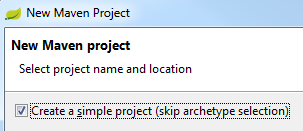
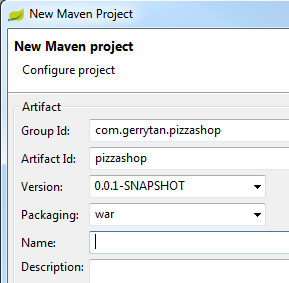
First, create new Maven project on STS. Skip archetype selection. Pick maven group id, artifact id and select packaging to war.
By default Maven will use JDK 1.5, re-configure it to use 1.6. Add following maven-compiler-plugin section to pom.xml under element. Ensure the change takes effect by updating maven project settings (right click on project -> Maven -> Update project…).
Now all the boilerplate code done, we can start coding the business functionality. For this simple app we will have a pizza database table with just id, name and price column. Create the Pizza entity class representing the table
package com.gerrytan.pizzashop;
// imports ..


(name = "pizza")
public class Pizza {
  @Id  private long id;
  private String name;
  private double price;
  /* getters & setters */
}
Create a DAO class to obtain Pizza entity persisted on database. Note that we won’t create service layer classes for the sake of simplicity (on real-life complex business application adding service layer is a good practice).
package com.gerrytan.pizzashop;
// imports..


s({"unchecked", "rawtypes"})
public class PizzaDAO {
   private SessionFactory sessionFactory;

  /**
   *  annotation below will trigger Spring Hibernate transaction manager to automatically create
   * a hibernate session. See src/main/webapp/WEB-INF/servlet-context.xml
   */

  public List findAll() {
    Session session = sessionFactory.getCurrentSession();
    List pizzas = session.createQuery("from Pizza").list();
    return pizzas;
  }
}
Create a Spring MVC controller to handle request from the main page. Note that PizzaDAO reference is injected, and after collection of Pizza entity objects are obtained it’s passed to the view using Model object.
package com.gerrytan.pizzashop;
// imports..


("/")
public class PizzaController {

   private PizzaDAO pizzaDAO;

  /**
   * This handler method is invoked when
   * http://localhost:8080/pizzashop is requested.
   * The method returns view name "index"
   * which will be resolved into /WEB-INF/index.jsp.
   *  See src/main/webapp/WEB-INF/servlet-context.xml
   */
  (method = RequestMethod.GET)
  public String list(Model model) {
    List pizzas = pizzaDAO.findAll();
    model.addAttribute("pizzas", pizzas);
    return "index";
  }
}
Add a JSP view to list all the pizza entities passed by the controller src/main/webapp/WEB-INF/index.jsp
It is assumed you have MySQL server running on your local machine (localhost) on the default port 3306. The name of the schema is pizzashop and table pizza. Have a look at Spring beans configuration section above to reconfigure this.
Running The Code
The easiest way to run your code is using in-memory Maven Tomcat plugin. It will launch on-the-fly Tomcat server with your code deployed. Make sure your project is selected on the project exploded and setup a maven run configuration on STS. Go to Run -> Run Configurations.. and create a new maven build entry like this:
Click Run and navigate your browser to http://localhost:8080/pizzashop
Well done on making it this far. Hopefully that was a quick and nice introduction to Spring MVC + Hibernate + MySQL and you can see how the tedious database to java class mapping is now simplified. You might have lots of questions in your mind by now — feel free to ask in the comment section below. Following are few official references and community article links you can browse around:
Add a security-context.xml spring beans config file. You can place all your security config on root application context xml but separating it would produce clearer code without namespace prefix clutter
Add basic HTTP form authentication and provider as seen on Spring reference manual
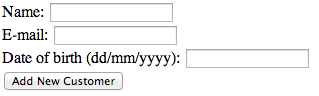
So you have a form that takes a date input like this:
It’s always handy to represent the form as a Pojo that gets bound automatically to/from your controller class:
public class AddCustomerForm {
  private String name;
  private String email;
  private Date dob;

  /* getters & setters */
}
Notice the usage of java.util.Date type for the dob field. If you do nothing, the binding wouldn’t work and resulting in error instead because Spring MVC doesn’t know how to convert the text form input into a Date object.
The trick here is to add annotation on the date property:
  (pattern = "dd/MM/yyyy")
  private Date dob;
(Since Spring 3.2 you don’t need Joda library to use this annotation)
Now on your controller the form input will automatically binds into your pojo
public String addCustomer(("addCustomerForm") AddCustomerForm form) {
  // do something with form input ..
}
MongoDB came with all sophisticated ObjectId generation feature, but often you just jumped the ship from relational database, and you still want an easy to read / communicate numeric identifier field which automatically increments every time new record is inserted.
One neat suggestion from MongoDB tutorial is to use a counter collection with a ‘counter name’ as its id, and a ‘seq’ field to store the last used number:
db.counters.insert({
  _id: "users",
  seq: 0
})
Then use findAndModify function to increment and obtain the next value.
When developing using Spring Data MongoDB, this neat trick can be written as a simple service. Here I used the collection name as the counter name so it’s easy to guess / remember.
import static org.springframework.data.mongodb.core.query.Query.*;
import static org.springframework.data.mongodb.core.query.Criteria.*;
import static org.springframework.data.mongodb.core.FindAndModifyOptions.*;


public class CounterService {
   private MongoOperations mongo;

  public int getNextSequence(String collectionName) {

    Counter counter = mongo.findAndModify(
      query(where("_id").is(collectionName)),
      new Update().inc("seq", 1),
      options().returnNew(true),
      Counter.class);

    return counter.getSeq();
  }
}
Counter is just a simple class representing the collection. Please beware the usage of int data type, this will limit to 2^31 entries maximum.
(collection = "counters")
public class Counter {
  @Id private String id;
  private int seq;
  /* getters & setters .. */
}
Then when inserting a new entry (with help of ), just set the id field like this before you save it
User newUser = new User();
newUser.setId(counterService.getNextSequence("users"));
newUser.setUsername(username);
newUser.setPassword(password);

userRepository.save(newUser);
You’ll get an incrementing simple numeric id each time you insert new object
Inspired by , this is a short tutorial on how you can map a request with *.json extension into a JSON view.
This tutorial will demonstrate a small subset of Spring JSON capability using the ‘Spring MVC Project’ template application generated by STS. When you first created a new project from the template, the web app came with a default home page showing ‘Hello World’ and a server time passed via Model attribute.
We will extend this home page a little bit so we can obtain the JSON view. Note that the JSON view will only contain the formatted attributes inside the Model object
By the way, if you haven’t already know — JSON stands for Java Script Object Notation. It’s a textual representation of a Java Script object, and it’s one of the most popular way of transferring information from server to client in modern Ajax application.
Create a new project using a template
Assuming you have SpringSource Tools Suite (STS) installed, create a new project and select Spring Template Project Wizard
Select ‘Spring MVC Project’ from the selection of template, it might prompt you to download if this is the first time you’re using it
Enter a project name and top-level package and hit ‘Finish’
Change the view resolver to ContentNegotiatingViewResolver
ContentNegotiatingViewResolver is a unique resolver which will delegate request to another resolver by the requested media types. There are multiple way it can determine the media type, but here we’ll just use the URL extension method (see the javadoc for more).
On the servlet spring beans configuration (servlet-context.xml), replace the default InternalResourceViewResolver with this:
[sourcecode language="xml"]
If the request has an extension .json, always provide MappingJacksonJsonView regardless –>
[/sourcecode]
In the example above, we define request with the extension “.*json” into “application/json” media type. Normal request is set to “text/html” by the browser by default. When a request came, the list of view resolvers on the “viewResolver” property will be consulted, and if it supports the requested media type, that view resolver will be used.
The “defaultViews” property specifies the view that will be override the ones provided by matching resolvers (even if none matches) — regardless of the view name returned by the controller. This however only hold true if the View supports the requested media type.
For example, if “/home” path is requested with Accept header “text/html”, ContentNegotiatingViewResolver will set the media type to “text/html”, consult InternalResoursceViewResolver bean (which supports text/html) and use it. If “/home.json” path is requested, the media type is set to “application/json” (not supported by InternalResourceViewResolver), and since the specified default view MappingJacksonJsonView supports it, it will be used. This is sufficient for common usage because all JSON view can be rendered in the same fashion
Have a look at for more info.
Change the Controller mapping
STS Spring MVC new project template mapped the MainController into “/”, however for our demonstration purpose, let’s map it to “/home”, so we can compare the different media type easily.
[sourcecode language="java"]
/**
* Handles requests for the application home page.
*/
public class HomeController {
private static final Logger logger = LoggerFactory.getLogger(HomeController.class);
/**
* Simply selects the home view to render by returning its name.
*/
(value = "/home", method = RequestMethod.GET)
public String home(Locale locale, Model model) {
logger.info("Welcome home! the client locale is "+ locale.toString());
Date date = new Date();
DateFormat dateFormat = DateFormat.getDateTimeInstance(DateFormat.LONG, DateFormat.LONG, locale);
String formattedDate = dateFormat.format(date);
model.addAttribute("serverTime", formattedDate );
return "home";
}
}
[/sourcecode]
Add Jackson dependency to your classpath
The MappingJacksonJsonView requires Jackson library in your classpath. This library will help you to transform java objects into JSON representation. Add the following dependency to your pom.xml
Spring is a really cool J2EE extension framework incorporating and techniques, and JBoss is one of the first open-source J2EE container well-known in the community. However building a Spring based application to fit for a JBoss deployment isn’t always a straightforward task.
Spring provides an easy-to-use rapid code generation tool called “Spring Roo” so you don’t have to start from scratch to achieve most of the configuration plumbing. However the code generated by Roo assumes a minimalistic web container (such as tomcat) where almost all Java EE API modules are deployed on the application side — not on the container.
Although this topic is still widely open for discussion, the benefit of using a container managed modules includes ease of configuration, operation and maintenance. For example if you deploy your datasource on JBoss, it would provide you with the connection pool usage statistics.
This guide demonstrate process of developing a simple Phonebook application where user can list and add contacts. Following are the goals we’re trying to achieve:
Spring-based application generated by Spring Roo which should be suitable to deploy to JBoss container.
Minimal (none if possible) JBoss customization. The web-app we’ll create should deploy straight into a fresh-install JBoss container. Only stuff like datasources should need configuration on JBoss
Use JBoss provided Java EE API modules whenever possible. The JBoss server profile we’ll use is ‘default’ which already provide a lot of stuff, including servlet, JSP, JSTL, EL, JTA, EJB3, JPA and Hibernate.
This guide and the demo source code is written against following versions:
JBoss 6.0.0.Final & 7.1.1.Final
Spring Roo 1.2.2.RELEASE
JDK 6
Apache Maven 3.0.3
Let’s Start the Rapid Code Generation
Start the Spring Roo shell (either via command line or your favourite IDE) and use following commands:
Create new war project. Adjust project name and top level package to your liking. IDE such as eclipse provide a dialog box to create a new project, feel free to use it instead.
project --topLevelPackage com.wordpress.gerrytan.springjboss --projectName spring-jboss --packaging war
Setup JPA persistence. JBoss came with pre-installed HSQL datasource available via JNDI under the name java:/DefaultDS, so we’ll leverage this. Feel free to install and use another database if you want to. (If you use JBoss 7, the sample datasource JNDI name is java:/jboss/datasources/ExampleDS)
After you run this command, Roo will create a Spring applicationContext.xml configuration file that will scan and contain your data and business layer beans and JPA persistence.xml persistence unit configuration.
Setup Spring MVC controller. If this is the first time you hear about Spring MVC, you might want to read their manual (or keep going — trust me, Spring MVC provides a powerful API for your web-app )
web mvc setup
After you run this command Roo will create a web.xml with Spring MVC DispatcherServlet configured, and a webmvc-config.xml that will scan and contain your Controller beans. Note that the webmvc-config.xml context will be set as a child of applicationContext.xml context so that your data layer beans will be instantiated first, and then injected to your controller beans. Roo will also configure JSP + Apache Tiles based views for you which we’ll cover later.
Great! At this point you have almost all the boilerplate and plumbing you need to start writing your web-app.
Start Writing the Web App
The small web app we’re going to write has one page with two panels, one for add-contact form, and the other for listing and deleting contacts:
Create a new Contact entity with firstName, lastName and phoneNumber fields. We’ll again leverage Roo to do this. Issue following command on a Roo shell:
entity jpa --class ~.Contact
field string --fieldName firstName --notNull
field string --fieldName lastName --notNull
field string --fieldName phoneNumber --notNull
Create (manually) a new Controller. I won’t use Roo this time because the controller code generation feature of Roo provides us more than we need, so we’ll just create a simple Spring MVC controller here. The controller has all handlers method to perform addition, listing and deletion. if this is the first time you see it.
("/contact")
public class ContactController {

  (method = RequestMethod.GET)
  public String get(("newContact") Contact contact) {
    return "contact/index";
  }

  (method = RequestMethod.POST, params="deleteId")

  public String delete( long deleteId) {
    Contact contact = Contact.findContact(deleteId);
    contact.remove();
    return "redirect:/contact";
  }

  (method = RequestMethod.POST)
  public String add(("newContact")  Contact contact, BindingResult bindingResult) {
    if (!bindingResult.hasErrors()) {
      contact.persist();
      return "redirect:/contact";
    }
    return "contact/index";
  }

  ("contacts")
  public List getContactList() {
    List result = Contact.findAllContacts();
    return result;
  }
}
Create the view, we’ll leverage the Apache Tiles API provided by Roo. Tiles adds much-needed templating and inheritance feature to JSP so it’s easy for you to reuse parts of your presentation code in multiple place. Have a look at their manual page for more info. Create a jspx file src/main/webapp/WEB-INF/views/contact/index.jspx which will contain our jsp view presentation code to list Contacts and add a new one:
First NameLast NamePhone Number
You have no contacts in your phone book. Add a new contact using the form above.
Id
First Name
Last Name
Phone Number
${contact.id}
${contact.firstName}
${contact.lastName}
${contact.phoneNumber}
And create a views.xml tiles configuration file. This file contains metadata information about template, inheritance, and other tiles feature. Since this is just a simple web-app, I’m not superclassing any other page or template, but just create a new standalone jsp page
That’s about all the code we’ll need for this web-app. Now is the slightly tricker part, plumbing Spring into JBoss.
EntityManagerFactory Plumbing
When you setup JPA using Roo, it gives you a Spring-managed persistence unit via . However when you deploy your app to JBoss, the presence of META-INF/persistence.xml also causes JBoss to create its own persistence unit, causing conflict. Of course you can if you want, but the approach we’ll take here is to use the JBoss provided:
Configure the JNDI name of the JBoss-provided persistence unit. Add following element to your web.xml. persistence/spring-jboss-emf will be the JNDI name of the JBoss provided persistence unit, and persistenceUnit is the name Roo give to the persistence unit configuration file (META-INF/persistence.xml)
persistence/spring-jboss-emfpersistenceUnit
Replace LocalContainerEntityManagerFactoryBean with JNDI lookup on applicationContext.xml
Let the persistence unit know what the datasource JNDI name is. We’ll just use the sample HSQL datasource which came with out-of-the-box JBoss install (java:DefaultDS on JBoss 6 and java:jboss/datasources/ExampleDS on JBoss 7). Add element to your META-INF/persistence.xml file:
We didn’t have to do this with Spring-managed persistence unit because LocalContainerEntityManagerFactoryBean already done it for us. Change java:DefaultDS into java:jboss/datasources/ExampleDS if deploying into JBoss 7.
And since we already done step 3, we no longer need to keep the datasource bean on applicationContext.xml. Feel free if you want to keep it though
Maven Fine Tuning
We’re nearly there. This last bit is related to Maven (the build, packaging, and dependency management tool):
(Only if you use eclipse) Change java.version properties on pom.xml from 6 into 1.6. You might not need to do this but I use eclipse and somehow I couldn’t get it to run in jdk 6 mode unless I change it. Right click on your project –> choose Maven –> Update project configuration once you’ve done this
Change the scope of following Maven dependencies into “provided”. These are the dependencies that will be provided by JBoss, so unless you mark it as so, Maven will include it on the war file (and potentially causing classpath conflict)
You can change the scope of a dependency by adding provided element. The default if not provided is “compile”
org.hibernatehibernate-core3.6.9.Finalprovided
Compile, Deploy and Cross Your Fingers
Here comes the moment of truth!
Run mvn clean package command to compile and package your war file. Once it completes you will get a target/spring-jboss-1.0-SNAPSHOT.war file. Deploy this file by placing it to your %JBOSS_HOME%serverdefaultdeploy folder
Start your JBoss server
Open http://localhost:8080/spring-jboss-1.0-SNAPSHOT/contact on your web browser
Enjoy your JBoss-ready Spring MVC web-app
Check the Demo Sourcecode
The demo sourcecode for this blog post is available here:
For source code browsing:
For svn checkout:
Note that if your code output some logging content, it’s best to use the slf4j logging API. Slf4j provides an abstraction of all other available logging APIs so your code will still work regardless of which logging implementation is used.
It Doesn’t Work!
Relax, it does take time to get everything in place. Here are few tips for troubleshooting JBoss deployed Spring web app (apart from the obvious: inspecting the exception, stack trace, logs, etc):
Review all the ‘plumbing’ work, make sure there’s no leak on the pipe! Following are the list of all the configurations file we’ve touched in this guide:
Review the jars included inside your war file against the one provided by JBoss. If you think you’re packaging something already provided by JBoss, maybe you should mark the dependency as “provided”
Consult the manuals, reference guide, and ask the community
One of the trickiest thing to do when developing database-backed application is deciding when and where to start and finish the transaction (eg: where should you draw the transaction boundary line).
Consider a very simple banking application with an AccountService class having getBalance(), debit(), credit() and transfer() methods. Transfer() calls getBalance() to validate the from-account has enough money, and then debit() the from-account and credit() the to-account.
All of the business steps of transfer() method have to be done in one transaction right? (why? — c’mon.. if you don’t do it in one transaction then it’s possible the balance got changed by another transaction between checking for sufficient money, debiting & crediting. The bank will lose reputation and have apologize to the poor customer.).
Pseudocode/sql for each method on AccountService class look somewhat like following:
If you programatically hard-code the transaction boundary into getBalance(), debit() and credit() method, then it might look something like this:
  public void debit(long accountId, double amount) {
    em.getTransaction().begin(); // start a new transaction
    Account account = em.find(Account.class, accountId);
    account.setBalance(account.getBalance() - amount);
    em.getTransaction().commit(); // commit
  }
But hangon, now you need to invoke all those 3 methods within 1 single transaction, your code might need to do something more complicated than that. If you change the transaction boundary into the transfer() method, then other clients that have been using getBalance(), debit(), credit() methods happily for other stuffs will be impacted — they now have to manually open and close transaction before calling those method (ugly).
Even worse, you may be considering to copy & paste the inside of getBalance(), debit() and credit() code into the transfer() method.. PLEASE DON’T!.. Remember Don’t Repeat Yourself principle!
Fortunately Spring provides a much better way of figuring out transaction boundary. All you need to do is to declare that your method needs an active transaction to be open. You do this by adding annotation to your method, plus bootstrapping few configurations
Your AccountService methods look like following now:
  public double getBalance(long accountId) {
     // do stuff here
  }


  public void debit(long accountId, double amount) {
    // do stuff here
  }


  public void credit(long accountId, double amount) {
    // do stuff here
  }


  public void transfer(long fromAccountId, long toAccountId, double amount) {
    // call getBalance(), check from account has enough money

    // call debit()

    // call credit
  }
And the magic happens! When you call the transfer() method, Spring detects you don’t have an open transaction, so it creates a new one. When transfer() calls getBalance(), Spring won’t create a new transaction because it detects there’s a currently open one. It will assign the open transaction into getBalance() method instead. The same applies to debit() and credit(). This is also known as Transaction Propagation.
Spring does this magic via a technique called AOP (Aspect Oriented Programming). Simply speaking, Spring transaction manager will be notified everytime annotated method is invoked / returned, and take action (start new transaction, assign existing one, close, etc.)
I’ve created a demo project with a unit test so you can try this yourself. Make sure you have jdk 1.6 and Maven 3 installed. SVN Checkout , have a feel around the classes and run mvn test. The output will be available at target/surefire-reports/com.wordpress.gerrytan.springtx.AccountServiceTest-output.txt. I’ve configured the logging such that you can see when hibernate (JPA) creates / commit / rollback transaction, and issues SQL to synchronize the persistence context.
2012-05-31 01:06:26,430 [main] DEBUG com.wordpress.gerrytan.springtx.AccountServiceTest - ----- Transfer $20 from account 2 to 1 -----
2012-05-31 01:06:26,430 [main] DEBUG org.hibernate.transaction.JDBCTransaction - begin
2012-05-31 01:06:26,431 [main] DEBUG org.hibernate.transaction.JDBCTransaction - current autocommit status: true
2012-05-31 01:06:26,431 [main] DEBUG org.hibernate.transaction.JDBCTransaction - disabling autocommit
2012-05-31 01:06:26,431 [main] DEBUG org.hibernate.SQL - select account0_.id as id0_0_, account0_.balance as balance0_0_, account0_.name as name0_0_, account0_.version as version0_0_ from account account0_ where account0_.id=?
2012-05-31 01:06:26,432 [main] DEBUG org.hibernate.SQL - select account0_.id as id0_0_, account0_.balance as balance0_0_, account0_.name as name0_0_, account0_.version as version0_0_ from account account0_ where account0_.id=?
2012-05-31 01:06:26,433 [main] DEBUG org.hibernate.transaction.JDBCTransaction - commit
2012-05-31 01:06:26,437 [main] DEBUG org.hibernate.SQL - update account set balance=?, name=?, version=? where id=? and version=?
2012-05-31 01:06:26,437 [main] DEBUG org.hibernate.SQL - update account set balance=?, name=?, version=? where id=? and version=?
2012-05-31 01:06:26,438 [main] DEBUG org.hibernate.transaction.JDBCTransaction - re-enabling autocommit
2012-05-31 01:06:26,438 [main] DEBUG org.hibernate.transaction.JDBCTransaction - committed JDBC Connection
2012-05-31 01:06:26,438 [main] DEBUG com.wordpress.gerrytan.springtx.AccountServiceTest - ----- Completed Transfer $20 from account 1 to 2 -----
Following are useful resources for further learning:
Spring Framework Reference Doc – Chapter 11 Transaction Management:
Spring Roo Reference Doc (Roo is a cool Spring source-code rapid generation tool I used for the demo code. Roo can generate a Spring-JPA-Maven source code for you in a zap!):
Gerry's software development journey of trial, errors and re-trials