Tag Archives: ssl

HTTP Strict Transport Security

Here’s another gotchas (and novel feature) of the internet world: HSTS (Http Strict Transport Security).

Basically a website can provide a Strict-Transport-Security response header to force the browser to use HTTPS automatically for all subsequent request for a duration of time.

hsts

The response header above says for the next 31536000 seconds (1 year), the browser has to use HTTPS to access this domain, and all its subdomains.

This becomes a gotcha if you’re testing a new subdomain over HTTP by updating your local host file, you might be wondering why your browser wouldn’t let you to connect using HTTP immediately — without consulting with the web server first.

Fortunately it can be overcame by simply clearing your browser cache.

Transferring File Using FTPS in Java

Here’s a sample code on setting up FTPS file transfer in Java. Make sure you have setup SSLContext trusting the FTPS server’s certificate.

SSLContext sslContext = /* setup SSLContext */
FTPSClient ftps = new FTPSClient(true, sslContext);
ftps.connect(hostname, port);

// Timeout exception will be raised if no response received after 20s
ftps.setDataTimeout(20000);

// Authenticate
ftps.user("ftp_user")
ret = ftps.pass("ftp_pass");

// Define protection buffer size and protocol. Following are the default for implicit FTP (FTPS)
ftps.parsePBSZ(0);
ftps.execPROT("P");

// Set passive mode and file transfer type
ftps.type(FTP.BINARY_FILE_TYPE);
ftps.enterLocalPassiveMode();

// Remote path where file will be downloaded from
ftps.changeWorkingDirectory("/remote/path");

// Retrieve a file called "file.txt" from remote server
FileOutputStream local = new FileOutputStream("file.txt");
ftps.retrieveFile("file.txt", local);

This code uses commons-net package, make sure it is included in maven dependencies:


  commons-net
  commons-net
  3.3

The actual FTPS code will vary greatly depending on your FTPS server setup. The above assumes FTPS server is running in passive mode with normal username / password authentication.

Trusting X509 Base64 PEM SSL Certificate in Java

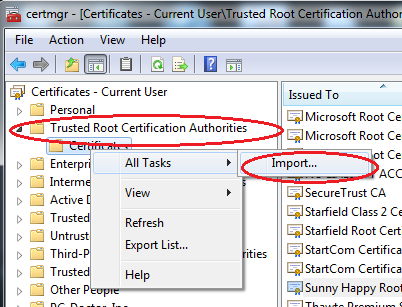
If you ever find yourself having to establish SSL connection with untrusted server (eg: because the server’s cert is not chained to 3rd party CA (internal / testing servers)), you’ll probably use -Djavax.net.ssl.trustStore and -Djavax.net.ssl.trustStorePassword.

While this method works great for jvm-wide configuration, it’s a bit tricky if you want to apply it to specific class / method only. Also if you ever had to dynamically update the trust certificate, it might be harder to get this method working

Trusting Certificate Using SSLContext

Supposed you have a X.509 SSL certificate in Base 64 encoded PEM format like below:

-----BEGIN CERTIFICATE-----
MIIDBzCCAe+gAwIBAgIJAI1DCiDwQMQ0MA0GCSqGSIb3DQEBBQUAMBoxGDAWBgNV
BAMMD3d3dy5leGFtcGxlLmNvbTAeFw0xNDA0MzAyMjU1NTZaFw0yNDA0MjcyMjU1
NTZaMBoxGDAWBgNVBAMMD3d3dy5leGFtcGxlLmNvbTCCASIwDQYJKoZIhvcNAQEB
BQADggEPADCCAQoCggEBAOjZRpPtBBrOE32MV2X1HlTmLFE3977o4k97CYZetgxZ
guLy+dPBaJ6fA3pjhkqXbICtsaBewAjnlvUgUilc0quwklepw9Sd9L6M9NgyCFGf
G1AFA8wEJwmtxA7TnDNjuqATqbLUOe2douuQ9Krttd5zbGB2vDO1Chc4GYb1pUxV
wTAdk+bXrpoeP/82LEYjcYq2UTXs/cUnzDAOzOCXcCugx2Rh2EdS/S6oXgOYv/BD
q1jVj3AojcJuJixW/BGWwvw/hkBof0RzrnJNqHnO3PWfc0LhOeqKwOhMZ9dV2p0m
v5X221nrBMwOZRDJBWybE5YuWmAt6ci2BtHgn3l4ClcCAwEAAaNQME4wHQYDVR0O
BBYEFBFwLKrHXhSyapQbXp/2E/R1VT0XMB8GA1UdIwQYMBaAFBFwLKrHXhSyapQb
Xp/2E/R1VT0XMAwGA1UdEwQFMAMBAf8wDQYJKoZIhvcNAQEFBQADggEBAAMRaPuv
lFTZpAn8lCqom0Af8+3OGEPUEYPOReE0xG7Ph+OSPhlI860C0QwiZn0PR3L+QK2F
d1g9GndfJATgyjqbhebKXO1b0OAQfGIPsEHsCtT+4myFNHnYmHKqnX1NrUXpjzcP
4uHpVU7Nomz+f4WjH+cACL4PrlldPtXXOsn7vFdZrYunitHTvslWe3RoQCkHRc93
3OKx4Xh2Vy1wCrfkZYd8Q1y55jysxwitYhQAYwv9GyL/pj5jzB5PxLAZbDRznK5E
CbqiKbfbcAEpbxceXG0YmVYY/kEzXKPxUw99GH/hkUTFhCT03unx7LWtYI5BG5o+
QCVuzU8kMeiOFkQ=
-----END CERTIFICATE-----

You can trust this by setting up a SSLContext:

CertificateFactory cf = CertificateFactory.getInstance("X.509");
InputStream certFile = new FileInputStream("mycert.crt");
Certificate ca = cf.generateCertificate(certFile); // this is java.security.cert.Certificate;

KeyStore keyStore = KeyStore.getInstance(KeyStore.getDefaultType());
keyStore.load(null, null);
keyStore.setCertificateEntry("ca", ca);

TrustManager trustManager = TrustManagerUtils.getDefaultTrustManager(keyStore);
SSLContext sslContext = SSLContextUtils.createSSLContext("TLS", null /*keyManager*/, trustManager);

Here the certificate above is placed on mycert.crt file on java work directory. On SSLContextUtils.createSSLContext the keyManager param is set to null because we don’t need present any private keys. The TrustManagerUtils and SSLContextUtils came from commons-net package so you’ll need to add that dependency to your pom.xml:


  commons-net
  commons-net
  3.3

SSLContext has a getSocketFactory() method which you can use to setup a SSLSocket which will verify against mycert.crt

SSLSocketFactory socketFactory = sslContext.getSocketFactory();
Socket socket = socketFactory.createSocket("dev.mycompany.com", 1234);

You can also pass SSLContext directly to some other libraries for it to trust your cert, below is ftps example using commons-net

FTPSCLient ftps = new FTPSClient(true, sslContext);

Internal SSL (TLS) Certification Authority Using OpenSSL

WARNING
The method described on this article is only intended for low critical testing, not production use. I am not liable for any damages / security breaches caused by following this method.

Scenario

I have few servers for development and testing purpose. I need to setup apache on those servers listening over HTTPS but it will only be used by people in my team, it’ll be a bit overkill to purchase SSL certificate just for this pupose.

I can create a self-signed certificate for each servers, and ask individual user to trust it (or otherwise they’ll get red browser warnings), but this is tedious. A better approach is to create a certificate for each server and chain it to our own internal CA. Each user only need to trust one certificate, and anything chained to it is automatically trusted (this can even be done to the whole network using domain controller auto enrollment).

This article will highlight how to create your own Certification Authority (CA), install it on apache and import it to your Windows / Firefox keystore. The tool I’m using is openssl. Following is the hypothetical setting for example purpose:

  • Company name: Sunny Happy Co Ltd
  • Company e-mail:
  • Server name: shcdev01 (web server will be installed on https://shcdev01)
  • OpenSSL is installed on C:OpenSSL-Win32

Setup openssl

Most UNIX system come with package manager where you can install openssl. If you’re on windows, download and install openssl here.

Setup Certification Authority (CA)

  1. Create directory where user certificates generation / chaining will take place, eg: C:SSLCerts
  2. Create a directory where CA files will be stored: C:\SSLCertsSunnyHappyCA
  3. Copy contents of C:\OpenSSL-Win32binPEMdemoCA to C:\SSLCertsSunnyHappyCA. This folder contains infrastructure file necessary for certificate chaining. This is a sample folder provided by OpenSSL installation so we don’t have to start from scratch
  4. Copy C:\OpenSSL-Win32binopenssl.cfg to C:\SSLCerts. This is the configuration file used when signing certificates. Few values need to be adjusted. Find following configuration keys on openssl.cfg and update it:
    • dir = C:/SSLCerts/SunnyHappyCA (This will be used as a relative path of other config items)
    • default_days = 7300 (Here I’m setting the default validity of chained certificate to be 20 years)
    • default_md = sha1
  5. Create a new folder C:\SSLCertsSunnyHappyCAnewcerts
  6. Create a new file C:\SSLCertsSunnyHappyCAindex.txt.attr and write the value unique_subject = no inside
  7. Open a command prompt with root / Administrator privilege and cd to C:SSLCerts. Tell openssl where your config file is by running set OPENSSL_CONF=C:/SSLCerts/openssl.cfg
  8. Create the CA public / private keypair using following command:
    openssl req -new -x509 -keyout SunnyHappyCA/private/cakey.pem -out SunnyHappyCA/cacert.pem -days 7300

    OpenSSL will prompt you for the key password, make sure you keep it safe since you will be using this again. On the next steps it will prompt you for geographical location and other info, this is what I put:

    c:\SSLCerts>openssl req -new -x509 -keyout SunnyHappyCA/private/cakey.pem -out SunnyHappyCA/cacert.pem -days 7300
    Generating a 1024 bit RSA private key
    .++++++
    ..++++++
    writing new private key to 'SunnyHappyCA/private/cakey.pem'
    Enter PEM pass phrase:
    Verifying - Enter PEM pass phrase:
    -----
    You are about to be asked to enter information that will be incorporated
    into your certificate request.
    What you are about to enter is what is called a Distinguished Name or a DN.
    There are quite a few fields but you can leave some blank
    For some fields there will be a default value,
    If you enter '.', the field will be left blank.
    -----
    Country Name (2 letter code) [AU]:AU
    State or Province Name (full name) [Some-State]:NSW
    Locality Name (eg, city) []:Sydney
    Organization Name (eg, company) [Internet Widgits Pty Ltd]:Sunny Happy Co Ltd
    Organizational Unit Name (eg, section) []:
    Common Name (e.g. server FQDN or YOUR name) []:Sunny Happy Root CA
    Email Address []:
    

    And I (again) set the validity to be 20 years (7300 days). The private key will go to SunnyHappyCA/private/cakey.pem and the public key SunnyHappyCA/cacert.pem. You now have a root CA keypair done!

Server Certificate Generation & Chaining

Server in here means our web / app server for testing purpose. In our case it sits on the unix host schdev01.

  1. Generate private key and certificate request for the server
    openssl req -new -keyout shcdev01_key.pem.orig -out shcdev01_req.pem

    Openssl will again prompt for password but this is different than the CA password. It will also prompt for similar locality information. It’s very important you put the Common Name into the corresponding server DNS name (schdev01 in this case), because this is what will be used on handshake.

    c:SSLCerts>openssl req -new -keyout shcdev01_key.pem.orig -out shcdev01_req.pem
    Generating a 1024 bit RSA private key
    .....................................................++++++
    ..................................++++++
    writing new private key to 'shcdev01_key.pem.orig'
    Enter PEM pass phrase:
    Verifying - Enter PEM pass phrase:
    -----
    You are about to be asked to enter information that will be incorporated
    into your certificate request.
    What you are about to enter is what is called a Distinguished Name or a DN.
    There are quite a few fields but you can leave some blank
    For some fields there will be a default value,
    If you enter '.', the field will be left blank.
    -----
    Country Name (2 letter code) [AU]:
    State or Province Name (full name) [Some-State]:NSW
    Locality Name (eg, city) []:Sydney
    Organization Name (eg, company) [Internet Widgits Pty Ltd]:Sunny Happy Co Ltd
    Organizational Unit Name (eg, section) []:
    Common Name (e.g. server FQDN or YOUR name) []:shcdev01
    Email Address []:
    
    Please enter the following 'extra' attributes
    to be sent with your certificate request
    A challenge password []:
    An optional company name []:
    

    By now we will have 2 additional files on C:SSLCerts: shcdev01_key.pem.orig (the encrypted private key) and shcdev01_req.pem (the certification request).

  2. Run following command to decrypt the user’s private key. This is necessary so we can use it later for chaining purpose.
    openssl rsa -in shcdev01_key.pem.orig -out shcdev01_key.pem
  3. And finally the big step: chaining your certificate to Sunny Happy Root CA. Run this command:
    openssl ca -in shcdev01_req.pem -out shcdev01_cert.pem

    Openssl will ask for the CA key’s password. Once you entered it will also ask you to confirm to certify. Sign it by entering y

    c:SSLCerts>openssl ca -in shcdev01_req.pem -out shcdev01_cert.pem
    Using configuration from C:/SSLCA/openssl.cfg
    Enter pass phrase for C:/SSLCA/SunnyHappyCA/private/cakey.pem:
    Check that the request matches the signature
    Signature ok
    Certificate Details:
            Serial Number: 286 (0x11e)
            Validity
                Not Before: Jan 24 05:00:19 2014 GMT
                Not After : Jan 22 05:00:19 2024 GMT
            Subject:
                countryName               = AU
                stateOrProvinceName       = NSW
                organizationName          = Sunny Happy Co Ltd
                commonName                = shcdev01
                emailAddress              = 
            X509v3 extensions:
                X509v3 Basic Constraints:
                    CA:FALSE
                Netscape Comment:
                    OpenSSL Generated Certificate
                X509v3 Subject Key Identifier:
                    40:27:EF:28:95:26:FF:19:BA:99:92:35:F2:AA:C4:2B:1E:43:77:5E
                X509v3 Authority Key Identifier:
                    keyid:BA:F7:51:AA:23:59:89:27:9A:22:47:49:6C:86:68:2C:4E:34:AD:82
    
    Certificate is to be certified until Jan 22 05:00:19 2024 GMT (3650 days)
    Sign the certificate? [y/n]:y
    
    
    1 out of 1 certificate requests certified, commit? [y/n]y
    Write out database with 1 new entries
    Data Base Updated
    

By the end of these steps, you’ll have a user certificate chained to our CA. You can rename .pem file into .crt and view it using Windows certificate viewer.

You can repeat these steps for as many apache servers you have. You will be using the private key (schdev01_key.pem) and certificate file schdev01_cert.pem on apache config.

Importing Root CA Certificate to Client’s PC

In windows, additional third party Root CA can be added via the certificate manager tool:

  1. Rename your CA certificate file (C:/SSLCerts/SunnyHappyCA/cacert.pem) into .crt file
  2. Open a command prompt as administrator and run certmgr.msc
  3. On the left tree select Trusted Root Certification Authorities/Certificates, right click > All Tasks > Import…
    importcacert
  4. Select the cacert.crt file we generated above when prompted. When the wizard asks where to keep the certificate, choose Place all certificates in the following store, click Browse, make sure Show physical stores is ticked and select Third-Party Root Certification Authorities/Local Computer. See this superuser forum Q&A if you can’t find it.
    savecacert

Once you’ve done this, you can inspect your shcdev01_cert.crt (after renaming it from pem) in windows and it will show it is chained to our company’s CA

clientcert

Credits

Thanks to Philippe Camacho for the OpenSSL tutorial from which I based this post.

Windows 7 Unable to Import Trusted Root Certification Authorities

Windows has its own trusted root CA certificates (which is also used by Google Chrome browsers). If your company is running your own internal CA, an additional CA certificate has to be added to it.

I encountered a very strange problem where everytime I import it via certmgr.msc the dialog says The import was successful but the certificate was never imported.

Solution 1: Use Administrator Elevated Privilege

  1. Click on windows icon -> Search for cmd
  2. Right click cmd.exe -> Run as Administrator
  3. From the command prompt, run certmgr.msc
  4. Continue with the import process

Solution 2: Edit Group Policy on Domain Controller

It is common for PCs in office environment to be connected to a network domain. The default domain policy is to disallow users from adding their own trusted root CA certificate.

To get around this problem, use group policy management editor on your domain controller and find **Certificate Path Validation Settings**. Update the settings into following:

cert_import2

See this Microsoft article for more info.